Microplastics Sampling and Processing Guidebook
Introduction
For decades, scientists around the world have been studying the origin of human-made pollution and its effects. One of the most pervasive pollution problems our environment is facing is marine debris.
Let us introduce you to marine debris, define what it is, and explore the impacts it has on the environment. You can then take the knowledge you gain and apply it as a citizen scientist to your local waterways or coastline.
This guidebook was created for citizen scientists to learn standardized methods of sampling and processing microplastics. We will take you through the scientific data collection methods used to sample and process water and beach sediment for microplastics. These methods can be modified to best accommodate classroom or other learning opportunities.
Citizen scientists have used these methods to collect microplastic data for a project covering the Northern Gulf of Mexico coast—from Texas to Florida. All of the data collected is used to outline the abundance of microplastics in the Northern Gulf of Mexico.
This project began through a grant awarded by the Gulf of Mexico Alliance.
Marine Debris
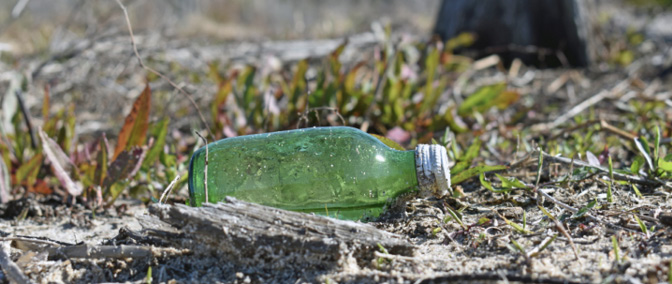
Marine debris is a global issue that reduces the quality of life in coastal environments. Defined by the National Oceanic and Atmospheric Administration as “any persistent solid material that is manufactured or processed and directly or indirectly, intentionally or unintentionally disposed of or abandoned into the marine environment or the Great Lakes.” Examples include trash, such as food wrappers, single-use items, and plastic; derelict vessels; and abandoned fishing gear, such as nets and fishing line. The main source of marine debris is from land through dumping, littering, and natural disasters; almost 9 million tons of plastics entered the ocean from land in 2010 alone.
Marine debris is harmful to the marine environment for many reasons, but a few of the main ones include entangling marine animals, animals’ mistaking debris for food and ingesting it, and damaging habitats. Marine animals, such as sea turtles, fish, birds, corals, seals, sea lions, and others are impacted by marine debris entanglement. For these animals, entanglement in abandoned nets, fishing line, traps, and other trash can lead to severe injuries, suffocation, and starvation. Many animals also mistake small debris pieces for food, ingesting and accumulating them into their bodies. This bioaccumulation of debris gives the animal a false sense of fullness, preventing them from eating actual food, and it can inevitably lead to starvation. Marine debris items such as abandoned fishing nets and other large trash items damage delicate habitats. Many habitats, such as corals and marsh grasses, can be smothered and killed by marine debris.
The most persistent type of marine debris is plastics, which are being produced and consumed much faster than we are able to sustainably dispose of or recycle them. Due to the long-lived nature of plastics and improper disposal, scientists estimate that, by 2050, plastics will outweigh fish in the ocean. Plastics are more environmentally friendly to transport than glass, and, if disposed of properly, can be recycled into new materials.
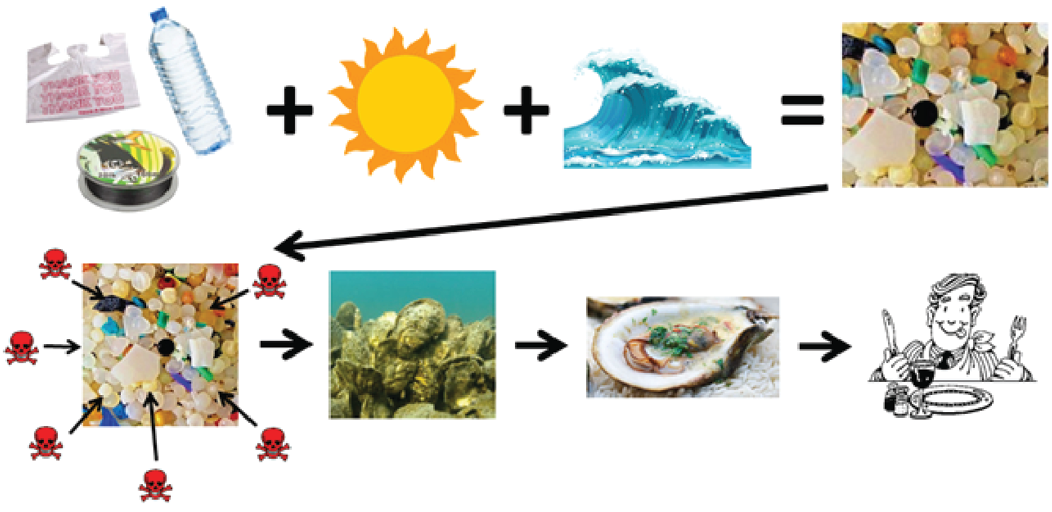
Although humans value plastic because it is cheap, lightweight, durable, and disposable, the situation is completely different for the environment. Nature cannot break down plastic. Plastic is man-made, and, as it “breaks down,” it is really just breaking up into smaller and smaller pieces, known as microplastics. Microplastics are generally defined as plastic pieces smaller than 5 millimeters, which is about the width of a pencil eraser. Microplastics are a growing environmental problem globally and locally. They are often mistaken as food and ingested by marine animals of all sizes, from tiny plankton to huge whales. Plastic contains its own toxins, like BPA, but also absorbs additional toxins from the water column. Once ingested, the toxins are introduced into the marine food web, where they impact wildlife and seafood.
For more information, see MSU Extension Publication 3113 Citizen’s Guide to Protecting the Mississippi Gulf Coast from Marine Debris.
Microplastics
Microplastics are plastic pieces smaller than 5 millimeters, which is about the width of a pencil eraser. They come in different forms, including microbeads, microfilms, microfibers, and microfragments. Many microplastics start out as larger plastic products (plastic water bottles, beach toys, or large fishing nets) that get broken up over time. Some begin as intentionally small plastics for cosmetic purposes (beads in face exfoliants, toothpaste).
Microplastics have been found all over the ocean—from the surface water to deep-sea benthic zones (lowest level of the ocean). There are even reports of microplastics being found frozen in Arctic ice! These small plastic pieces are often mistaken as food and can be ingested by small organisms like plankton to larger organisms like whale sharks. Not only are plastics indigestible, but they may also be toxic to the animals that consume them.
Plastic is absorbent, like a sponge, so it absorbs hydrophobic chemicals from the water it floats in. There are all kinds of chemicals in seawater—from pesticides to steroids to BPA—that can be very harmful to humans and wildlife. Plastic can absorb these chemicals.
Primary versus Secondary Microplastics
There are two categories of microplastics: primary and secondary (see Figures 3 and 4). Within these categories, microplastics are usually separated into four types: microbeads, microfibers, films, and fragments.


Primary microplastics include plastic particles purposefully manufactured as small pellets, beads, and fragments. Many everyday cosmetic products, including face wash, toothpaste, exfoliants, deodorant, and makeup, contain plastic microbeads. Fortunately, in 2016, the United States passed a law banning the production of personal-care products and cosmetics that contain microbeads. This law took effect in July 2017 and, in July 2018, it will no longer be legal to sell these products in the United States.
Another common form of primary microplastics are “nurdles,” which are small plastic pellets that serve as raw material in the creation of plastic products. Throughout the transportation and handling process, they can get carelessly spilled into the environment. Due to their size, shape, color, and smell, nurdles are often mistaken as food by many different marine animals.
Secondary microplastics are the result of the breakdown of larger plastic pieces. The environment cannot naturally break down plastic materials. Chemical and physical processes like wave action, heat, UV radiation, and animal grazing cause plastics to break up into smaller and smaller pieces. For example, washing clothing causes synthetic fibers like nylon, polyester, and acrylic to shed microfibers that can eventually be flushed out to sea.
Examples of Microplastics
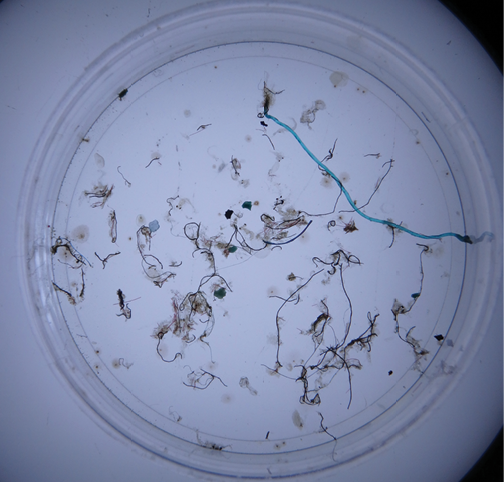
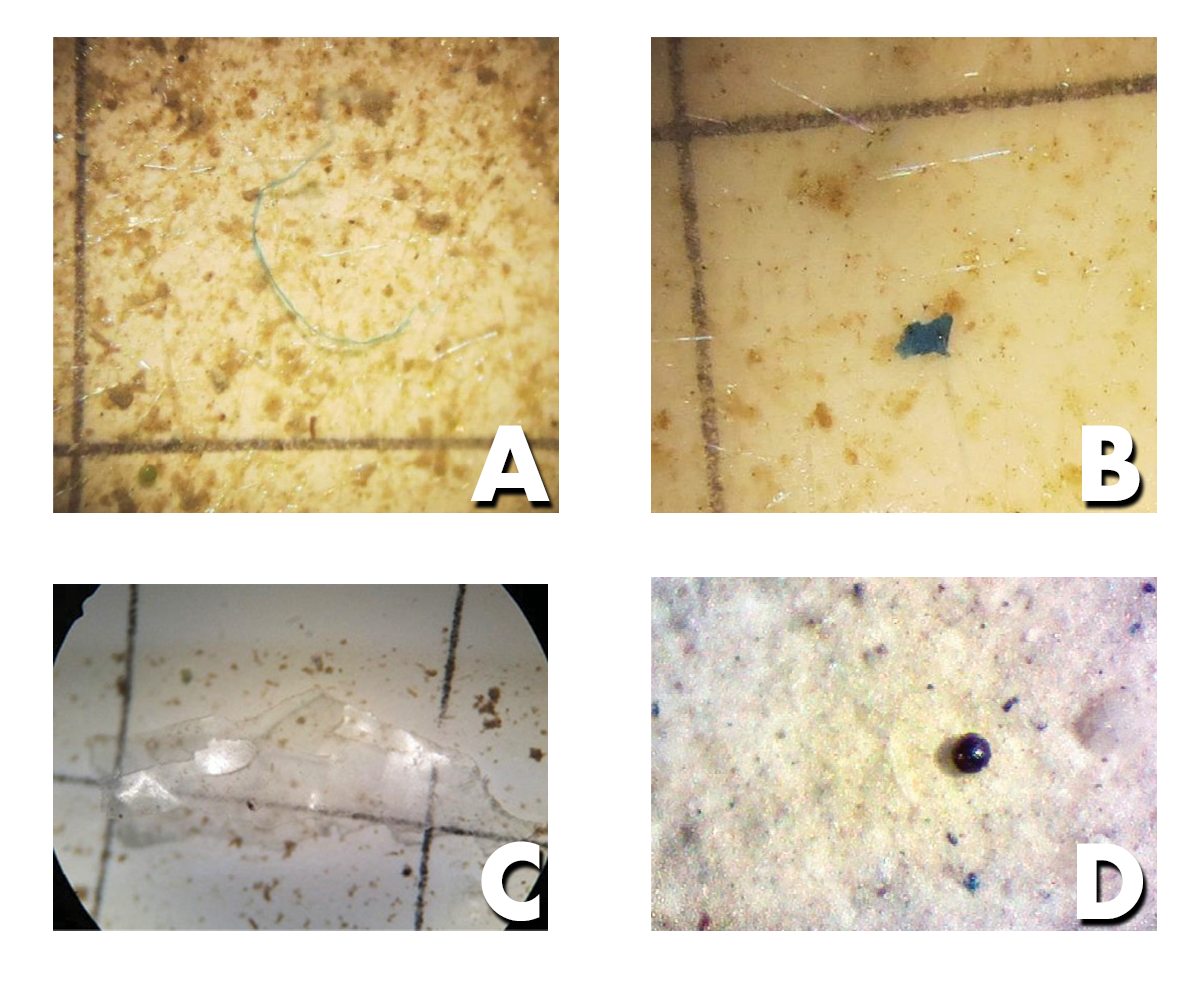
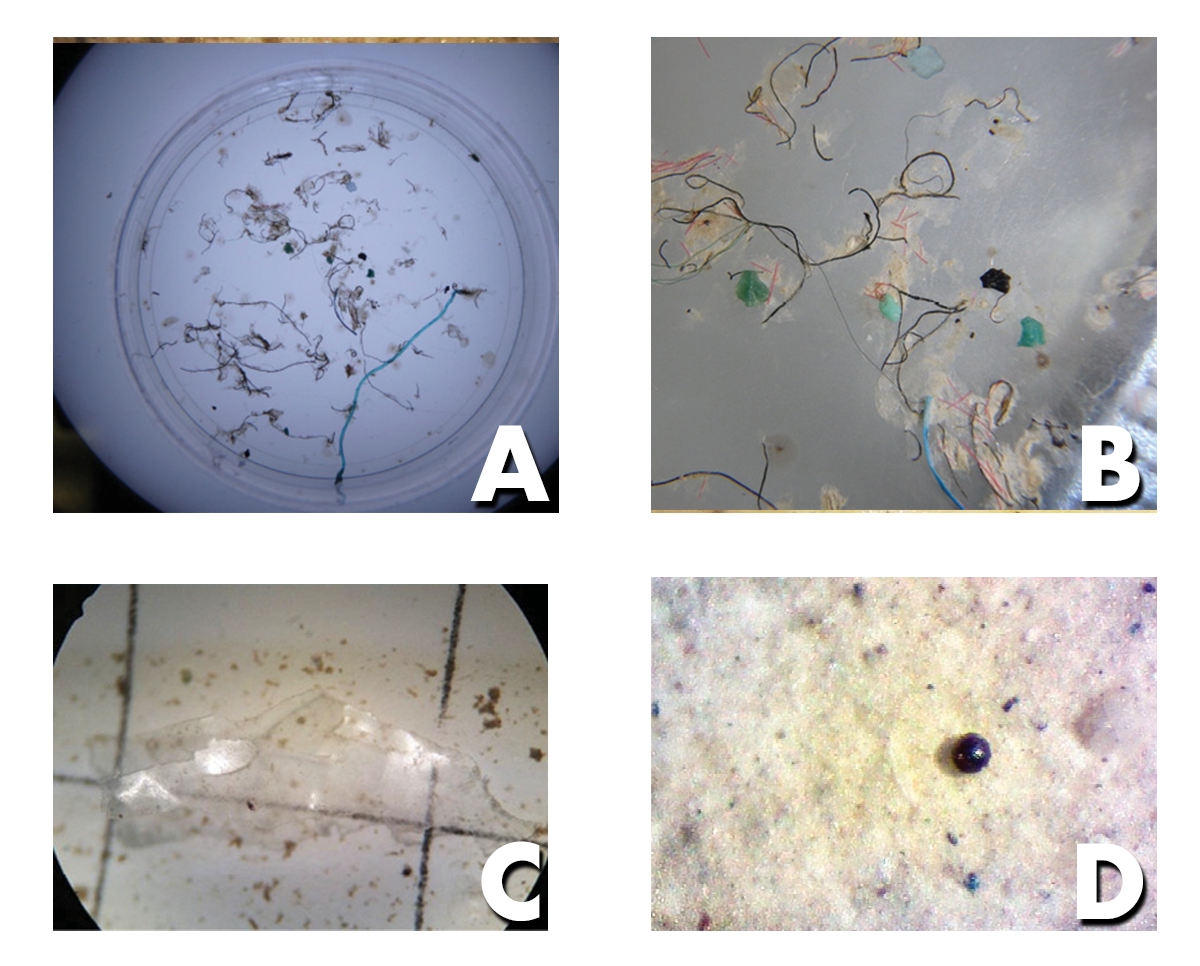
Identifying microplastics can be a little difficult. It is easy to confuse something organic (e.g., eggs, copepods, carapace, seeds) for a microplastic. Microplastics are usually brightly colored, frequently blue or reddish.
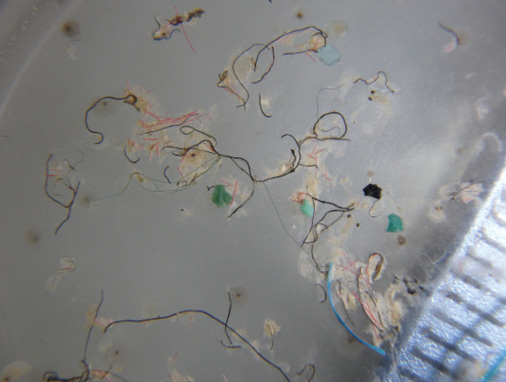
Figure 5. Microfiber and microfragment pieces viewed through a microscope. (Photo by Caitlin Wessel)
How to Sample
Sediment
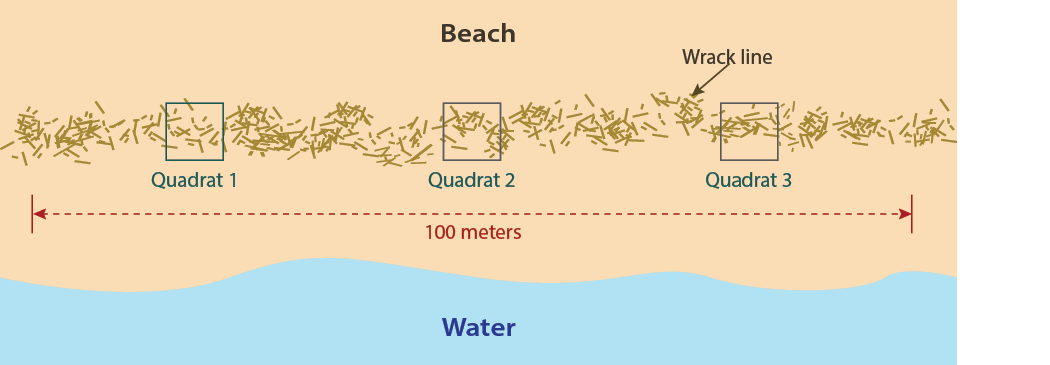
Coastlines and beaches all around the world are composed of many different types of sediment. The sampling and processing outlined in this guidebook is most applicable in sandy sediments (i.e., sandy beaches, sandbars). Sediment sampling is done at the high, high tide line (wrack line). The wrack line is the accumulation of debris (sticks, seaweed, etc.) that marks the maximum extent of water height during high tide. The deposit of debris here is where microplastics (if there are any) will be most dense, without much wave action to carry them away. For accurate data collection, collect at least three sediment samples to give a more accurate average of the sampled area.
Supplies needed
- 0.25-meter quadrat
- Scoop
- 5-mm sieve
- 5-gallon bucket
- Gallon zipper-seal bags
- Permanent marker
- GPS

Sediment Collection
- Find the high, high tide line (also called the wrack line or storm line). This is the area where debris that washes in with the tide will accumulate in a line (Photo 1).

- Randomly select a location along the wrack line. Place your quadrat in the sand with the wrack line running through the middle (Photo 2). The suggested quadrat size is ¼ m2, which has individual side lengths of 50 cm.

- Remove any large pieces of natural debris from the quadrat area if there are any. Shake any loose sand off of the debris into your quadrat (Photos 3 and 4).


- Use your scoop to pick up the top 3 cm of sand (about 1 inch) that is within your quadrat (Photos 5 and 6).


- Set the 5 mm sieve on a 5-gallon bucket (Photo 7). Pour each scoop through the sieve, collecting the sand into the 5-gallon bucket (Photos 8–10); anything that doesn’t pass through the sieve can be discarded.


- Once you have scooped the entire top layer of sand through the sieve and into the bucket, pour the sand from the bucket into a 1-gallon zipper-seal bag (Photo 11). Inspect for holes in the bag and double-bag if necessary. You should fill approximately one bag for EACH quadrat you sample.
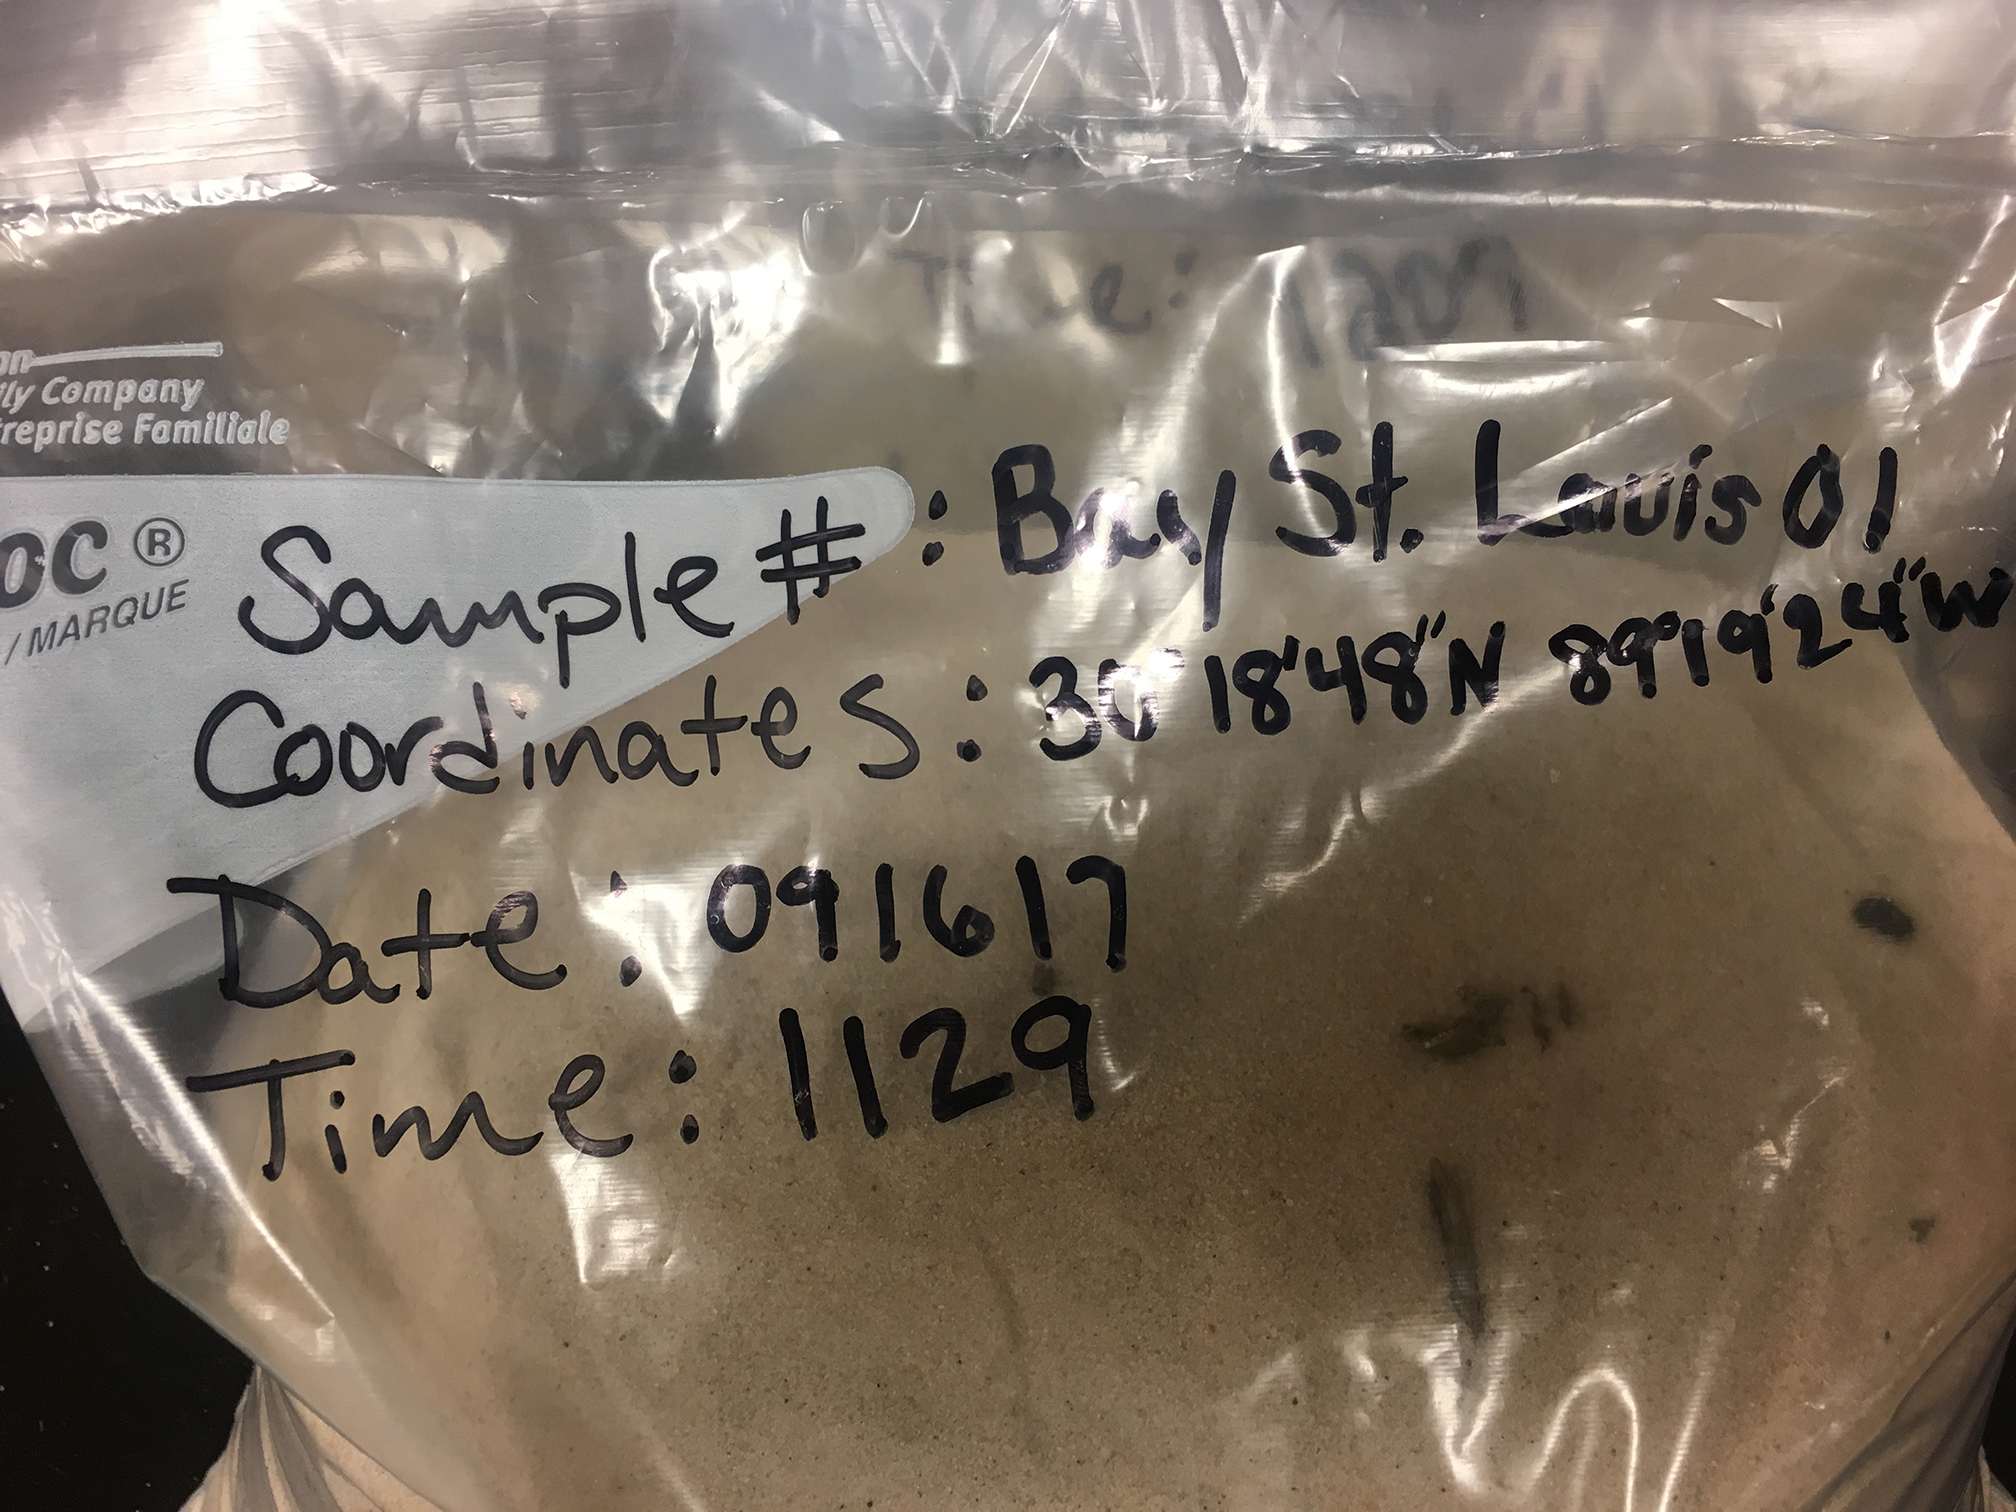
- Make sure to label your samples with sample #, GPS location, and date/time using a permanent marker (Photo 12). Take the samples back to the lab to be filtered through the density separator (described in the next section).
Processing the Sediment Sample
The process of separating the microplastics from the sediment sample is done by density separation. In density separation, salt water and air bubbles are pumped through the sediment sample, fluidizing it; because microplastics are less dense than the salt water and sediments, they float to the top where they can be counted.
Step-by-step videos are available on the Mississippi Coastal Cleanup YouTube page under the “Microplastics” playlist.
*Please refer to the “Building a Density Separator” handbook before proceeding with this step.*
The Process
- Secure the density separator to a garbage can (a bungee cord works perfectly) near your SALT water reservoir, or fill the garbage can halfway with SALT water. Target salinity for the water reservoir is 32–35 parts per thousand; if necessary, a saltwater reservoir can be made using aquarium Instant Ocean. Salinity can be measured easily with a refractometer if one is available. Avoid using fresh water for your water reservoir; sample recovery is highest with salt water because it is denser than freshwater.
**You will need an electrical outlet for the water pump AND aerator to be plugged into.

 Supplies needed
- Density separator
- Garbage can
- Bungee cord
- Aerator
- 55um sieve
- Air stone
- ¼-inch flexible tubing
- Nitex 53um mesh
- Water pump
- Garden hose piece
- Timer
- Electrical outlet
- Attach one end of the hose to the water pump and the other end to the density separator.


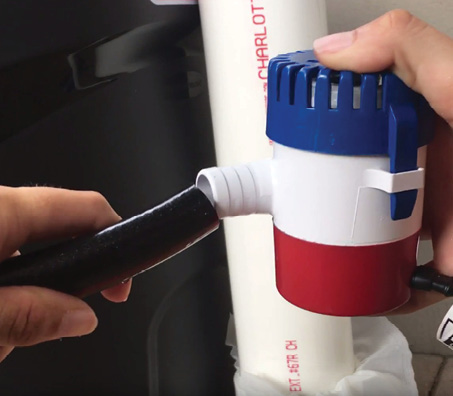

- Submerge the water pump in the salt water reservoir.

.jpg)


- Attach the air stone to the flex tubing. Lower the air stone to the bottom of the separator and turn it on.


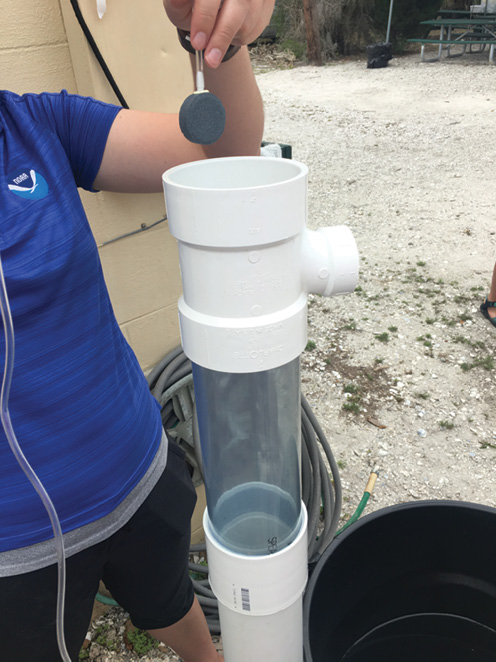
- Make sure the ball valve is open and turn on the water pump.
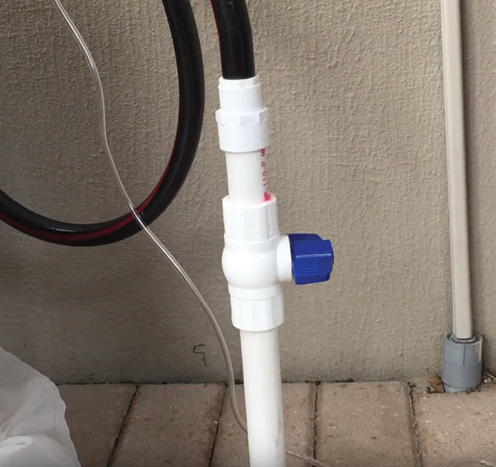
Closed position. 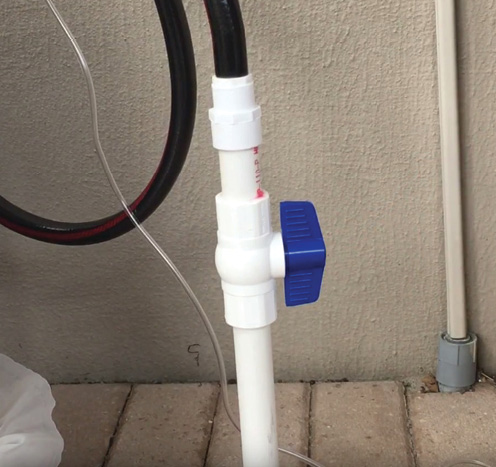
Open position. - Fill the density separator with just enough water so that you can see the water level, then shut off the water by turning the ball valve to CLOSED. Keep in mind: Water will rise when you add the sediment sample, so you don’t want to fill the density separator with too much water, causing the water and your sample to spill out the top of the density separator.


- Turn the air on until uniform bubbles form.
- Add the sand. You can do half a sample at a time or the whole sample if the sand is clear of sticks and other debris.
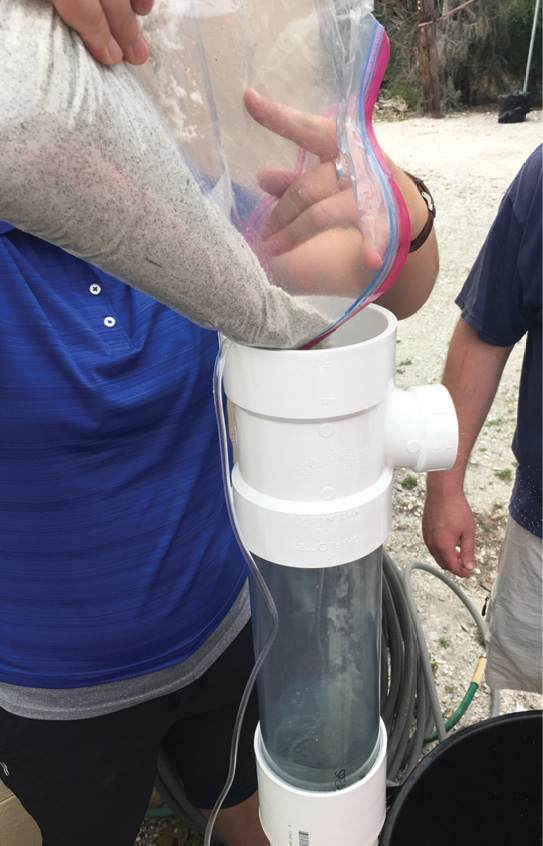
- Adjust the air if needed to get small, consistent bubbles.
- Turn the water on (open the valve) slowly. Place the 55um sieve at the opening.

- Adjust the water (using the valve) so it barely splashes over into the 55um sieve (start the timer).
**Hold or place the sieve on a support for the duration of the separation.
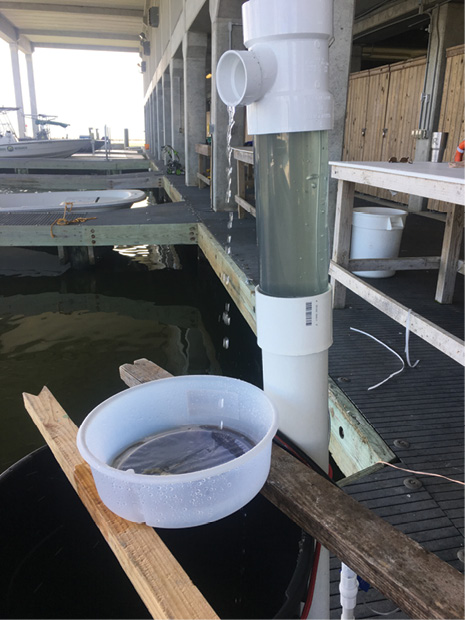
- Adjust the water again, if needed.
- Rinse the top of the tube with water to knock any loose sand into the density separator.
- At 7 minutes run time: turn off the air for 10 seconds, then turn it back on.
- At 9 minutes run time: unplug the water pump for 10 seconds, then plug it back in.
- At 10 minutes run time: turn the air off for 10 seconds, then turn it back on.
**This is to ensure the sediment is well mixed to release any stuck microplastics.
- Run 26 minutes total.
- Rinse and then remove any large debris (sticks, leaves, etc.) from the sieve.
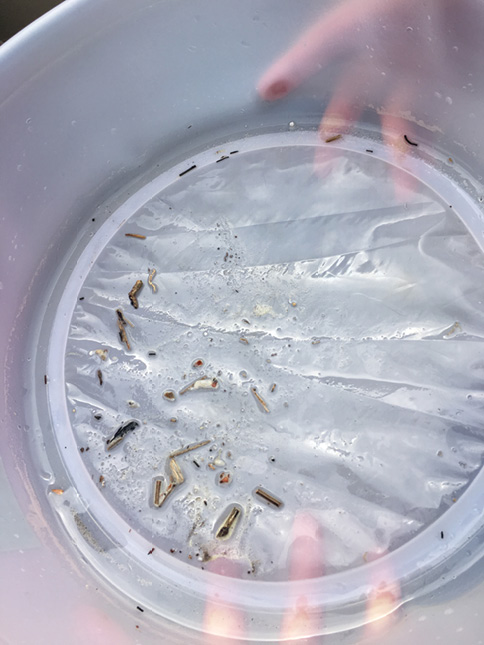
- Rinse any material caught in the sieve into a shallow analysis dish using water.
- Remove the air stone. Detach the density separator from the hose, dump remaining sediments out of the tube, and rinse with water.
- Repeat with the next sample.
*See Identifying Microplastic Samples from the Density Separator below.
Water
Microplastics have been found all over the ocean—from surface water all the way to deep-sea benthic zones. There are even reports of microplastics being found frozen in Arctic ice. Water samples can be taken anywhere (coastal waters, bayous, streams, rivers, lakes, etc.). You should try to take a water sample in the same area sediment samples are taken. Surface water is the targeted water for the following process.
Supplies needed
- 1-liter water container
- GPS
- Permanent marker/grease pencil
Water Collection
- In the same area you took your beach sample, walk out past where the waves are breaking (to avoid getting a bunch of sediment in the sample) to a depth of about 2 feet, and remove the lid from the jar.
- Take a surface water sample by dipping the jar in the water.

- Slowly tilt the jar upright to completely fill it with water and remove any air bubbles. If your sample does have some sediment in it, you can wait for the sediment to settle out (overnight to a week) before processing the sample.

- Put the lid back on the jar. Make sure to label the jar and fill out the associated data sheet with the sample #, GPS coordinates, date, and time where the sample was collected (e.g., Water01, GPS coordinates, date/time).


- Take these samples back to the lab for water filtering (described in the next section). Water samples can be stored at room temperature indefinitely. If the water samples contain a lot of sediment, allowing the sediment to settle makes water-filtering easier.
Processing the Water Sample
To separate the microplastics from water samples, use the following technique. This technique is very operator-friendly for citizen scientists of all ages.
Supplies needed
- Vacuum pump
- Vacuum pump tubing
- 500-ml wash bottle
- 1000-ml filtering flask
- 500-ml filter funnel
- 47mm, 0.45um gridded filters
- Dissecting scope
- Filter forceps
- Fine-tip tweezers
- Petri dishes
- Tape
- Permanent marker

The Process
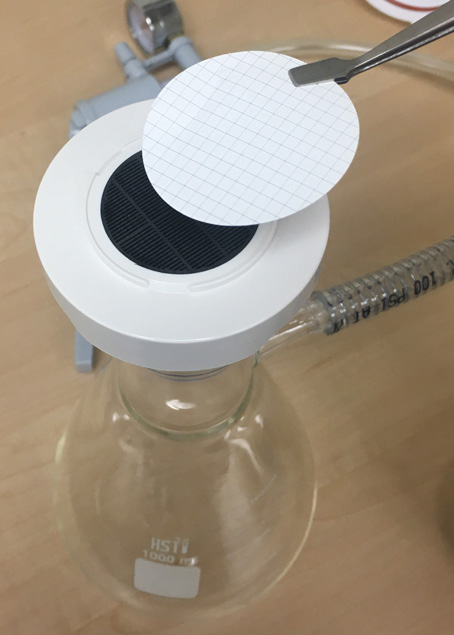
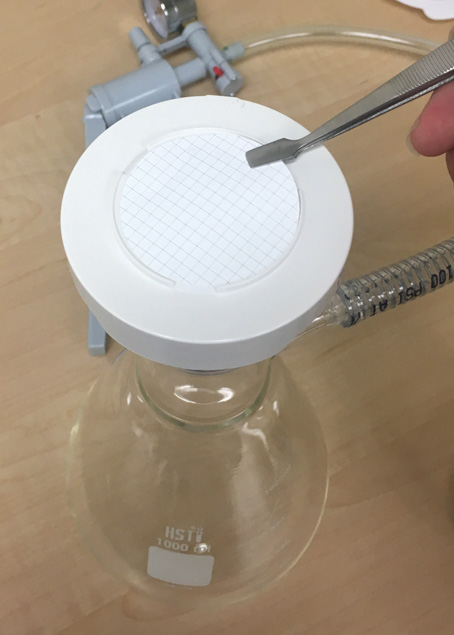
- Set up the filter apparatus by placing the filter funnel on the filtering flask and attaching the vacuum pump to the flask.

.jpg)
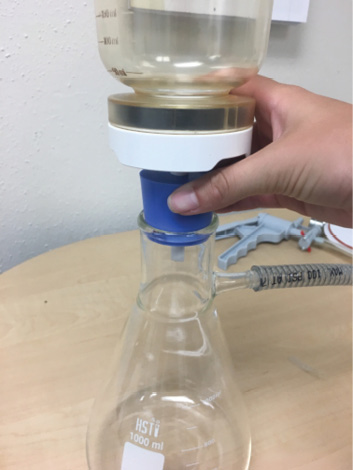
- Remove the funnel from the funnel holder, and make sure you triple-rinse the funnel using filtered water to get rid of any contaminants before you start each filter.
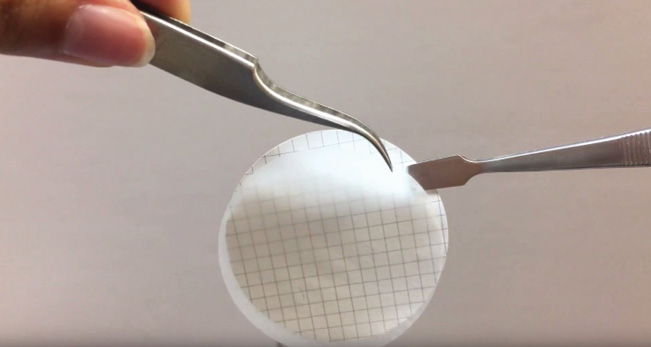
- Using forceps, place a piece of filter paper on the filter funnel holder, grid lines facing up. Be sure to remove any protective sheeting from the filter during this step. Do not touch the filter paper with your hands because oils from your hands will clog the filter. Use only the forceps to remove the protective covers, place the filter on the funnel stand, and remove the filter paper from the funnel stand.

- Attach the funnel to the filter holder.


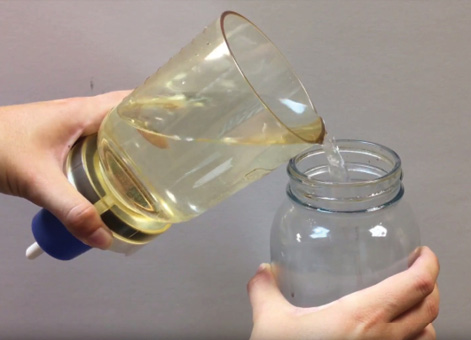
- Take the water sample and fill the funnel. Place the lid on the funnel. Immediately place the lid back on the sample bottle and open the tabs on the funnel lid so it does not become vacuum sealed to the funnel once you begin filtering. Creating a vacuum seal will break the filter when the pressure is released.


- Turn on (or squeeze if using the hand-held version) the vacuum.
- Continue adding water from the sample jar until the entire sample has been run through the filter. If your filter gets clogged, you can switch to a clean filter. (See the Clogged Filter section below).
- Once the water sample is filtered, release the vacuum pressure by removing the vacuum tube.
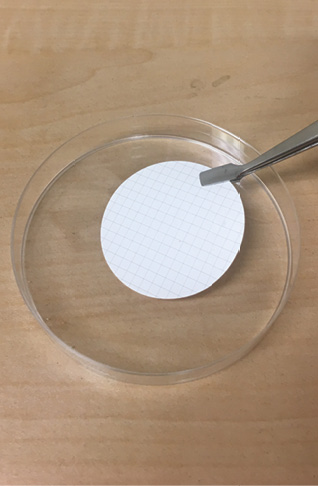
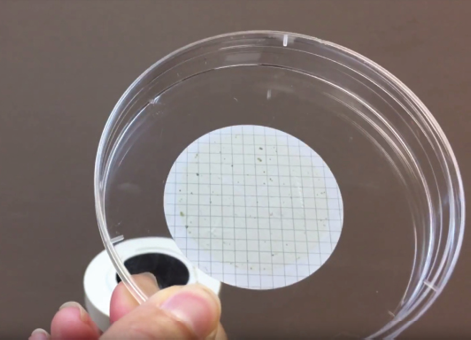
- Carefully use forceps to grab the filter paper by the edge and place it in a petri dish. Place the cover on the petri dish.


- Label the petri dish, using tape, with sample jar # and processing date.
- Repeat with all water samples.
Clogged Filter
If you notice the process of water filtering has slowed or stopped, you can switch to a new filter:
- Remove the filter funnel from the flask.


- Dump the sample back into the original sample jar.

- Run the vacuum pump momentarily to remove any excess water.
- Release vacuum pressure by disconnecting the vacuum tube.
- Remove the clogged filter and replace it with a new filter using the forceps.
- Put the clogged filter into a petri dish, and label it with the respected jar’s sample # (in some cases you will have multiple filters for the same water sample).

How to Identify Microplastics under the Microscope
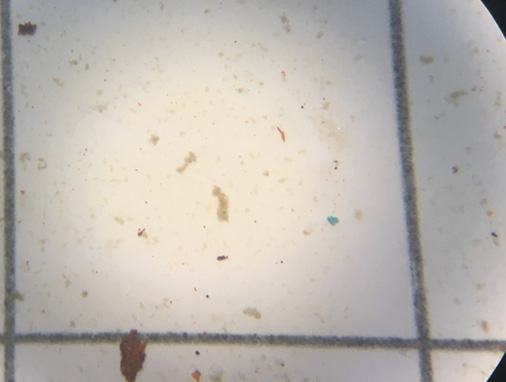
- Observe the filter paper under a microscope with at least 40X magnification. The top light on the scope works best for identifying microplastics.

Figure 10. Observe the filter paper under a microscope with at least 40X magnification. - Scan the filter paper in a row-by-row pattern to prevent missing any plastic pieces.
- Microplastics are categorized into the following types:
- Fibers look like thin threads and are often colored
- Fragments are pieces of plastic with varying shapes
- Film refers to thin pieces of plastic (like grocery bags and plastic food wrappers)
- Microbeads are spherical plastic pieces
- Record the number of each plastic on a data sheet. (A data sheet template can be found at the end of this guide.)
Identifying Microplastic Samples from the Density Separator
- Visually examine the sample captured in the sieve, and remove any non-microplastic materials (glass and organic material like sticks).
- Rinse the contents in the sieve, using a wash bottle, into a petri dish.
- Sort the microplastics by type using a dissection microscope (see How to Identify Microplastics under the Microscope on page 28).
- Setting the petri dish on gridded or graph paper may make counting microplastics through the microscope easier.
- Record information on a data sheet.
- If you want to keep them, store the microplastics in a dark, controlled environment.
Not Sure if It’s a Microplastic?
Whether you are looking at your processed water or sediment sample, determining what is and is not a microplastic can be a little challenging. Sand, seaweed, and little organisms can be mistaken for microplastics. These tips should help:
- Plastics will often be colorful.
- Squeeze test! If you cannot tell if a particle is plastic, use your fine-tip tweezers to squeeze the particle. If it squishes apart, then it is most likely not plastic; plastic will keep its shape or bounce back to its shape.
- Only count what you are confident IS a microplastic.
- Have two to three people look at the filter and microplastics. Having different eyes look and count will result in the most accurate results.
If you would like to keep the filters containing the microplastics, just fold them in half (sample side in), wrap in aluminum foil, and store in a controlled environment.
For any questions about the filtering process, visit the Florida Sea Grant Extension & Education Program.
You may also refer to the Florida Microplastic Awareness Project video training modules.
Data Logs
Water
| Sample # | Collection Date and Time | Collection Location | Processing Date and Time | # of Microfibers | # of Microfragments | # of Microbeads | # of Microfilms |
|---|---|---|---|---|---|---|---|
Sediment
| Sample # | Collection Date and Time | Collection Location | Processing Date and Time | # of Microfibers | # of Microfragments | # of Microbeads | # of Microfilms |
|---|---|---|---|---|---|---|---|
Submitting Data
Want your data to be part of a Gulf-wide microplastics citizen scientist monitoring project? Submit your data to us! Email digital logs or scanned data logs to coastalextension@gmail.com.
References
Jambeck, J. R., Geyer, R., Wilcox, C., Siegler, T. R., Perryman, M., Andrady, A., Narayan, R., & Law, K. L. (2015). Plastic waste inputs from land into the ocean. Mar. Pollut. 347, 768–771.
MacArthur, E. (2017). Beyond plastic waste. Science 358(6365), 843.
Wessel, C. C., Lockridge, G., Battiste, D., & Cebrian, J. (2016). Abundance and characteristics of microplastics in beach sediments: Insight into microplastic accumulation in northern Gulf of Mexico estuaries. Marine Pollution Bulletin 109(1), 178–183.
Acknowledgments
Thank you to all of the citizen scientists for their hard work and time invested in this project. Without passionate people like you, projects like this would not be possible. A huge thanks to the Gulf of Mexico Alliance for awarding MSU with the grant to fund the development of this document.
Sponsored by the Gulf of Mexico Alliance – Gulf Star Program.
Publication 3243 (POD-06-24)
MASGP-17-069
By Mandy Sartain, Extension Program Assistant, Mississippi State University, Marine Debris Specialist, Mississippi-Alabama Sea Grant; Caitlin Wessel, NOAA Marine Debris Program, Gulf of Mexico Regional Coordinator, Dauphin Island Sea Lab; and Eric Sparks, Assistant Extension Professor, Mississippi State University, Extension Program Leader and Coastal Ecology Specialist, Mississippi-Alabama Sea Grant.
The Mississippi State University Extension Service is working to ensure all web content is accessible to all users. If you need assistance accessing any of our content, please email the webteam or call 662-325-2262.


