
Mississippi Vegetable Gardener's Guide
Grow Your Own Vegetables
Growing a vegetable garden in Mississippi can be highly rewarding. Gardeners can enjoy the freshest produce ripened in their own garden. Sometimes only minutes elapse between harvest, preparation, and consumption. Even if you don’t consume the food on the day of harvest, it typically lasts longer in storage than store-bought produce. That’s because most fresh vegetables at the grocery store travel about 1,800 miles between producer and consumer, and it often takes several days to be received. Additionally, gardeners have more variety available to them and are not limited to what is stocked at the stores.
Vegetable gardens have a long history in Mississippi. In the past, a family’s food often came right from their own garden. Today, gardening is typically much more recreational. Regardless of the motives, gardeners want a successful harvest from what they plant. This resourceful guide aims to provide key information to successful gardening.
What to Plant
While Mississippi’s climate is not suitable for all fruits and vegetables, we can grow a tremendous assortment because of our long growing season. But while you can grow many types of produce, there’s no sense in planting something your family won’t eat.
Once you decide what to plant, consider how much to plant. This decision is based in part on the days required
for a plant to reach maturity (when it can be harvested) and how much of each vegetable your family can eat. Another important factor is how much garden space you have. Some vegetables take a lot of garden space and a long time before they can be harvested, while others are planted and harvested in a short time, producing abundantly in a small space.
Most melons, pumpkins, vining types of squash, and sweet potatoes take several months to mature and take up a considerable amount of garden space. Typically, they are harvested over a short time, but the produce has a long shelf life. Most okra, tomatoes, peppers, eggplant, and pole beans also grow for several months in the garden, but they typically can be harvested continuously. Sweet corn takes a considerable amount of garden space, but many gardeners feel it is worth it to be able to enjoy the incredible sweetness of freshly harvested corn that typically cannot be matched by corn purchased at the grocery store.
For gardens with limited space, consider planting smaller vegetables: bush, snap, and lima beans; leafy greens like lettuce, spinach, mustard, collards, Swiss chard, and turnips; green onions; tomatoes; sweet peppers; and eggplant. As space permits, add broccoli, cabbage, hot peppers, okra, summer squash, southern peas, and pole beans. Watermelons and pumpkins take up much more space. Cucumbers, which normally take up a lot of ground space, can be trellised. For gardeners who only have a patio available, a growing number of vegetables have been developed for containers, such as the Patio Snacker cucumber and the Micro Tom tomato. They are very small but produce abundantly for their size.
Irish and sweet potatoes are productive for the garden space required but can be difficult to store long term. For example, long-term storage of sweet potatoes is best at 55 to 60 degrees.
Choose varieties recommended for growing in hot, humid climates. Look for varieties that are labeled with “good” or “excellent” disease resistance to multiple diseases. Many new varieties offer much better disease resistance, higher yields, and great flavor. The varieties you choose can make a big difference in how successful you will be. For example, there are tomato varieties available today that are highly resistant to multiple diseases, yield over 20 pounds of tomatoes per plant, and have exceptional, competition-winning flavor. Keep a gardening journal to keep track of what you liked, what worked, and what didn’t.
Vegetables grown for their fruits or seeds, such as sweet corn, tomatoes, squash, cucumbers, eggplant, peppers, beans, and peas, should be planted in the sunniest spots. Vegetables grown for their leaves or roots, such as beets, cabbage, lettuce, mustard, Swiss chard, spinach, and turnips, can grow in partial shade, though they perform better in direct sunlight.
Succession Planting
Many people who grow gardens only plant once during the spring. But in Mississippi, we have the opportunity to grow and harvest produce almost year-round. The long growing season combined with successive plantings (growing more than one vegetable in the same space during the year) optimizes what the garden can produce.
As soon as one vegetable is harvested, space can be cleared, prepped, and planted with another. For example, follow an early-spring planting of English peas with a late-spring planting of cucumbers; then replant the space with fall bush snap beans, leafy greens, or late southern peas. Another example is to follow early sweet corn with winter squash and pumpkins in early July. Spring Irish potatoes can be followed by lima beans or southern peas, which are followed by fall greens.
Practice crop rotation (planting nonrelated plants in the same location in successive plantings) to prevent disease buildup in the garden soil. Rotation should be by family groups. For example, don’t replace tomatoes with peppers since they are in the same family.
When growing vegetables (like snap beans, sweet corn, lettuce, radishes, leafy greens, and southern peas) that are intended to be consumed fresh from the plant, make small successive plantings of vegetables.
Planting at 2-week intervals provides continuous fresh vegetables. Plant only as much as your family can eat before the next planting begins to produce. If you plan to can and freeze as well as use fresh vegetables, plant more vegetables at one time to provide enough at harvest for preserving.
Table 3 (page 16) lists expected yields for the different vegetables. Keep in mind that the estimated yields given for some vegetables (tomatoes, peppers, okra, pole beans, and eggplant, for example) are for multiple harvests over a period. Vegetables with extended harvest periods require only one planting during the season. However, with tomatoes, peppers, and eggplant, a second planting made in midsummer provides good-quality vegetables for a fall harvest.
A second planting of okra, about 6 weeks after the first planting, has some benefit for late-season harvest, but you can get the same benefit by cutting the first planting back to a height of 3 to 4 feet in late summer.
Plant your garden according to a detailed plan. A finished garden plan shows the following:
- vegetable varieties
- number of successive plantings for each vegetable
(if applicable) - planting dates and locations
- row spacing
Related Vegetable Groups
Tomato, Eggplant, Irish potato, Pepper
Cucumber, Squash, Pumpkin, Muskmelon, Watermelon
Snap bean, Lima bean, Peanut, Southern pea
Cabbage, Broccoli, Turnip, Mustard, Collard
Garden Location
The ideal garden site is close to the house but out in the open where it receives full sun and is not shaded by trees or buildings. Choose a place that is near a water supply and has loose, fertile, well-drained soil.
Few gardeners are fortunate enough to have the ideal garden site or soil. This does not mean growing a successful garden is impossible. If you select the right vegetables and carefully manage the soil, some vegetables can be produced in almost any location.
Select a site free of serious weed problems. Nutsedge, torpedograss, bermudagrass, cocklebur, and morning glory are just a few of the weeds that are difficult to control in a garden.
Fence the garden site to keep out children and animals. A two-strand, low-voltage electric fence may be the only way to keep small animals like rabbits and raccoons out. Remove low tree limbs that hang over the garden and give animals access.
Garden Layout
Design your garden to meet your needs. Careful planning reduces work and can make the garden more productive. Randomly planting seeds and plants will likely result in waste and disappointment.
Consider your available equipment when designing the shape of your garden. Where the work is done with a tractor, long rows are practical. Therefore, a long, narrow, rectangular garden would be more practical than a more square-shaped garden. When cultivation is by hand, the shape is much more flexible, but be sure to mound the soil for each row to improve drainage.
Also, consider the slope of the land; run rows perpendicular to the slope, especially on sandy-textured soils that tend to wash and erode. Where the land is uneven, contour the rows.
Rows for small vegetable plants, such as carrots, onions, and radishes, can be laid closer together for hand cultivation than for power equipment. Planting them in double rows or a broad band in a row can increase the yield from a small garden plot.
Closely spaced rows and vegetable plants help shade out weeds and reduce water loss from the soil surface. However, this also reduces air movement and increases chances for diseases. Be sure to leave enough space between the rows to work around the plants comfortably but keep rows close enough together to get more produce from a smaller area. Cover the rows with mulch, such as pine straw, leaves, grass clippings, shredded paper, or newspaper, to prevent weeds from germinating and reduce soil erosion.
Plant perennial vegetables, like asparagus, where they won’t interfere with yearly land preparation. Plant long-season vegetables, like tomatoes, okra, peppers, and eggplant, together where they won’t interfere with short-term vegetables and replanting. Plant corn, okra, pole beans, staked tomatoes, and other tall vegetables on the north side of the garden so they won’t shade or interfere with the growth of shorter vegetables.
To get fuller ears from sweet corn, plant them in a block of at least four rows rather than one or two long rows. This will help to ensure good pollination. When possible, group vegetables according to their lime and fertilizer needs. Southern peas, lima beans, snap beans, and peanuts do not require as much nitrogen fertilizer as other vegetables.
Soils
Garden Soil
The ideal garden soil is deep, loose, fertile, and well-drained (internally as well as on the surface); has plenty of organic matter; and is free of weeds and diseases. Such soils can sometimes be difficult to find, but less-than-ideal soils can be just as productive with proper preparation and management.
Water moves quickly through well-drained soil and never completely shuts off air movement. Drainage is important because roots cannot develop, live, or function without a constant oxygen supply. Clay soils dry slowly after rain because their pores are small, and water moves through them slowly. Sandy soils, on the other hand, have many spaces and dry out quickly.
Clay and sandy soils can be successfully remedied by adding organic matter. Increasing the organic matter in clay soil improves the tilth, makes it easier to work, and improves its drainage. Adding organic matter to sandy soil increases its water-holding capacity and improves its fertility.
Garden soil affects the way vegetable plants grow and look. When soils are cold, wet, crusty, or cloddy, seedlings are slow to emerge, and some may not survive. Root rot diseases may take a heavy toll on seedlings, especially beans. Other soil-related plant symptoms are stunted plants, slow growth, poor color, and shallow, malformed roots. Signs of poor soil structure are crusts, hard soil layers below the surface known as hardpans or fragipans, standing water, and erosion.
Increase the soil’s organic matter content by adding manure, composted leaves, sawdust, bark, or peat moss. Also turn under plant residues like sweet corn stalks and green manure crops (soybeans, rye, southern pea plants, and others) after harvest. Plant residues should be free of diseases if they are to be added to the garden soil. Cover crops, such as clovers and vetch, planted in the fall prevent soil erosion and leaching of plant nutrients. They also provide organic matter and nitrogen when turned under in spring.
Manures vary in nutrient levels, and the amount of straw, age, exposure to weather, and degree of composting changes their composition. Be careful not to overfertilize when applying chicken litter to garden soil. Use no more than 200 pounds per 1,000 square feet of garden space. Cow and horse manure is lower in nutrient content than poultry manure and can be applied at 250 to 300 pounds per 1,000 square feet. It is best to use manure that has been aged (composted) for at least 3 months to avoid nitrogen depletion from composting it in the garden. This can use too much nitrogen in the soil and cause plants to suffer.
Overuse of manures can add so much fertilizer to the soil that plant growth is harmed. Most organic materials release some nutrients quickly and the rest over time. (See the Organic Gardening section on page 42 for more information.) While adding organic matter improves soil fertility, manures and plant residues are not balanced fertilizers, and soils require additional fertilizer. Test the soil every year or two and make adjustments as recommended.
Soil Preparation
Plants and seeds are easier to establish and grow better in well-prepared soil. The initial prep work is typically best started in the fall, except in areas where erosion could be a problem. Consider using an approved herbicide to kill existing weeds or turfgrass before working the soil for new garden plots. Apply lime, if needed, at the rate recommended from your soil test. Break the soil with a plow, rototiller, or spade. Plow or turn the soil to a depth of 7 to 8 inches. (Many smaller garden tillers will struggle or fail at this task.) Leave fall-plowed land rough until spring.
In early spring, you can disc or rake the soil several times at regular intervals to keep down weeds, break up clods, and smooth the soil.
If you did not plow or spade the garden site in the fall, turn the soil in spring as soon as it is dry enough to work. For most soils, you’ll know it is dry enough when you can shape a handful of soil into a ball that crumbles when you press on it with your thumb. Soil that is too wet will be sticky, and the ball will stay intact. Avoid working wet soils.
Just before planting, apply fertilizer (and lime if it was not added in the fall or earlier in the spring) as recommended. Then, pulverize the soil with a rototiller (or harrow) to get a smooth, level surface. This helps to firm the soil, break up clods, and leave a smooth surface for seeding. Soil left in rough condition for several days after turning in the spring may dry out and form hard clods, making it much more difficult to prepare a good seedbed. Especially where the soil is clay, level, and likely to stay wet, use a hoe, rake, or rototiller to pull the soil into raised rows that are 10 to 12 inches across on the tops. Let the sides slope gently to the walkways to provide good surface drainage.
Conventional row spacing is 36 to 40 inches apart, but spacing depends on the farming equipment, garden size, and vegetables being grown. Rows for large, vining vegetables like watermelons, cantaloupes, pumpkins, and winter squash are usually 6 to 8 feet apart.
Raised Beds
Raised beds can help where gardening space is limited or the soil quality is poor. For example, if the site is low and collects water or the soil drains poorly, using raised beds will avoid these problems. Raised beds are planting areas where the soil is several inches higher than that of the natural grade. This is accomplished by adding soil to the growing area or incorporating soil amendments, such as compost, sand, composted sawdust, or bark, into the existing soil.
In areas where the soil is extremely poor, you can excavate and replace it with a homemade custom soil blend, a commercial soil blend, a soilless potting mix, or topsoil. Before going to this extreme, it is recommended that you first get the soil tested and amend the existing soil as directed. A soil test could potentially save you a significant amount of time, labor, and money. (See the Soil Testing section on page 6 for more information.)
Where the native soil is adequate, you can make raised beds by pulling the soil from the walkways and placing it on the beds. Then, fill the walkways with mulch materials like pine straw.
Raised beds can be framed with wood, bricks, or concrete blocks, or they can be left unframed. The framing adds to the appearance and keeps the soil in place. Depending on the materials used and the design, it may even provide seating.
Ideally, raised beds should be no wider than 4 feet (so you can easily reach the center from either side) and no longer than 25 feet unless crossovers are provided. Beds 4 feet wide and 25 feet long contain 100 square feet and make calculations for rates of fertilizer easier. Beds accessible from only one side should be narrower than 4 feet so you can reach across the whole bed from one side. All framed beds should be of the same width so that covering materials (shade frames or sashes for cold frames) fit all beds, making crop rotation easy.
Raised-bed soil that has been improved by adding organic matter and sand often enables excellent root crops like carrots, onions, turnips, and parsnips to grow, even though they would not grow in the native soil. Select vegetables that produce a lot for the space they occupy. Trellis vining crops like cucumbers, pole beans, Malabar spinach, and melons. Support melon fruit in slings. Raised beds require more water than ground-level beds, but when the alternative is no garden at all, it’s worth the extra effort.
Here are some additional advantages of raised-bed gardening:
- Raised beds produce more vegetables per unit of garden space because space is not wasted with walkways between every row.
- Soil in raised beds dries and warms more quickly in spring, which permits earlier planting and harvest of spring vegetables.
- Soil does not become compacted because you don’t walk on it.
- Closely spaced plants in raised beds shade out weeds and reduce the need for frequent cultivation.
Raised-bed gardening, however, does have some disadvantages:
- It can be difficult to space plants properly. Plants without adequate space will take over other plants’ space.
- Closer plant spacing can reduce airflow and increase disease problems.
- Raised beds require more frequent watering because of improved drainage.
- Raised beds may require more frequent fertilization because of the leaching that results from frequent watering and improved drainage.
- Raised beds may not be compatible with equipment.
- Raised beds are more expensive to create.
Container Gardening
Container gardening is available to anybody who has sunlight and a source of water. Appropriate containers for growing vegetables have a low center of gravity, keep the growing medium from washing away, and allow water to drain from the bottom. Quart-sized (or larger) pots and cans can grow herbs, radishes, lettuce, strawberries, and other small plants. Tomatoes, peppers, squash, eggplant, and other large plants need a container that will hold 5 gallons or more. Old ice chests, bathtubs, barrels, and other large containers can support several plants, but don’t forget to add drainage holes.
Fill containers with disease-, insect-, and weed-free soilless potting mix. Do not use garden soil in containers. You can make your own blend with compost, peat moss, or other organic material and sand. Sand helps with drainage and provides weight for stability. Organic or synthetic fertilizers supply needed nutrients. Water is the most limiting factor in container gardening because plant roots are restricted. Container gardens often need to be watered twice on hot summer days.
Composting
Compost is organic material that is broken down by microorganisms into simpler organic and inorganic compounds. Soil mixed with compost has improved soil structure, tilth, fertility, and water- and nutrient-holding capacity. Compost can be mixed directly into the garden soil or used as mulch on the soil surface. If you choose the second option, work the compost into the soil after harvest or at the end of the season.
The most significant benefit from compost is its value as a soil conditioner. Compost increases the water-holding capacity of the soil, reducing the frequency that you need to water. Adding compost improves both sandy and clay soils. Plant nutrients in compost include nitrogen, phosphorus, and potassium. They are mostly in an organic form, and they release slowly and are less subject to leaching.
Compost is something you can make at home, but composted bark and manure can also be purchased. Make compost from vegetable scraps from the kitchen and other plant materials from normal yard chores, such as leaves and grass clippings, or hauled-in materials like sawdust, straw, or hay. Remember to use only vegetative materials and no meat, chicken, or fat scraps.
Construct a pile by alternating layers of plant waste material and soil. Keep the pile moist and add a mixed fertilizer to speed the composting process. Alternate layers of fresh, nitrogen-rich materials (including fresh grass clippings, vegetable scraps, and coffee grounds) and dry, carbon-rich materials (including hay, dry leaves, straw, and sawdust) in a volume ratio of approximately 1:3.
Make sure the straw or hay came from a field that was not treated with pyridine carboxylic acid-based herbicides, such as aminopyralid, clopyralid, and picloram, since these compounds may not be broken down during the composting process and can severely damage your vegetables.
Locate your compost pile out of sight. It can be built on open ground or in a bin made of cinder blocks, rough boards, old pallets, or wire fences. The sides of the bin should not be air- or water-tight. Spread a layer of the organic matter about 6 inches deep and, if desired, add 1 cup of a mixed fertilizer like 6-8-8 to every 10 square feet of the surface. Then add 1 inch of soil and enough water to moisten but not soak the pile. Repeat this process until the pile is 4 to 5 feet high. Make the top of the pile concave to catch rainwater. Under normal conditions, turn the pile in 2 or 3 weeks and again in 5 weeks.
The heat generated from the materials breaking down helps decomposition. Moist, green plant materials and fresh manure decompose much faster than dry, brown materials and can produce a considerable amount of heat. If you start the compost pile in the fall, decomposition will be slow until spring and summer. See Extension Publication 1782 Composting for the Mississippi Gardener for more information.
Soil Testing
The soil reaction, or measure of acidity or alkalinity, is based on a scale of 1 to 14 and is referred to as pH. A pH of 7.0 is neutral. Any values below 7.0 are acidic, and any values above 7.0 are basic or alkaline.
The ideal pH value for garden soil is between 6.0 and 7.0. Vegetables do not grow well in acidic soils with a pH of 4.5 to 5.5 or in alkaline soils with a pH above 7.5. To determine your soil pH, you will need to get it tested. Contact your county Extension office for a soil test box and instructions for taking a soil sample. There is a $10 fee for complete analysis (pH plus nutrient analysis with lime and fertilizer recommendations) on each sample. The limestone (lime) recommendation is the most important piece of information on a soil test report.
In areas with high rainfall like Mississippi (average of 55 to 60 inches per year), soils are generally acidic. However, there are exceptions, particularly in the Delta and Blackland Prairie, and the pH can easily fall outside of the optimal range for vegetable gardening. Of all soil samples analyzed at Mississippi State University’s Soil Testing Laboratory from 2015 to 2020, 51 percent had a pH of 5.9 or below and needed lime. Only 31 percent of soil samples had a pH between 6.0 and 7.0.
The soil test tells you if and how much lime is needed. Lime is the most effective and inexpensive aid available for soil improvement. The soil’s calcium and magnesium levels tell you what form of lime to apply—dolomitic (magnesium and calcium) or calcitic (calcium). An acidic soil that tested medium-low to very low in magnesium should be limed with dolomitic (high-magnesium) lime. An acidic soil high in magnesium can be limed with either calcitic limestone or dolomitic limestone.
Plants growing in highly acidic (or highly basic) soils will grow slowly, partly because of poor root growth. This makes them more susceptible to drought stress and less efficient at absorbing soil nutrients, and they may develop symptoms of nutrient deficiencies.
Ideally, you should apply lime to acidic soils well ahead of planting (2 to 3 months) to provide time for it to dissolve and change the soil pH. However, lime begins to react as soon as it is incorporated into the soil and can be applied at any time to increase soil pH levels. The best time to apply lime is in the fall.
Apply lime evenly over the entire area and work it into the top 4 or 5 inches of soil. Incomplete mixing may make future tests show a need for more lime, which can result in applying too much lime and poor plant growth. Lime not only raises the soil pH but improves soil fertility. Lime also improves the structure of clay soils and makes them easier to work.
Adding lime to the soil is not a once-in-a-lifetime event. Since soils limed to the proper pH return to their acidic state with time, test the soil every year or two to determine if additional lime is needed. Sandy soils become acidic again faster than clay soils.
These are some factors that cause soil pH to drop:
- using acid-forming fertilizers
- lime leaching from the soil with rain and irrigation water
- organic matter decomposing and releasing organic acids
Soil test results are reliable only if you take samples properly:
- Use a spade or trowel to remove a slice of soil 6 inches deep.
- Get similar sections from other random places in your garden.
- Put these samples in a pail or box.
- Mix the soil thoroughly.
- Remove about 1 pint of the well-mixed soil and dry it at room temperature.
- Place the dried soil in a soil test box or other container.
Do not take samples where fertilizer has been spilled or manure has been piled. Also, do not include debris such as leaves, sticks, roots, or large stones in your sample. Deliver the soil sample to your county Extension office.
Fertilizer Needs
The amount of fertilizer to apply depends on the soil’s natural fertility, amount of organic matter, type of fertilizer, and vegetables being grown. Get a soil test to determine your garden’s fertilizer needs.
In addition to soil testing, you also must measure your garden to determine the number of square feet it occupies. Garden fertilizer recommendations are based on 1,000 square feet, and an area of 1,000 square feet could measure 25 by 40, 20 by 50, 30 by 33, or other dimensions according to your plot layout.
If your area is smaller than 1,000 square feet, divide the actual area by 1,000, then multiply the decimal figure by the recommended lime and fertilizer rates. For example, if your plot measures 16 by 24, the area contains 384 square feet; 384 divided by 1,000 equals 0.384; multiply 0. by your recommended fertilizer rate to determine the amount of fertilizer to apply.
Vegetable plants require many different nutrients for good growth and production, but the three major nutrients that usually require the most attention by gardeners are nitrogen (N), phosphorus (P), and potassium (K). Calcium (Ca) and magnesium (Mg) are also very important, but they are supplied by limestone. All other nutrients are obtained from air, water, and soil.
Mixed fertilizers are normally sold by grade (signified by their “N-P-K” numbers) and contain two or three major plant nutrients. The N-P-K refers to the percent nitrogen (N), available phosphate (P2O5), and available potash (K2O).
Fertilizer sources of the major plant nutrients are ammonium sulfate (21 percent nitrogen, 21-0-0), a blend of ammonium sulfate and urea (34 percent nitrogen, 34-0-0), nitrate of soda (16 percent N, 16-0-0), calcium nitrate (15.5 percent N, 15.5-0-0, plus 19 percent Ca), urea (46 percent N), superphosphate (46 percent P2O5, 0-46-0), and muriate of potash (60 percent K2O, 0-0-60). Phosphorus and potassium do not easily leach from garden soils like nitrogen; therefore, they can build up to very high levels in regularly fertilized gardens. In these cases, nitrogen is the only fertilizer recommended since additional phosphorus and potassium are unnecessary.
Where nitrogen is the only fertilizer recommended, the usual recommendation is 3 pounds of 34-0-0 (3 pints) per 1,000 square feet of garden space before planting. Measuring the amount of fertilizer to apply is important because adding too much can damage plants and adjacent water sources. It can even leach into the underground water supply.
Vegetables differ in their fertilizer requirements. Leafy greens like mustard, turnips, collards, cabbage, and spinach are heavy users of nitrogen. Broccoli and sweet corn also require more nitrogen than some other vegetables. While nitrogen is important to the plant growth of fruit and root vegetables, phosphorus and potassium are important to the proper development of roots and seeds. Peanuts, southern peas, and beans get nitrogen from the air and do not require heavy nitrogen fertilization. Overfertilizing these vegetables with nitrogen causes excessive growth of leaves at the expense of the fruit.
Apply fertilizer before or at planting. Two methods of application are “in the row” and “broadcast.” For most gardeners, the broadcast method is more practical.
To broadcast, spread the recommended amount of fertilizer evenly over the soil surface and then thoroughly mix it into the soil while preparing the beds. Heavy-feeding vegetables need additional fertilizer (side-dressing) after the plants are well established (see Table 1).
For row application, apply the recommended fertilizer to the row. Mix it thoroughly with the soil so that it will not damage the seed and tender plants.
Fertilizer can be applied in a combination of broadcast and row applications. Broadcast two-thirds of the recommended fertilizer over the entire garden surface and mix it into the soil. Apply the remaining one-third of the fertilizer in furrows 3 inches to the side of the row and slightly below the level of the seeds.
Nitrogen fertilizer applied before or at planting time usually does not supply all the nitrogen needed during the growing season for heavy- and medium-feeding vegetables. Also, irrigation and rain can leach water-soluble nutrients, especially nitrogen, into deeper areas of the soil, out of the reach of the roots of shallow-rooted vegetables.
Apply (side-dress) additional nitrogen fertilizer along the row, 4 to 6 inches from the base of established plants, being careful to keep all fertilizer off plant leaves.
Table 1. Side-dress applications of nitrogen*.
| Crop | Timing |
|---|---|
| beans | At three- to four-leaf stage. |
| beets, carrots | 4–6 weeks after planting. |
| bell peppers, eggplant, tomatoes | After first fruit set and again at 4- to 6-week intervals. |
| broccoli, cabbage, cauliflower, Brussels sprouts | 3 weeks after transplanting or after danger of late freeze in spring; broccoli again when heads begin to show. |
| cucumbers, muskmelons, watermelons, winter squash | When vines begin to run. |
| English peas | When plants are 4–6 inches tall. |
| Irish potatoes | When sprouts break through soil surface. |
| leafy greens (mustard, turnips, chard, collards) | When plants are about one-third grown. |
| lettuce, kohlrabi, Chinese cabbage | 2 weeks after transplanting; 4 weeks after sowing seed. |
| okra | After first pods are harvested. |
| onions (green and bulb) | From sets: when tops are 6 inches high. From transplants: when established and actively growing. |
| peanuts | None |
| radishes | None |
| southern peas | None |
| summer squash | Before bloom when plants are 8–10 inches tall and again in 4 weeks. |
| sweet corn | When 8 inches high and again when knee high. |
| sweet potatoes | None |
| turnips (roots), rutabagas | 4 weeks after sowing seeds. |
| tomatoes | When first fruit are 1 inch in diameter and again at first harvest. |
*1 pint of 34-0-0 per 100 feet of row, 3⅓ tablespoons per 10 feet of row.
Planting
Planting Dates
Use Figure 1 and Table 2 to determine planting dates for vegetables in your garden. Identify your garden’s zone (1, 2, 3, 4, or 5) using the map. Some Mississippi counties are divided into two or more zones.
The zones are based on weather data for the median (most frequent) dates of last freezes (temperature of 32°F or less) in spring. Freezes can occur before or after the median dates listed for each zone, but this is rare. Each vegetable has been categorized as cool- or warm-season, and the recommended planting dates make up the body of information in the table.
Beets, for example, are recommended for planting in zone 1 from February 1 to March 1. The starting dates are 4 and 6 weeks before the last median frost date for the zone for cool-season vegetables, and 2 and 4 weeks after the last median frost date for warm-season vegetables. The cut-off date for planting cool-season vegetables is to provide sufficient time for the vegetables to mature before the heat of summer. The cut-off date for planting warm-season vegetables is to permit maturity and harvest before disease, insect, and weather pressures become too great and before cold temperatures in the fall.
Most cool-season vegetables can be planted in both spring and fall, allowing gardeners to harvest in both seasons. Crops like broccoli, cabbage, Chinese cabbage, cauliflower, collards, kale, spinach, Swiss chard, and rutabagas are higher quality and produce over a longer period when planted in the fall. Most warm-season vegetables can be planted over a period of several weeks ranging from midspring to midsummer.
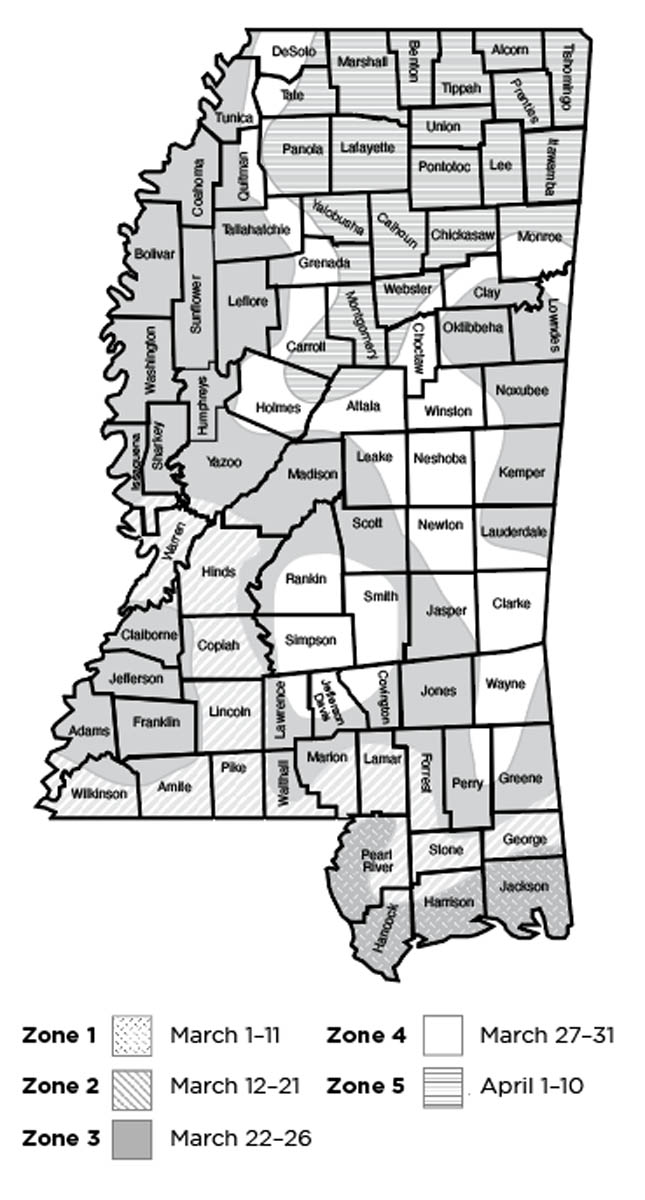
Table 2. Spring and summer planting dates.
Cool-Season Vegetables
| Vegetable | Zone 1 | Zone 2 | Zone 3 | Zone 4 | Zone 5 |
|---|---|---|---|---|---|
| beets | Feb. 1 | Feb. 12 | Feb. 22 | Feb. 27 | Mar. 3 |
| Mar. 1 | Mar. 15 | Apr. 1 | Apr. 1 | Apr. 5 | |
| broccoli (plants) | Feb.1 | Feb. 13 | Feb. 22 | Feb. 27 | Mar. 3 |
| Feb. 15 | Mar. 1 | Mar. 10 | Mar. 15 | Mar. 20 | |
| cabbage, collards (plants) | Feb. 1 | Feb. 12 | Feb. 22 | Feb. 27 | Mar. 3 |
| Feb. 15 | Mar. 1 | Mar. 15 | Mar. 20 | Apr. 1 | |
| carrots | Jan. 20 | Jan. 29 | Feb. 8 | Feb. 13 | Feb. 18 |
| Apr. 15 | Apr. 15 | Apr. 15 | Apr. 15 | Apr. 15 | |
| cauliflower (plants) | Feb. 1 | Feb. 12 | Feb. 22 | Feb. 27 | Mar. 3 |
| Feb. 15 | Mar. 1 | Mar. 10 | Mar. 15 | Mar. 20 | |
| chard, Swiss | Feb. 1 | Feb. 12 | Feb. 22 | Feb. 27 | Mar. 3 |
| Mar. 1 | Mar. 15 | Apr. 1 | Apr. 1 | Apr. 5 | |
| kohlrabi | Jan. 20 | Jan. 29 | Feb. 8 | Feb. 13 | Feb. 18 |
| Mar. 1 | Mar. 15 | Apr. 1 | Apr. 1 | Apr. 5 | |
| lettuce, head | Jan. 20 | Jan. 29 | Feb. 8 | Feb. 13 | Feb. 18 |
| Mar. 1 | Mar. 1 | Mar. 1 | Mar. 5 | Mar. 10 | |
| lettuce, leaf | Jan. 20 | Jan. 29 | Feb. 8 | Feb. 13 | Feb. 18 |
| Apr. 1 | Apr. 1 | Apr. 1 | Apr. 10 | Apr. 15 | |
| mustard | Feb. 1 | Feb. 12 | Feb. 22 | Feb. 27 | Mar. 3 |
| Apr. 1 | Apr. 1 | Apr. 15 | Apr. 15 | Apr. 20 | |
| onions (sets or plants) | Jan. 20 | Jan. 29 | Feb. 8 | Feb. 13 | Feb. 18 |
| Mar. 1 | Mar. 1 | Mar. 1 | Mar. 1 | Mar. 15 | |
| peas, English | Jan. 20 | Jan. 29 | Feb. 8 | Feb. 13 | Feb. 18 |
| Mar. 10 | Mar. 10 | Mar. 15 | Mar. 20 | Apr. 1 | |
| potatoes, Irish | Jan. 20 | Jan. 29 | Feb. 8 | Feb. 13 | Feb. 18 |
| Feb. 15 | Mar. 1 | Mar. 1 | Mar. 10 | Mar. 15 | |
| radishes | Feb. 1 | Feb. 12 | Feb.22 | Feb.27 | Mar. 3 |
| Mar. 15 | Mar. 15 | Apr. 1 | Apr. 15 | Apr.25 | |
| spinach | Jan. 20 | Jan. 29 | Feb. 8 | Feb.13 | Feb.18 |
| Feb. 15 | Mar. 1 | Mar. 15 | Mar. 15 | Mar. 15 | |
| turnips | Feb. 1 | Feb. 12 | Feb. 22 | Feb. 27 | Mar. 3 |
| Apr. 1 | Apr. 1 | Apr. 15 | Apr. 15 | Apr. 20 |
Warm-Season Vegetables
| Vegetable | Zone 1 | Zone 2 | Zone 3 | Zone 4 | Zone 5 |
|---|---|---|---|---|---|
| beans, snap bush | Mar. 15 | Mar. 25 | Apr. 4 | Apr. 8 | Apr. 14 |
| Apr. 15 | Apr. 20 | May 1 | May 1 | May 10 | |
| beans, snap pole | Mar. 15 | Mar. 25 | Apr. 4 | Apr. 9 | Apr. 14 |
| Sept. 1 | Aug. 15 | Aug. 15 | Aug. 10 | Aug. 1 | |
| beans, lima bush | Mar. 29 | Apr. 8 | Apr. 18 | Apr. 23 | Apr. 28 |
| Aug. 15 | Aug. 1 | Aug. 1 | July 25 | July 15 | |
| beans, lima pole | Mar. 29 | Apr. 8 | Apr. 18 | Apr. 23 | Apr. 28 |
| Aug. 5 | Jul. 20 | Jul. 20 | Jul. 15 | Jul. 5 | |
| corn | Mar. 1 | Mar. 11 | Mar. 21 | Mar. 26 | Mar. 31 |
| Jul. 15 | Jul. 15 | Jul. 15 | Jul. 15 | Jul. 15 | |
| cucumbers | Mar. 29 | Apr. 8 | Apr. 18 | Apr. 23 | Apr. 28 |
| Sept. 14 | Aug. 28 | Aug. 21 | Aug. 14 | Aug. 10 | |
| eggplant (plants) | Mar. 29 | Apr. 8 | Apr. 18 | Apr. 23 | Apr. 28 |
| Aug. 15 | Aug. 10 | Aug. 10 | Aug. 1 | July 15 | |
| muskmelons | Mar. 29 | Apr. 8 | Apr. 18 | May 15 | Jun. 1 |
| May 1 | May 1 | May 15 | Apr. 23 | Apr. 28 | |
| okra | Mar. 29 | Apr. 8 | Apr. 18 | Apr. 23 | Apr. 28 |
| Jul. 15 | Jul. 15 | Jul. 15 | Jul. 15 | Jul. 15 | |
| peanuts | Mar. 15 | Mar. 25 | Apr. 4 | Apr. 9 | Apr. 14 |
| May 1 | May 1 | May 1 | May 15 | May 15 | |
| peas, southern | Mar. 29 | Apr. 8 | Apr. 18 | Apr. 23 | Apr. 28 |
| Aug. 10 | Aug. 10 | Aug. 1 | Aug. 1 | Jul. 20 | |
| peppers (plants) | Mar. 29 | Apr. 8 | Apr. 18 | Apr. 23 | Apr. 28 |
| Aug. 15 | Aug. 10 | Aug. 10 | Aug. 1 | Jul. 15 | |
| potatoes, sweet (plants) | Mar. 29 | Apr. 8 | Apr. 18 | Apr. 23 | Apr. 28 |
| Jul. 1 | Jul. 1 | Jul. 1 | Jul. 1 | Jul. 1 | |
| pumpkins, winter squash | Mar. 29 | Apr. 8 | Apr. 18 | Apr. 23 | Apr. 28 |
| Jul. 1 | Jul. 1 | Jul. 1 | Jul. 1 | Jul. 1 | |
| spinach, New Zealand | Mar. 15 | Mar. 25 | Apr. 4 | Apr. 9 | Apr. 14 |
| Apr. 15 | Apr. 15 | Apr. 20 | May 15 | May 15 | |
| squash, summer | Mar. 29 | Apr. 8 | Apr. 18 | Apr. 23 | Apr. 28 |
| Sept. 14 | Aug. 28 | Aug. 21 | Aug. 14 | Aug. 10 | |
| tomatoes (plants) | Mar. 29 | Apr. 8 | Apr. 18 | Apr. 23 | Apr. 28 |
| Aug. 15 | Aug. 10 | Aug. 10 | Aug. 1 | Jul. 20 | |
| watermelons | Mar. 29 | Apr. 8 | Apr. 18 | Apr. 23 | Apr. 28 |
| May 1 | May 1 | May 15 | May 15 | Jun. 1 |
Compare New Varieties to Established Varieties
Every year, companies release new varieties that are advertised as having superior yield, taste, and disease resistance. Such claims are often true, but advertised claims may not hold true in your own garden. You can conduct a side-by-side comparison by planting a new variety next to your go-to variety. You may be surprised to find that your go-to variety has been outmatched.
In addition to making your own comparisons, universities conduct trials regularly throughout the country on new varieties, and their results are usually made available online. It is important to note that trials done in the southeastern U.S. are likely to be more reliable for Mississippi gardeners than trials conducted in other parts of the country.
Transplants versus Seeds
Small plants (called transplants or starts) or seeds of vegetables are available in many local and online stores. Transplants can give certain vegetables a head start on the growing season and help avoid diseases that can develop later in the season.
Planting transplants of warm-season vegetables like tomatoes, tomatillos, peppers, and eggplant is standard practice and recommended over direct-sowing these crops. Grafted versions of these transplants are available and are increasing in popularity, offering enhanced disease resistance and higher yields.
Cool-season transplants of cabbage, broccoli, cauliflower, head lettuce, and onions are also recommended. While you can purchase transplants of cucumbers, squash, cantaloupes, and watermelons, the extra time needed to become established after they are transplanted is often longer than directly sowing seeds into the garden, so you may want to direct-seed these crops.
Some vegetables like sweet potatoes, Irish potatoes, and garlic are grown almost exclusively from vegetative parts (slips, cut-up tubers, or separates cloves, respectively) rather than from true seeds. The nursery industry uses the term “seed” for Irish potatoes even though they are not real seeds. “Seed potato” refers to actual potatoes that need to be cut into pieces before they are planted.
You can purchase or grow your own vegetable transplants in a cold frame, in a hotbed, in a greenhouse, on a light bench, on a sunny porch, or by a sunny window. See Extension Publication 3436 Homegrown Flower, Herb, and Vegetable Transplants for more details.
There are many advantages of growing your own plants:
- They are substantially less expensive.
- They are available when you need them.
- You can grow the specific varieties you want.
- You reduce the chances of introducing new diseases and insects into your garden.
You can successfully grow transplants of many vegetables by following a few simple guidelines:
Seed
Transplants require several weeks to grow, so get your seeds early. Start them at the appropriate time so they will be large enough to handle for transplanting but not so large that they outgrow their containers and become unwieldy to manage. Store unused seeds in an airtight container in the refrigerator, where they may last for many years.
You can test the viability of old seeds by placing 10 or so seeds between two moistened paper towels in an airtight container or plastic bag. Store it in a warm, dark place. Check the bag every couple of days to see if the seeds begin to germinate. Toss packets of seeds that fail to germinate. Alternatively, fresh seeds can be purchased every year to avoid germination problems.
Soil
Do not use garden soil because it does not provide proper drainage and can be contaminated with disease and weed seeds. Several commercial sterile, soilless seed starting mixes are available, or you can prepare your own:
- 2 quarts sphagnum peat moss (remove any large sticks)
- 1 quart vermiculite
- 1 quart perlite
- 1 tablespoon limestone
Container
Containers for seed germination can be plastic or Styrofoam egg cartons, half-pint milk cartons, small trays, aluminum foil loaf pans, pie tins, peat pots, or peat pellets. Dry, soilless media repels water, so lightly moisten it before filling containers. Make sure larger containers have drainage holes before filling them nearly to the top with the soilless mix. Small containers like egg cartons do not require drainage holes if they are watered carefully.
Expandable peat pellets (available at nurseries and garden supply stores) eliminate the need for a mix. Place dry, flat pellets in a shallow tray and sprinkle them several times with warm water until they are completely expanded. Allow a little time between sprinklings. Surround the expanded pellets with sand or vermiculite to hold them upright and slow their drying between watering.
Planting Seeds
Do not plant too many seeds; a little goes a long way. Plant them at the depth recommended on the back of the seed packet. Generally, larger seeds are planted deeper than smaller seeds. When using trays or pans, plant the seeds in rows and cover with ¼ inch of the potting mix or vermiculite. Vermiculite is a great medium to cover the seeds since it has a contrasting color from the seed starting mix and helps keep seeds moist. When using individual containers, plant two or three seeds per container. With the expanded pellets, make a small depression in the top and drop in one or two seeds.
Transplants are recommended for triploid, or seedless, watermelons. To aid germination, plant seedless watermelon seeds with the rounded end facing down and the pointed end facing up.
Germination
Cover containers with a germination dome or a piece of plastic or slip them into a clear plastic bag to keep the humidity high. The best temperature for germination is 75 to 80°F. Lower temperatures will slow down germination. Tomato, pepper, and eggplant seeds won’t germinate at temperatures below 60°F. Even at the optimum temperature, eggplant and pepper seeds may take 2 weeks to germinate. If you’re using an egg carton, keep the lid on until the seeds begin to germinate. Make sure the soil stays moist but is not overly saturated, as this may cause the seeds to rot.
Seeds do not require light to germinate. But as soon as the seedlings begin to emerge from the mix, remove the cover, lower the temperature, and increase the amount of light to prevent spindly growth. Place cool, white (4000K+), 40-watt fluorescent or LED tube lights several inches above the seedlings. Provide 18 hours of supplemental light per day. An outlet timer may be helpful. If the weather is warm during the day, you can set the trays outside, but be sure the soil stays moist. Bring trays inside during cool or cold nights.
Tomato, pepper, and eggplant seedlings grow best when the day temperature is 70 to 75°F and the night temperature is 60 to 65°F. Broccoli, cabbage, and cauliflower prefer cooler temperatures—65 to 70°F during the day and 55 to 60°F at night. At these temperatures, broccoli, cabbage, and cauliflower take 5 to 7 weeks to reach an appropriate size for transplanting to the garden. Peppers and eggplant may need 8 to 10 weeks. Seedless watermelon requires about 3 weeks.
Thinning and Transplanting
Individual containers with more than one seedling must be thinned to one plant. Pinch out or cut off the extra seedlings while the first leaves are still small.
Seedlings germinated in trays must be transplanted to individual containers while still small. Lift and separate seedlings and replant them into individual containers such as peat pots, plastic cell-packs (saved from previously purchased transplants; be sure to wash them), peat pellets, or other small containers. Use a commercial soilless potting mix or prepare your own.
Fertilizer
Commercial seed-starting mixes may contain enough fertilizer to grow the seedlings. These are referred to as “charged.” Check the packaging for details. Homemade mixes of peat, vermiculite, and perlite contain no fertilizer; fertilize seedlings for optimal growth starting just as the first true leaves start to develop from the cotyledons.
An all-purpose, liquid-soluble fertilizer (such as 20-20-20) can be mixed at a rate of 50 to 75 ppm nitrogen. Fertilizer packaging often has a table listing the amount of fertilizer required to reach the target ppm concentration per gallon of water. Fertilize one to three times per week. Be sure not to overfertilize as this can damage tender seedlings.
Store excess fertilizer solution in a dark, cool place in an airtight container to prevent evaporation. Use it as the plants grow.
As the plants develop more true leaves, fertilizer rates can be increased to 75 to 150 ppm. It is important to supply an appropriate amount of fertilizer. Plants suffer from both insufficient and excessive amounts of fertilizer. Too little fertilizer is better than too much because more fertilizer can be added later if needed.
Disease
Damping-off is the major disease that attacks seedlings, especially when the medium is kept excessively wet. Seedlings suffering from damping-off appear pinched at the soil line, fall over, and die. See the Vegetable Diseases section on page 28 for more information.
Hardening Off
Transplants grown in a cold frame are stockier and better able to withstand outside garden conditions than transplants grown indoors or in a greenhouse. Before setting out tender transplants, place them in a cold frame for 1 to 2 weeks to acclimate them to colder temperatures, brighter light, and wind. This greatly increases their chances of survival once set in the garden.
If a cold frame is not available, move plants outdoors for an increasing amount of time during the day over the course of 1 to 2 weeks to harden them off. Bring them back inside if nights will be cool. Not doing so often causes excess stress on the transplants and slows down their establishment in the garden.
Cold Frame
Cabbage, broccoli, and cauliflower transplants are easy to grow in an outside cold frame. Build a simple frame and cover it with polyethylene. Plants grown in a cold frame require 8 to 10 weeks to reach the size for setting in the garden, so start early. Place the cold frame in a sunny location with the low side facing south and the high back facing north. Paint the inside white to reflect light and promote uniform growth.
Since temperatures in a cold frame are frequently below the optimum for seed germination, plant seeds in a soilless mix in trays and germinate them indoors. Once the seeds have germinated, move the trays to the cold frame. Open or remove the cold frame cover for ventilation on clear days when the air temperature is 45°F or higher. Thin the seedlings to stand ½ inch or more apart. Crowding results in spindly, weak transplants. Fertilize to promote growth.
Growing onion transplants requires considerable time. Start by planting seeds in September or October in closely spaced rows in a cold frame. Transplants will be ready for setting out in January and February. To have transplants of cabbage, broccoli, and other cool-season vegetables ready in time for spring planting, you must start very early in the year, which may not be practical. Transplants of these vegetables can be grown for the fall garden.
Sweet potato transplants (slips) are produced by planting sweet potatoes in beds of sawdust or sand. Maintain the temperature in the bed close to 80°F. Since disease problems can be carried on the mother roots and transmitted to the slips, it is better for gardeners to purchase their sweet potato slips or to use vine cuttings. Vine cuttings are made by cutting potato slips above the surface of the bedding material. The cuttings develop roots rapidly when planted in warm, moist garden soil.
Buying Transplants
When buying vegetable transplants, select recommended varieties. Plants with good roots that are healthy (white, not brown or black), stocky, medium-sized, and free of diseases or insects are best. Avoid yellow, spindly, or oversized plants and those with spotted foliage, brown marks on the stems, or knots on the roots.
Transplanting to the Garden
At an appropriate planting time, dig a hole in the prepared soil. Being careful not to damage the stems, remove the transplants from their plastic pots. Place your hand over the top of the pot with the stem between your index and middle fingers, and invert the plant into your hand. Then, carefully loosen the root ball and place it into the hole.
Do not remove transplants grown in fiber pots, such as peat pots, before planting. Cover fiber pots completely with soil, making sure not to leave the upper edges exposed to the air. Plant tall tomato transplants deeply so that the lowest set of leaves is close to the soil surface.
Starter Solution
Plants cannot grow properly without all the necessary nutrients. Garden centers often sell fertilizer that is specially formulated with higher phosphorus content to help roots establish quickly in the garden, but most soils in Mississippi have adequate phosphorus for proper and healthy root growth. Check your soil test results to see if this is the case in your garden. The limiting nutrient in Mississippi soils is often nitrogen; therefore, plants typically establish faster with supplemental nitrogen, not phosphorus, at the time of transplant.
Protection
Depending on the weather, it may be necessary to protect newly set plants from sun, cold, and wind. Homemade shelters include boxes, baskets, flowerpots, and plastic milk containers. Commercial hot caps of paper or plastic and devices containing water protect young, tender plants from frost. A wooden shingle stuck in the ground at a slant on the south side of a plant serves as a sunshade. A piece of newspaper or a paper grocery bag pinned down over a plant provides protection from the sun.
Wrap the bottom 12 to 18 inches of wire tomato cages with clear plastic to provide some protection to transplants from wind, cold, and blowing sand. You may prefer to avoid this hassle altogether by planting the garden a week or two later when the weather is warmer. Also, warm-season vegetables do not grow well in cold soil and cool air temperatures. Therefore, planting extra early—before the weather warms in the spring—may not be that beneficial in terms of earlier and larger yields.
Planting and Thinning Tips
Start with fresh seeds or older, properly stored seeds with good germination. You can plant older seeds, but use more seeds to make up for their lower germination rates. Begin by marking straight rows with stakes and a string or cord. Add fertilizer if you did not already do so.
Rake the seedbed clean of clods, rocks, and other debris. Make shallow furrows suitable for small seeds by drawing a hoe handle along a string. For deeper furrows, use a corner of the hoe blade. In the spring, plant seeds shallowly to speed germination. As the season progresses, plant seeds deeper to ensure a good supply of moisture.
Small seeds are difficult to distribute thinly and evenly and are easier to space if mixed with dry sand or dry, pulverized soil before planting. When planting small seeds like carrots that germinate slowly, mix in some radish seeds to mark the row. The radishes will germinate very quickly.
Seeds that are large enough to handle easily can be planted in groups (hills) or spaced evenly (drilled) in the row. Either way is acceptable. When planting in hills, place several seeds in small areas at the desired final plant spacing. Sweet corn, squash, pumpkins, watermelons, cantaloupes, and okra are often planted in this way.
Space seeds of beans, peas, beets, chard, and sweet corn evenly down the row. Space individual seeds 1 or more inches apart but at a spacing closer than the desired final plant spacing.
After the seeds are placed, cover them with soil. (See Table 3 on page 16 for the recommended depth of planting). Carefully firm (do not pack) soil over the seeds with the flat blade of a hoe. Be careful not to plant seeds too deeply. Seeds covered with too much soil do not germinate.
Once the seeds germinate and the seedlings are established, remove the excess seedlings. Thin sweet corn, okra, and summer squash to one plant per hill, pumpkins and melons to two plants per hill.
Thinning seems wasteful, especially to new gardeners, but it prevents crowding. Leaving the plants spaced too closely together reduces yields, makes the plants more susceptible to disease, and generally starves the plants for water and nutrients because of the excess competition.
In the thinning process, try to save the strongest seedlings and remove excess plants with a hoe, rake, or your fingers. Where seedlings are very close together and pulling disturbs the roots of the remaining plants, pinch out or cut the excess plants. If carefully removed during thinning, seedlings of some vegetables can be transplanted and used to fill in empty places or shared with other gardeners. Excess lettuce and other greens can be eaten.
The temperature of the garden soil at planting affects how quickly seeds germinate or if they germinate at all. Most cool-season vegetable seeds germinate at a soil temperature of 60°F, while most warm-season vegetable seeds germinate slowly at a soil temperature of 75°F. The longer seeds are in the soil without germinating, the more they are subject to attack by diseases and insects. Black plastic mulch is an effective way to raise the soil temperature to allow early planting of warm-season vegetables. (For more information, see the Mulching section on page 17.)
Other materials available to home gardeners are plastic row tunnels and floating row covers that allow early planting and provide some protection from cold. You can use plastic tunnels in combination with black plastic mulch. Floating row covers made of non-woven polyester also provide early insect protection.
Pollination
Pollination is the transfer of pollen within a flower or between flowers. For leafy (greens, spinach, cabbage) and root (beets, carrots, radishes) vegetables, pollination is not important since you are not harvesting fruit. But for vegetables we grow for their developing fruit, ripened fruit, or seeds (melons, corn, tomatoes, squash, pumpkins, okra, etc.), pollination is almost always needed.
Pollen is produced in the anthers (male parts) and must be moved to the pistil (female part). One part of the pistil, the ovary, develops into the seed or fruit that is eaten—squash, tomatoes, cucumbers, and corn kernels. Pollen is transferred from the anthers to the pistil in one of three ways: wind, insects or birds, and self-pollination.
Corn pollen is carried by the wind as it falls from the tassel to the silks of the ears. Corn planted in a single row has a much lower pollination rate than corn planted in a block of adjacent rows. High temperatures and drought do not interfere with pollination (the transfer of pollen) but can prevent proper fertilization, resulting in poorly developed ears.
The pollination process in all beans, peas, and tomatoes is called self-pollination because the transfer of pollen takes place within the individual flowers without the aid of insects or wind.
Squash, pumpkins, melons, gourds, and most cucumbers are insect-pollinated. In these vegetables, which have the male and female flower parts in separate flowers (yet still on the same plant), insects transfer pollen from male flowers to female flowers while going from flower to flower, collecting nectar and pollen.
Bees often are seen on vegetables that are wind- and self-pollinated, where they are collecting pollen and nectar. Since pollinating insects are so important in the garden, it is important to consider them when choosing and applying insecticides. Choose insecticides that are least toxic to bees and apply them late in the day when bees are not actively working in the garden.
Vegetables that are self- and insect-pollinated can suffer from lack of pollination and fertilization, just as wind-pollinated corn does. High temperatures, shade, and insufficient moisture often result in pollen that is unable to properly pollinate the pistil. Incomplete pollination results in poorly shaped fruit (cucumbers, watermelons, tomatoes).
Except for corn, cross-pollination between different vegetables is an unnecessary concern to gardeners. All summer squash, pumpkins, vegetable spaghetti, acorn squash, and small ornamental gourds are closely related and will cross if planted close to one another. Jumbo pumpkins and most winter squash can cross. If you grow several varieties of summer and winter squash and pumpkins in the same garden, purchase fresh seed each year.
Different corn colors (yellow and white) and types (standard sugary, sugary enhanced, supersweet, field, and pop) cross-pollinate if planted close to one another if they silk and tassel at the same time. Results can vary from a few yellow kernels on normally all-white ears to a situation where the corn is not fit to eat. All sweet corn must be isolated from the field corn and popcorn, and all supersweet corn must be isolated from all other corn. To prevent cross-pollination in corn, isolate different types at 250 feet apart, or stagger the planting dates so the maturity dates between the corn types are at least 14 days apart. This also applies to cross-pollination with field corn.
Table 3. Planting guide.
| Vegetable | Seeds or plants per 100 feet | Depth of planting (inches) | Distance between plants (inches) | Average crop expected per 100 feet | Average days to harvest |
|---|---|---|---|---|---|
| asparagus | 1 oz | 1 | 18 | 30 lb | 2 years |
| 65 plants | 6–8 | ||||
| beans, snap bush | ½ lb | 1 | 3–6 | 60 lb | 50–55 |
| beans, snap pole | ½ lb | 1 | 4–12 | 80 lb | 65 |
| beans, lima bush | ½ lb | 1 | 3–6 | 47 lb in shell | 65 |
| 18 lb shelled | |||||
| beans, lima pole | ½ lb | 1 | 4–12 | 66 lb in shell | 80 |
| 25 lb shelled | |||||
| beets | 1 oz | ½ | 2 | 75 lb | 65 |
| broccoli | ⅛ oz | ¼–½ | 18–24 | 50 lb | 80–115 |
| 50–65 plants | 18–24 | 50 lb | 75 | ||
| cabbage | ⅛ oz | ¼–½ | 12–18 | 150 lb | 100 |
| 65–100 plants | 12–18 | 150 lb | 80 | ||
| cabbage, Chinese | ⅛ oz | ¼–½ | 12 | 100 lb | 80 |
| carrots | ⅛ oz | ¼–½ | 2 | 100 lb | 75 |
| cauliflower | ⅛ oz | ¼–½ | 18–24 | 80 lb | 80–115 |
| 50–65 plants | 18–24 | 80 lb | 65 | ||
| chard, Swiss | 1 oz | ¼–½ | 6 | 75 lb | 50 |
| collards and kale | ¼ oz | ¼–½ | 8–16 | 150 lb | 55 |
| corn, sweet | 3–4 oz | 1–2 | 12 | 10 doz | 80 |
| cucumbers | ½ oz | 1 | 12–18 | 100 lb | 55 |
| eggplant | 50 plants | 24 | 150 lb | 85 | |
| kohlrabi | ⅛ oz | ¼–½ | 3–4 | 75 lb | 55 |
| lettuce, head | ¼ oz | ¼ | 12 | 75 head | 80–115 |
| 75–100 plants | 12–14 | 75 head | 80 | ||
| lettuce, leaf | ¼ oz | ¼ | 8–12 | 50 lb | 50 |
| muskmelons | ¼ oz | 1 | 36–48 | 100 fruit | 90 |
| mustard | ¼ oz | ¼–½ | 2 | 100 lb | 45 |
| okra | 1 oz | 1 | 12–18 | 90 lb | 65 |
| onions, green | 600 sets or plants | 2 | 100 bunches | 35 | |
| onions, bulb | 220 sets or plants | 6 | 100 lb | 110 | |
| parsley | ⅛ oz | ¼ | 4–6 | 30 lb | 90 |
| peanuts | ½ lb | 1–2 | 3–4 | 45 lb green | 110 |
| 15 lb dry | |||||
| peas, English | 1 lb | 1–2 | 2 | 30 lb in shell | 65 |
| peas, southern | ½ lb | 1 | 4–6 | 40 lb in hull | 65 |
| peppers, bell | 50 plants | 24 | 150 lb | 75 | |
| potatoes, Irish | 10 lb | 4 | 12 | 150 lb | 100 |
| potatoes, sweet | 75–100 | 12 | 100 lb | 120 | |
| pumpkins | ½ oz | 1–2 | 48 | 300 lb | 90–110 |
| radishes | 1 oz | ½ | 1 | 40 lb | 28 |
| rutabagas | ½ oz | ¼–½ | 12 | 90 lb | 90 |
| spinach | ½ oz | ½ | 4 | 70 lb | 45 |
| squash, summer | ½ oz | 1 | 36 | 150 lb | 55 |
| squash, winter | ½ oz | 1 | 48 | 100 lb | 90 |
| tomatoes | 35–65 plants | 18–36 | 125 lb | 70 | |
| turnips, greens | ¼ oz | ¼–½ | 2–3 | 50–100 lb | 50 |
| turnips, roots | ¼ oz | ¼–½ | 2–3 | 50–100 lb | 60 |
| watermelons | ½ oz | 1½ | 48–72 | 60 fruit | 85 |
Maintenance
Mulching
A mulch is any material used to cover the garden soil’s surface to protect plant roots from heat, cold, or drought, to keep fruit clean, or to control weeds. Mulches help to make more attractive, higher-yielding vegetable gardens.
Garden mulch changes the environment where the plants are growing, resulting in better plant growth and higher yields. When deciding to use a mulch, weigh the advantages against possible disadvantages, cost, and availability of a particular mulching material.
There are many types of mulching materials, but they can be divided into two general categories: natural and synthetic. Natural mulches are organic materials, such as straw, hay, compost, composted bark, paper, or pine needles. Synthetic mulches are plastics, rubber, and landscape glass.
Natural Mulches
Natural mulches consist of organic plant and/or animal residue or by-products. They are generally spread over the ground surface around established plants or over the entire growing area in a layer 2 to 5 inches deep. Composted sawdust, bark, wood shavings, leaves, grass clippings, rice hulls, ground corncobs, and composted animal manures may also be used. Pine needles, hay, and straw are light and airy, so a 4- to 5-inch-deep layer is needed for them to be effective.
Most natural mulches have some fertilizer value and are good soil conditioners when worked into the soil. They improve both the physical and chemical properties of soil. The organic matter incorporated into the soil improves water-holding capacity, nutrient availability, and soil aeration.
Some mulching materials, such as pine needles, peat, and oak leaves, are acidic and lower the soil pH once they are tilled into the soil. Soil testing and liming, as recommended, can counteract the acidification of soils.
Finely ground peat moss makes a poor mulch. It is easily blown around by wind and becomes almost water repellent when dry. Peat is best used to improve soil organic matter content, moisture-holding capacity, and structure by mixing it with the soil.
Organic mulches are summer mulches since most of their advantages are realized in hot weather. A summer mulch protects soil from compacting rains, foot traffic, drying winds, and heat. It also controls weeds by excluding light from germinating seeds and seedlings. Mulches prevent some weed problems, reducing competition for light, water, and nutrients.
By reducing soil moisture loss, mulches reduce the need to water, and garden vegetables suffer less in dry periods. Organic mulches also increase the water absorption rate of soils. The reduced soil temperatures under organic mulches encourage root growth in the upper soil layer where there is more oxygen and fertilizer.
Mulch also reduces soil erosion and keeps soil from splashing on vegetable leaves and fruit during rains or sprinkling. This can reduce losses to some diseases such as early blight.
Apply organic mulches to warm-season vegetables when the soil has warmed sufficiently for good plant growth and when plants are large enough that they won’t be covered. Keep the soil free from weeds until summer mulch can be applied. Mulching warm-season vegetables too early in the growing season makes them susceptible to frost injury by preventing soil warming and insulating plants from any warmth in the soil.
Organic mulches are beneficial when applied to cool-season vegetables like broccoli, cabbage, and English peas in midspring. They help prevent rapid soil warming and drying and extend the growing and harvest periods.
Some organic mulches require changes in garden fertilization methods. Sawdust, wood shavings, and ground corncobs are low in nitrogen. As they decompose, nitrogen is drawn from the soil, causing a nitrogen shortage in the mulched vegetables. To prevent this, add ¼ pound of 34-0-0 or its equivalent to each bushel of sawdust, shavings, or corncobs before applying. When it is time to side-dress, pull the mulch back from plants and apply fertilizer to the soil surface. With sawdust, compost, or bark, apply fertilizer to the mulch surface and water it in.
Always remember that dry mulch may catch fire.
Synthetic Mulches
Plastic mulches are springtime mulches. They help warm the soil (permitting early planting), promote rapid growth, allow early harvest, and control weeds.
Plastic mulches reduce soil moisture loss and protect fruits and leaves from soilborne diseases. Black plastic is the most used synthetic mulch. It is widely available, relatively inexpensive, and comes in various widths and lengths. Use 11/2-mil (0.0015 inch) thick plastic.
Use clear plastic mulch only when the soil has been fumigated to kill weed seeds. Clear plastic warms soil more rapidly than black plastic, but weed seeds germinate under clear plastic.
Warm-season vegetables like cucumbers, melons, squash, tomatoes, peppers, and eggplant grow better and produce more when grown on black plastic mulch than on bare soil. Transplants can be set through plastic mulch by cutting round holes with a sharpened bulb planter. Use the same tool to plant seeds of widely spaced vegetables like squash and melons.
While frequently used with warm-season vegetables, plastic mulch can be used with cool-season vegetables like cabbage, broccoli, and cauliflower to promote early growth. Plastic mulch is not used with vegetables that are closely spaced in the rows.
Black plastic mulch can also be used with plastic row tunnels to further promote early growth and harvest.
Applying Plastic
Prepare the soil completely before applying a plastic mulch. Incorporate fertilizer and lime, remove weeds and debris, and break up large clods. Rake the soil to prepare a smooth, level surface. Make sure the soil contains a good supply of moisture before being covered.
Plastic that is 3 to 4 feet wide is best for covering a standard garden row. Select a time to apply plastic mulch when there is little or no wind. Bury one end of the plastic and unroll it down the row. Get the plastic as straight as possible and in contact with the soil surface. Then, bury all edges to keep wind from getting under it and causing tears.
If you have a small garden that is less than 4 feet wide, use large sheets of black plastic to cover the whole area rather than covering individual rows. Be careful when stepping on wet plastic, as it can be slippery.
Soils lose less moisture from evaporation with plastic mulches, so you won’t need to irrigate as often. In prolonged dry periods and with vegetables that are in the garden for a long time, supplemental water becomes necessary. Because plastic keeps rain and sprinklers from irrigating the crops, you will need to irrigate the plants using other methods, such as drip irrigation or hand watering into the holes around each plant. The easiest way to irrigate with plastic mulch is to install a drip irrigation system or lay soaker hoses on the surface of the rows before covering them with plastic.
Because plastic mulch protects soil from leaching rain, the soil needs less fertilizer. When additional fertilizer is required, apply it through the planting holes and upside-down “T” slits cut at intervals into the plastic.
Although plastic warms the soil in spring, it can have disadvantages in summer. Excess heat can build up under the plastic, and high soil temperatures can injure plant roots and reduce yields. Rather than remove the plastic and lose the advantage of weed control, cover the plastic with pine needles, hay, or similar organic mulches to provide shade where the crop foliage does not.
Another technique is spraying black plastic mulch with white latex paint after an early crop to reduce the buildup of excess heat under the mulch during the summer. This will make it useful for summer and fall vegetables. The light-colored surface reflects much of the heat, and the other benefits of the mulch remain. At the end of the season, remove the plastic because it will not decompose in the soil as organic mulches do.
Newspaper
Newspaper is an organic material, but as a manufactured product it may be thought of differently from other organic mulches. Newspaper makes a good mulch when you use a thickness of several sheets. Hold newspaper to the soil surface with soil, sticks, rocks, or coat hanger wires.
Some gardeners use a thin layer of pine needles to hold the newspaper down. Apply a newspaper mulch after plants are established. Like other organic mulches, newspaper decomposes rapidly and adds organic matter to the soil.
Watering
Vegetable gardens usually need about 1 inch of water (630 gallons per 1,000 square feet) per week during the growing season. Gardens in sandy soil may need as much as 2 inches of water per week in midsummer.
Mulches that slow soil surface evaporation can reduce the amount of water needed. Soaker hoses and drip or trickle irrigation systems wet only the soil in the root zone and can cut the amount of water needed in half.
Adequate soil moisture is important for seed germination, uniform growth, and productivity. The most critical periods for adequate moisture are during seed germination, early growth, flower and fruit development, and root enlargement of root crops, and immediately following transplanting.
Sprinklers
There are several choices of garden sprinklers, ranging from the simple garden hose with a spray nozzle to semi-automatic equipment. Many portable lawn sprinklers are adequate for the garden. Adjust the rate of water application so that it is not faster than it can enter the soil. Water applied too rapidly runs off, resulting in erosion or puddles and causing soil compaction.
Place the sprinkler where plants will not interfere with the pattern of application. This often means mounting the sprinkler above the tops of the plants where wind may affect the distribution pattern. Place small cans throughout the garden to measure the amount of water applied and show the overlap necessary to approach an even application of water.
Since overhead sprinklers wet plant leaves, water early enough in the day to allow time for leaves to dry before night. This helps keep leaf diseases from developing and spreading. Each watering should wet the top 3 to 5 inches of soil.
Drip Irrigation
Soaker or perforated plastic hoses are excellent for watering the garden. Place the hose with holes up along one side of the plants or underneath an organic or plastic mulch.
Drip irrigation systems are available online and through mail-order catalogs, magazine ads, and local distributors. These systems usually consist of a supply line that connects to a garden hose and delivery tubes that are placed next to the plants. A 150-mesh filter is recommended to prevent clogging small pores and emitters. The systems operate at low pressure and deliver small amounts of water very slowly through pores in the delivery tubes or emitters punched into the delivery tubes.
Correct use of a drip irrigation system should keep vegetable plants actively growing in dry periods yet cause no problem when rain occurs following irrigation. The system, when properly operated, keeps soil at the base of the plant (root zone area) moist. This may require operating the system for short periods three or four times a week during dry weather. Never allow the soil to dry completely. Drip irrigation, when used correctly, prevents drought stress but is not designed to correct drought stress like sprinkler irrigation, which wets all the soil.
Single drip lines will not adequately water wide-row or raised-bed gardens, but several spray heads are available that do a good job in these special types of gardens when fitted to the drip irrigation delivery tube.
Drip irrigation systems have many advantages:
- Reduces water use by half or more.
- Water is placed where it is needed: at the base of plants and not in walkways.
- Large gardens can be watered all at once.
- Harvesting, cultivating, spraying, and other garden chores can be done while watering.
- Keeps plant leaves dry.
The major disadvantage of a drip system is the initial cost.
Insect Identification and Control
The average home vegetable garden may contain more than a dozen different types of vegetable crops, and each of these crops may be attacked by several different species of insects. Being able to manage and control these insect pests is one of the keys to successful vegetable gardening.
Insect pests can damage vegetables in several different ways. Pests like tomato fruitworms, cowpea curculios, stink bugs, and pickleworms cause direct damage by feeding on the fruit. Pests like tobacco hornworms, which feed primarily on the leaves, or aphids, which suck sap from the plant, cause indirect damage. Even though the fruit is not damaged directly, the plant’s ability to produce fruit can be reduced if it loses enough leaf area or sap. Pests like thrips and bean leaf beetles also can cause damage by transmitting plant diseases. In addition to the direct damage they cause, pests like corn earworms and cowpea curculios also contaminate food.
Even though many different species of insect and mite pests can occur in home vegetable gardens, they do not usually all occur at one time, so you probably will not have to “spend the summer spraying bugs” to have a successful garden. Many methods besides insecticide sprays can manage insect populations and keep them from reaching levels where insecticide sprays are necessary. Many of these methods are passive, requiring relatively little effort from the gardener, and many are things that you will do anyway if you want to grow a vigorous, productive crop.
Sometimes insect pest populations will reach damaging levels and you will need to treat them with insecticides. Apply these treatments only to the crop (or crops) being attacked. Rarely will you need to apply a broadcast treatment of insecticide to every crop in the garden. In fact, doing so can be counter-productive, causing pest problems that you otherwise would not have had. This is because unneeded insecticide treatments can destroy beneficial insects, allowing the pests that they were keeping in check to increase in numbers.
However, there are situations when repeated insecticide treatments may be needed to adequately protect certain crops. This is especially true when you are trying to produce a crop when pest populations are especially high (because of the time of year or planting location).
For example, yellow squash are very likely to experience heavy infestations of squash bugs and squash vine borers when grown in midsummer to fall. When grown in the same location year after year, southern peas are likely to experience heavy infestations of cowpea curculios if you do not apply timely insecticide treatments. Fall tomatoes normally experience heavy infestations of stink bugs and tomato fruitworms. There are many other examples, and experienced gardeners quickly learn which pests are especially troublesome in their area and when to expect these pests.
Common Garden Insect Pests
Insects damage plants by eating the foliage, boring in stems or roots, sucking plant juices, and attacking fruit. The type of damage caused by a particular insect depends on the type of mouthparts the insect has. Pest insects can be classified as having one of two different types of mouthparts: sucking or chewing.
The following two sections briefly discuss some of the more common insect pests in these two groups. For more detailed information on insect management and control, see Extension Publication 2347 Insect Pests of the Home Vegetable Garden.
Sucking Insects
Insects that have sucking mouthparts inject saliva into plants and remove plant juices. The results of feeding may be on individual leaves and stems, or the whole plant may be affected, especially seedling plants. Sucking insects can deform fruit like peas and beans before the pod hardens. The following paragraphs describe examples of garden pests with sucking mouthparts.
Aphids or plant lice are soft-bodied insects that may be green, pink, black, or yellow. They remove the sap from leaves or stems, causing curled leaves and yellowish plants on many garden crops. They also can inject poisonous saliva or disease-causing organisms during feeding. Very large numbers of these insects can occur on cabbage, tomatoes, mustard, and peas. These insects secrete a sticky substance known as “honeydew,” which supports the growth of black sooty mold fungi. Although sooty mold fungi do not invade the plant, heavy buildup of sooty mold is unsightly and can interfere with photosynthesis.
Harlequin cabbage bugs overwinter as adults in old cabbage stalks, bunches of grass, or other areas that give protection. They are black with brilliant red or yellow markings. They suck sap from cabbage, collards, mustard, and turnips and cause the plants to wilt and die.
Stink bugs can be either brown or green. They give off an unpleasant odor when handled or crushed. Stink bugs are large, shield-shaped insects that may or may not have any distinguishing marks. They suck the sap from seeds in developing bean and pea pods, scarring the developing seed. In some cases, the punctured seed will not develop normally. The outside of the pod will be marked with a small, pimple-like structure at the puncture site.
Thrips are very small insects rarely more than ⅟₁₆ inch long. The insect is straw-colored with a pair of fringed wings. It damages plant leaves or flower buds by puncturing plant cells with its single, icepick-like mouthpart and feeding on the escaping sap. The feeding causes the leaves to curl and have a silvery appearance. The shoots of infested onions take on the same silvery appearance. To check for thrips, place a handkerchief between the rows and slap the plants toward the handkerchief, or pull one or two plants and shake them over an empty box. If the insects are present, you will see them on the white background.
Whiteflies are small, white insects commonly found on the undersides of leaves. When infested plants are disturbed, the insects flutter about. Both adults and immatures are damaging. They feed by piercing the tissue and removing plant sap. Whiteflies can occur in great numbers on plants like eggplant and tomatoes. Early detection is important to control this pest.
Chewing Insects
Insects with chewing mouthparts cut holes in leaves and fruit and bore into stems and fruit. The following paragraphs describe examples of garden pests with chewing mouthparts.
Ants are attracted to the garden for many reasons. Some feed on honeydew produced by aphids, some feed on decaying fruit, and some search for other insects. In many cases, ants are considered only a minor nuisance pest, but fire ants can inflict a painful sting. Control ants by controlling aphids, keeping fruit harvested, and using labeled fire ant baits around the perimeter of the garden (not in the garden).
Bean leaf beetles overwinter as adults in or near garden sites. They are ready to feed on young beans and southern peas as they emerge from the ground. Adult colors and markings can vary, but they are typically reddish to yellowish with a black band around the edge of the first pair of wings. Sometimes, but not always, they may have three or four black spots on their backs. However, there are numerous exceptions to this color pattern, and some specimens are red, solid tan, and even pink. You may overlook the beetles because they feed on the undersides of leaves. If disturbed, they will drop to the ground and hide. Adults eat small holes in the leaves. When treating for bean leaf beetles, be sure to apply insecticide to both the upper and lower leaf surfaces.
Blister beetles are gray, black, or striped, slender beetles about ¾ inch long. The adults eat the foliage of most garden crops, especially tomatoes.
Cabbageworms or cabbage loopers are pale green measuring worms with light stripes down their backs. Imported cabbageworms are velvety green. They make ragged holes on the undersides of leaves and bore into the heads of cabbage, collards, and related plants.
Corn earworms are green, pinkish, or brown with light stripes along their sides and on their backs. These worms reach a length of nearly 2 inches before they are ready to pupate. They attack corn at two different growth stages. In corn that has not tasseled, the worms will feed in the whorl, damaging new leaves as they form. Later, the adult moths are attracted to the new silks for egg-laying. After hatching, the young larvae will burrow into the ear and feed on kernels near the tip of the ear. Many gardeners do not bother with trying to control this pest in corn, preferring instead to simply discard the damaged portion of infested ears. However, this insect will also attack tomatoes, and heavy infestations can cause severe injury to this crop.
For control of earworms in corn during the whorl stage, directly spray into the whorl when you first note the damage. To prevent damage to the ears, apply insecticide when silks first appear. Make spray applications 3 to 4 days apart until the silks are dry. Treat the ear area of the stalk thoroughly. To provide as much protection as possible for bees, make applications in the early morning or late afternoon, and do not treat the tassel.
Cowpea curculio adults are secretive insects that are rarely seen. They are small and dark gray. The larvae, white, legless grubs, cause the most damage. It feeds on developing seeds within the pods of beans and peas and destroys their usefulness. To control cowpea curculios, apply a foliar spray when small pea pods first appear, and make a total of three applications at 5-day intervals.
Cutworm adults are dull-colored moths that are most active during the night. The worms are dull gray, brown, or black and may be striped or spotted. Cutworms feed at night and remain hidden during the day. They damage stands by cutting young plants at the soil line. Control cutworms by using aluminum foil or wax paper collars to protect young transplants. You can also use sprays containing permethrin to control cutworms and/or prevent injury.
Fall armyworm adults are dull-colored, night-flying moths. They usually do not appear in our area until the first part of June. Larvae will vary in color from light tan or green to nearly black, with yellowish lines down their sides. The larvae feed primarily on corn but will sometimes feed on peas, tomatoes, and beans. They infest the whorls of corn and can be found 1 to 2 inches deep in the whorl. It is difficult to get insecticides to the target, but direct sprays into the whorls.
Flea beetles are small with enlarged hind legs. They jump vigorously when disturbed. These beetles eat tiny, round or irregular holes out of leaves. The leaves often look as if they have been peppered with very fine birdshot. The beetles attack cabbage, eggplant, peppers, potatoes, spinach, sweet potatoes, tomatoes, turnips, and related crops.
Mexican bean beetles are short, yellow to coppery-brown beetles. When the insects are at rest, 16 black spots are visible on their backs.
The pickleworm and melonworm are similar in appearance but vary in their feeding habits. The pickleworm often enters the fruit from the ground side, causing the inside of the fruit to sour after air enters. It also tunnels in the vines. The melonworm rarely enters the vine. It feeds on the foliage more than the pickleworm. When mature, both worms are about ¾ inch long and range from whitish to green. Damaging populations are more likely to develop on late-planted crops. Start control procedures when young caterpillars are in and around blooms.
Seed maggots are small, white to dirty-white fly larvae. Seed attacked by this insect usually fail to germinate, or plants are weak and stunted. Infestations are usually most severe during wet, cool springs and on ground that is high in organic matter. If these conditions are present, delay planting until conditions are right for good germination and growth.
Serpentine leaf miner adults are tiny flies. Their maggots feed on the tissue between the upper and lower surfaces of leaves, causing slender, white, winding trails through the interiors of the leaves. They can severely damage beans, cucumbers, peas, squash, tomatoes, and other vegetables.
Squash vine borer adults are distinctly colored, wasp-like moths. The front wings are covered with metallic, olive-brown scales; the hind wings are transparent. The abdomen is ringed with red, black, and copper. Eggs are placed on leaves and stalks. Small larvae will bore into the plant from these locations, causing the runner to wilt eventually. As with all borers, this insect is difficult to control once it enters the plant because insecticides cannot reach the feeding site. Infestations are more common on pumpkins and late-planted squash, and weekly insecticide treatments are often required to protect these crops. Apply in late afternoon to protect bees.
Cucumber beetles, striped or spotted, damage several garden vegetables. Some of these are cucumbers, muskmelons, squash, and, to a lesser extent, beans and peas. The spotted cucumber beetle (SCB) is more of a problem on these latter vegetables than is the striped. They feed on leaves, tender stems, and, in some cases, the root system. The larvae of the SCB damage seedling corn and are known as the southern corn rootworm. Use foliar sprays of carbaryl or other recommended insecticides to control adults.
Tobacco hornworm adults are large moths that feed on the nectar of various plants. They do not damage any portion of the plant, but the larvae can eat large amounts of foliage quickly, and larvae will occasionally feed on fruit. This worm is green with diagonal white lines located along its sides and a prominent horn at its tail. These insects are found on tomatoes, eggplant, peppers, and related plants.
Slugs are not insects. However, they can be annoying. These pests leave a trail of thick, sticky material over plant parts that will appear as a silver trail when dry. They feed on young foliage and low-lying fruit like strawberries. Slugs rest in moist, shaded areas during the day and become active at night. To control slugs, use methaldehyde or iron phosphate baits according to label directions. Be sure not to contaminate edible parts of plants. Trapping can be effective. Place wet burlap bags in your garden late in the afternoon. The next morning, look under the bags for slugs and destroy any you find.
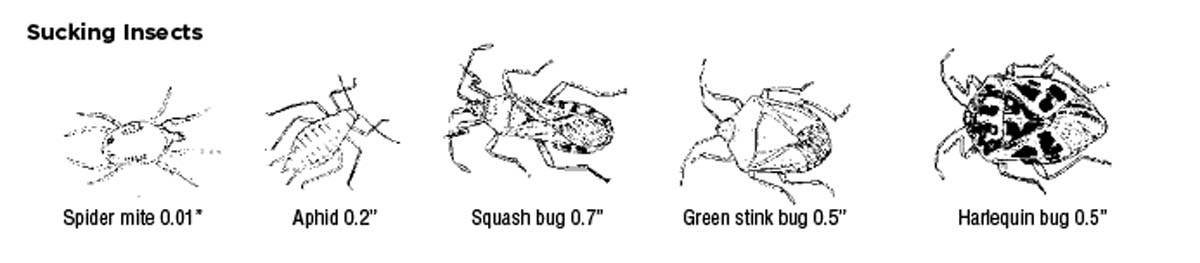

Insecticides for the Home Vegetable Garden
This section provides general information about commonly used garden insecticides. See Table 4 on page 24 for specific pest/insecticide recommendations.
Use insecticides safely!Before using any insecticide, always be sure to read the label carefully and follow all label directions regarding personal protective equipment and instructions for mixing and applying the product. The label is the law, and the directions it specifies are designed for the safety of the applicator, the environment, and those using the area. Handle insecticides with the respect they deserve. They are poisons, and excessive exposure can result in acute and/or chronic health problems.
Be sure the insecticide is labeled for use on the vegetable being treated. Few insecticides are labeled for use on every vegetable crop grown in the garden. Before applying an insecticide to a particular crop, be sure to read the label and verify that the product is labeled for use on that crop.
Observe and follow the pre-harvest interval. The pre-harvest interval, or PHI, is the amount of time that must elapse between making an insecticide application and harvesting the crop. PHIs vary greatly depending on the insecticide being used and the vegetable crop being treated. For example, the PHI for carbaryl (Sevin) is 3 days on tomatoes, 7 days on Irish potatoes, and 14 days on turnips. Failure to observe PHIs can result in the consumption of excessive insecticide residues.
Specific Insecticides
* indicates insecticides that are suitable for use in organic gardens.
Malathion is a long-time standard insecticide for home vegetable gardens. It controls a wide range of pests and is labeled for most vegetables. It is especially useful for controlling aphids, “bugs,” and certain beetles.
Bt kurstaki*: Bacillus thuringiensis is a bacterium that produces compounds that are toxic to certain insect species. There are different species and strains of this bacteria that produce different toxins. Bt kurstaki produces a compound that is toxic to certain caterpillars but has no effect on other insect species. Thuricide is one of the more common brand names for this product. It is most effective against leaf-feeding caterpillars like loopers and diamondback moths.
Spinosad* is a microbial insecticide that is very effective against a number of different caterpillar pests. Two commonly available brand names that are labeled for use on many different vegetable crops are Green Light Spinosad Lawn and Garden Spray and Fertilome Bore, Bagworm, Leafminer, and Tent Caterpillar Spray. Spinosad is very effective against most caterpillar pests, but it is not effective against most other types of insects. However, it is also effective against thrips, leaf miners, and Colorado potato beetles.
Insecticidal soaps* are potassium salts of fatty acids. They control insects that they contact by disrupting cell membranes. They are most effective against soft-bodied pests like aphids, mites, and thrips. Thorough coverage of the pest is necessary to achieve control. Insecticidal soaps have a short pre-harvest interval and are labeled for use on most vegetables. Safer Insecticidal Soap is an example of one brand name.
Neem oil* is a botanical product that is primarily useful against aphids, mites, and whiteflies. It is labeled for use on most vegetables and is sold under several brand names (Monterey 70% Neem Oil is one example). Thorough coverage of the pest is necessary to obtain control.
Azadirachtin* is an organic product labeled for use on all vegetables, with a zero-day PHI. Azatrol is the brand name most often used by home gardeners, but several other commercial formulations are available. Azadirachtin has activity against a wide range of insect pests but is most useful against soft-bodied sucking pests, such as whiteflies and aphids. Although azadirachtin and neem oil both come from the neem tree’s seed, they are not the same product.
Pyrethrin* or pyrethrum is a botanical insecticide that is used primarily by organic gardeners. This insecticide provides rapid knockdown of most insects, but insects often recover. Piperonyl butoxide (PBO) often is mixed with pyrethrin to act as a synergist. This increases the overall effectiveness and helps prevent pests from recovering, but piperonyl butoxide is not acceptable for organic gardening. Pyrethrin or pyrethrin + PBO is active against a wide range of insects, is labeled for use on most vegetables, and has a very short pre-harvest interval. However, its efficacy is limited by its very short residual activity.
Acetamiprid is especially effective against whiteflies and aphids and is labeled for control of many other pests. Ortho Max Flower, Fruit, and Vegetable Insect Killer is one common brand name. This product is sold as a ready-to-use spray and as a concentrate.
Pyrethroids are a group of relatively new synthetic insecticides that are modeled after the botanical pyrethrum molecule. These products are effective against a wide range of insect pests and are used at very low rates. The following pyrethroid insecticides are currently labeled for use in the home vegetable garden.
- Permethrin is one of the most useful insecticides for home vegetable gardeners. It can be used on a wide range of crops and controls a broad spectrum of pests. It also has shorter preharvest intervals than most other pyrethroid insecticides. Permethrin is readily available in most farm and garden stores and is sold under many different brand names (Bonide Eight Insect Control Concentrate; Hi-Yield Garden, Pet, and Livestock Insect Control; and Martin’s Vegetables Plus are three examples). Permethrin is effective against many beetle, bug, and caterpillar pests, but it is not effective against whiteflies and spider mites.
- Bifenthrin is an especially useful pyrethroid on crops for which it is labeled, but bifenthrin is not labeled for all vegetable crops. Ortho Bug B Gon Insect Killer for Lawns and Gardens is a commonly available brand name. Bifenthrin is somewhat less likely than other pyrethroids to trigger outbreaks of spider mites and aphids.
- Lambda cyhalothrin is one of the newer pyrethroid insecticides. Spectracide Triazicide Insect Killer for Lawns and Landscapes is the most common brand name. It is very effective against several different insect pests, but it is labeled for use only on a very few vegetable crops.
- Zetamethrin (zeta-cypermethrin) is sold as GardenTech Sevin Insect Killer. However, this product does not contain carbaryl and should not be mistaken for older formulations of “Sevin.” Zetamethrin is an especially useful insecticide for home vegetable gardens because it is labeled for use on most vegetables with a 1-day pre-harvest interval and is effective on most insect pests (but check the label for exceptions). Some crops have significantly longer PHIs, and this and other pyrethroids do not control some pests, such as aphids, whiteflies, spider mites, and certain caterpillar pests.
Applying Insecticides in Home Vegetable Gardens
You can choose from several different methods of applying insecticides to vegetables in your home garden. Dusts, ready-to-use sprays, and liquid sprays are three of the most common methods.
Dusts
A few insecticides are available for use as ready-to-use dust formulations (5% Sevin Dust and 0.25% permethrin are two examples). Dusts normally are applied using a shaker can—often the container the insecticide comes in is modified so it can be used as a shaker can—or a hand-powered, pump-type duster. Dusts have the advantage of being relatively convenient to apply, but they are generally less effective than sprays. It is also difficult to achieve thorough, uniform coverage with dusts, especially when using the shaker-can method of application. Also, many people consider dusts to be unsightly.
Ready-to-Use Sprays
Several insecticides are sold as ready-to-use (RTU) sprays that are labeled for use in the home garden. Permethrin, carbaryl, cyhalothrin, cyfluthrin, and neem oil are examples of active ingredients that are sold as RTUs. These products come in hand-pump spray bottles in which the product has already been diluted to its final-use strength. These RTU treatments are a very convenient way to apply spot treatments to individual plants. However, they are too costly to use on a large scale.
Single-Nozzle Hand-Pump Sprayers
Single-nozzle hand-pump sprayers are the most common method of applying insecticides in the home garden. They come in sizes ranging from 1 quart to 5 gallons, with 1 gallon being the most common size. They can be used to apply liquid concentrate, wettable powder, or wettable granule insecticides according to label directions. Here is an example of the directions that might appear on the label of a liquid concentrate: “Mix 1 tablespoon per gallon of water and spray to runoff, taking care to direct spray to undersides of leaves.”
Hand-pump sprayers are powered by pumping air into the headspace over the insecticide mixture. This compressed air then forces the insecticide spray through the nozzle when the spray valve is opened. Most hand sprayers have a nozzle that can be used to adjust the coarseness or fineness of the spray droplets. Be sure to thoroughly rinse the sprayer after each use.
To avoid crop injury, it is strongly recommended that insecticides not be applied with a sprayer that has previously been used to apply herbicide. It is best to dedicate one sprayer specifically for herbicide use and another for applying insecticides and fungicides. Label each sprayer clearly.
Caution!
- Be sure to read and follow all label directions.
- Note and observe the pre-harvest interval (PHI).
- Store insecticides in a safe, secure place where children cannot get to them.
- If you spill any of the insecticide on your body, wash with soapy water immediately. Wash all exposed skin after dusting or spraying.
- Wash all food before preparing or eating.
Table 4. Insecticides for home vegetable gardens.
| Crop | Pest | Insecticide (PHI)* |
|---|---|---|
| tomatoes | tomato fruitworm tobacco hornworm |
bifenthrin (1), carbaryl (3), cyhalothrin (5), malathion (1), permethrin (1), pyrethrins (0), spinosad (1), zetamethrin (1) |
| looper | Bt kurstaki (0), spinosad (1) | |
| stink bug leaf-footed bug |
bifenthrin (1), carbaryl (3), cyhalothrin (5), malathion (1), permethrin (1), pyrethrins (0), zetamethrin (1) | |
| spider mite | insecticidal soap (1), neem oil (NA) | |
| thrips | bifenthrin (1), carbaryl (3), cyhalothrin (5), malathion (1), permethrin (1), pyrethrins (0), spinosad (1), zetamethrin (1) | |
| whitefly | azadirachtin (0), acetamiprid (7), insecticidal soap (1), neem oil (NA), insecticidal oil (see label) | |
| leafminer | spinosad (1) | |
| aphid | azadirachtin (0), acetamiprid (7), insecticidal soap (1), neem oil (NA), malathion (1) | |
| peppers | aphid | azadirachtin (0), acetamiprid (7), insecticidal soap (1), neem oil (NA), malathion (3) |
| leafminer | spinosad (1) | |
| flea beetle | bifenthrin (7), carbaryl (0), permethrin (3), zetamethrin (1) | |
| European corn borer | permethrin (3), spinosad (1) | |
| thrips | malathion (3), permethrin (3), spinosad (1), zetamethrin (1) | |
| spider mite | insecticidal soap (1), neem oil (NA) | |
| pepper weevil | malathion (3), permethrin (3) | |
| eggplant | flea beetle | bifenthrin (7), carbaryl (3), malathion (3), permethrin (3) |
| Colorado potato beetle tortoise beetle |
bifenthrin (7), carbaryl (3), permethrin (3), spinosad (1), zetamethrin (1) | |
| okra | aphid | acetamiprid (7), azadirachtin (0), insecticidal soap (1), neem oil (NA), malathion (1) |
| stink bug leaf-footed bug |
bifenthrin (7), malathion (1), pyrethrins (0), zetamethrin (1) | |
| corn earworm | bifenthrin (7), spinosad (1), zetamethrin (1) | |
| looper other caterpillars |
Bt kurstaki (0), spinosad (1) | |
| corn | cutworm | bifenthrin (1), carbaryl (2), permethrin (1), zetamethrin (1) |
| chinch bug stink bug | bifenthrin (1), carbaryl (2), malathion (5), permethrin (1), zetamethrin (1) | |
| corn earworm fall armyworm European corn borer |
bifenthrin (1), carbaryl (2), malathion (5), permethrin (1), pyrethrins (0), spinosad (1), zetamethrin (1) | |
| squash, pumpkins | squash bug | acetamiprid (0), bifenthrin (3), carbaryl (3), malathion (squash–1; pumpkins–3), permethrin (1), pyrethrins (0), zetamethrin (1) |
| squash vine borer | acetamiprid (0), bifenthrin (3), permethrin (1), zetamethrin (1) | |
| pickleworm | bifenthrin (3), carbaryl (3), permethrin (1), zetamethrin (1) | |
| cucumber beetle | bifenthrin (3), carbaryl (3), malathion (squash–1; pumpkins–3), permethrin (1), zetamethrin (1) | |
| spider mite | insecticidal soap (1), neem oil (NA) | |
| melons | thrips | bifenthrin (3), permethrin (1), spinosad (3), zetamethrin (1) |
| cucumber beetle flea beetle | bifenthrin (3), carbaryl (3), malathion (1), permethrin (1), zetamethrin (1) | |
| leafminer | spinosad (3) | |
| looper | spinosad (3), Bt kurstaki (0) | |
| pickleworm melonworm | bifenthrin (3), permethrin (1), spinosad (3), carbaryl (3), zetamethrin (1) | |
| whitefly | azadirachtin (0), insecticidal soap (1), neem oil (NA) | |
| spider mite | insecticidal soap (1), neem oil (NA) | |
| beans (lima beans, snap beans, pole beans) | aphid | acetamiprid (7), azadirachtin (0), malathion (1), insecticidal soap (1), neem oil (NA) |
| spider mite | insecticidal soap (1), neem oil (NA) | |
| bean leaf beetle cucumber beetle Mexican bean beetle | bifenthrin (3), carbaryl (3), malathion (3), bifenthrin (3), zetamethrin (1) | |
| cowpea curculio | carbaryl (3), bifenthrin (3), zetamethrin (1) | |
| corn earworm lima bean pod borer other caterpillars |
bifenthrin (3), spinosad (3), zetamethrin (1) | |
| leaf miner | spinosad (3) | |
| stink bug plant bug |
malathion (3), carbaryl (3), pyrethrin (0), bifenthrin (3), zetamethrin (1) | |
| southern peas (cowpeas, field peas, black-eyed peas, crowder peas | aphid | acetamiprid (7), azadirachtin (0), malathion (3), insecticidal soap (1), neem oil (NA) |
| spider mite | insecticidal soap (1), neem oil (NA) | |
| bean leaf beetle cucumber beetle Mexican bean beetle | carbaryl (3), malathion (3), bifenthrin (3), zetamethrin (1) | |
| cowpea curculio | carbaryl (3), bifenthrin (3), zetamethrin (1) | |
| corn earworm lima bean pod borer other caterpillars |
spinosad (3), bifenthrin (3), zetamethrin (1) | |
| stink bug plant bug |
malathion (3), carbaryl (3), pyrethrin (0), bifenthrin (3), zetamethrin (1) | |
| sweet potatoes | armyworm looper |
spinosad (7), zetamethrin (1) |
| flea beetle cucumber beetle tortoise beetle | carbaryl (7), permethrin (7), zetamethrin (1) | |
| sweet potato weevil | carbaryl (7) Stored sweet potatoes may be treated with phosmet (Imidan dust) according to label. | |
| Irish potatoes | Colorado potato beetle | acetamiprid (7), spinosad (7), carbaryl (7), permethrin (7), zetamethrin (1) |
| blister beetle flea beetle |
carbaryl (7), permethrin (7), zetamethrin (1) | |
| potato tuberworm | spinosad (7), permethrin (7) | |
| leaf miner | spinosad (7) | |
| peas (English peas, sweet peas, snow peas) | aphid | acetamiprid (7), azadirachtin (0), malathion (3), insecticidal soap (1), neem oil (NA) |
| thrips | malathion (3), spinosad (3) | |
| caterpillar | spinosad (3), Bt kurstaki (0) | |
| leaf miner | spinosad (3) | |
| onions | onion thrips | malathion (3), cyhalothrin (14), insecticidal soap (1), zetamethrin (1) |
| turnips | aphid | azadirachtin (0), malathion (7), insecticidal soap (1), neem oil (NA) |
| vegetable weevil yellow-margined leaf beetle flea beetle |
malathion (7), carbaryl (14), spinosad (1), zetamethrin (1) | |
| looper diamondback moth | Bt kurstaki (0), spinosad (1) | |
| collards | aphid | azadirachtin (0), malathion (7), insecticidal soap (1), neem oil (NA), acetamiprid (7) |
| looper diamondback moth | Bt kurstaki (0), spinosad (1) | |
| harlequin bug stink bug | malathion (7), carbaryl (14), permethrin (1), zetamethrin (1) | |
| mustard | aphid | malathion (7), insecticidal soap (1), neem oil (NA) |
| looper diamondback moth |
Bt kurstaki (0), spinosad (1) | |
| vegetable weevil yellow-margined leaf beetle | malathion (7), carbaryl (14), zetamethrin (1) | |
| spinach | aphid | azadirachtin (0), malathion (7), insecticidal soap (1), neem oil (NA) |
| leafminer | spinosad (1) | |
| looper other caterpillars |
Bt kurstaki (0), spinosad (1) | |
| cabbage | aphid thrips |
acetamiprid (7), malathion (broccoli–3; cauliflower–7), insecticidal soap (1), neem oil (NA) |
| looper diamondback moth cabbageworm |
Bt kurstaki (0), spinosad (1) | |
| harlequin bug stink bug |
carbaryl (3), cyhalothrin (1), malathion (7), bifenthrin (3), permethrin (1), zetamethrin (1) | |
| broccoli, cauliflower | aphid | acetamiprid (7), malathion (broccoli–3; cauliflower–7), insecticidal soap (1), neem oil (NA) |
| looper diamondback moth other caterpillars |
Bt kurstaki (0), spinosad (1) | |
| harlequin bug stink bug |
carbaryl (3), cyhalothrin (1), malathion (broccoli–3; cauliflower–7), bifenthrin (7), permethrin (1), zetamethrin (1) | |
| Brussels sprouts | aphid | acetamiprid (7), malathion (7), insecticidal soap (1), neem oil (NA) |
| looper diamondback moth other caterpillars |
Bt kurstaki (0), spinosad (1) | |
| harlequin bug stink bug |
carbaryl (3), cyhalothrin (1), malathion (7), permethrin (1), zetamethrin (1) | |
| lettuce | aphid | azadirachtin (0), malathion (head lettuce–7; leaf lettuce–14), insecticidal soap (1), neem oil (NA) |
| caterpillar | Bt kurstaki (0), spinosad (1) |
Noninsecticidal Insect Management Methods
For every insect pest, there are many different species of predators and parasites that feed on that pest and help keep its population in check. If it were not for these naturally occurring predators and parasites, our gardens would be overrun with insect pests. You, as a gardener, must recognize the importance of this natural control and avoid disrupting it when possible.
Without question, naturally occurring biological control is the single-most important method of controlling insect pests.
By their very nature, insecticide treatments are disruptive to biological control because they kill beneficial insects, as well as pests. This is why you should avoid unnecessary insecticide treatments. Destroying naturally occurring beneficial insects can actually cause pest populations to increase.
However, do not let a fear of disrupting natural control keep you from making insecticide applications when they are needed. In the Southern garden, there will be times when pest populations escape natural control and reach damaging levels. Prompt, judicious use of insecticides can control pest populations and help prevent crop damage.
When selecting insecticide treatments, keep in mind that some insecticides are more disruptive of natural control than others. For example, Bt products control only caterpillar pests and are harmless to most beneficial insects, while broad-spectrum insecticides like permethrin are more disruptive. Still, there are times when you will need to use one of the broad-spectrum treatments to obtain control of a particular pest or pest complex.
Many cultural control practices can make plants more or less vulnerable to insect attack and/or injury. Healthy, vigorous plants are generally more resistant and more tolerant to damage by insect pests. Consequently, practices that promote good growth and plant health also help with insect management.
Because many species of insect pests complete several generations per growing season, with populations increasing substantially with each generation, early-planted crops often experience lower insect pressure than late-planted crops. This is especially important with crops like sweet corn, summer squash, and tomatoes.
Many insect pests also reproduce on alternate weed hosts and overmature vegetable plants that are left in the garden. So good sanitation practices, including weed control and prompt removal of plants that have ceased to produce, will help reduce insect populations.
Some varieties of a vegetable are less vulnerable to insect damage than other varieties of the same vegetable. So variety selection also can be an important insect management consideration. These are just a few general examples of how cultural control practices can influence insect populations.
“Hand-picking and foot-stomping” is one type of mechanical control that home gardeners can use successfully. In small plantings, you can control insects by physically removing individual insects or egg masses. Physically washing aphids from plant terminals with spray from a garden hose is another form of mechanical control.
You might also use floating row covers, which prevent insects from attacking or depositing eggs on young plants. Collars of wax paper or aluminum foil can protect young transplants from cutworm attack.
Reflective mulches are another useful mechanical control for certain pests. These are especially effective in preventing thrips from attacking young tomato and pepper plants and spreading virus diseases, particularly tomato spotted wilt virus.
Using plastic mulches instead of organic mulches helps reduce populations of certain pests because the plastic mulch provides less favorable shelter for pests like crickets and slugs. Commercially available pheromone traps or sticky traps also can help you control or monitor certain pest species.
Vegetable Diseases
Garden vegetables can be attacked by a wide range of fungi, bacteria, viruses, and nematodes. No single management measure is effective against all diseases caused by these microscopic pests, but some general disease management measures can reduce the overall level of disease that may occur:
- Plant varieties that are suitable for your growing region and that have resistance, if available, to diseases that commonly occur in your area.
- Purchase and plant disease-free (healthy-looking) transplants.
- Purchase or obtain seeds only from reputable sources and from plants that were not diseased the previous season.
- Use fungicide-treated seed.
- Plant seeds/transplants when weather conditions are optimal for seed germination and plant growth.
- Plant in an area that drains well and that receives adequate sunlight and good airflow.
- Practice crop rotation.
- Stake, trellis, or cage plants.
- Use mulch.
- Use practices that reduce the length of time that leaves remain wet.
- Avoid working with plants when wet.
- Clean and disinfect tools, equipment, and support structures between uses.
- Avoid movement of infested soil to non-infested sites.
- Remove diseased plant tissues or, in limited infections, entire plants.
- Remove weeds and volunteer plants.
- Use approved fungicides or biologicals (see Table 5).
- Remove and destroy or bury crop debris.
When combatting a specific disease, the first step in setting up a disease management program is to correctly identify the disease problem. Of course, the earlier the disease is identified, the better chance you have of successfully managing it. With quick action, you can successfully manage leaf spots, blights, and mildews within the same season. Other disease problems may not be treatable this season, but correct disease identification allows you to take preventive disease management measures next year.
Many garden vegetable diseases are easy to identify. For others, you may need the advice of someone more experienced, such as a county Extension agent or plant pathologist. A disease is best identified on plants that are less than 50 percent damaged. Dead plants make poor samples for disease identification and should not be used for this purpose.
Common vegetable disease symptoms and recommended management measures for those diseases are provided below. If you cannot identify a disease from these descriptions, contact or visit your county Extension office for assistance.
If it is necessary for a specialist to examine a physical sample to diagnose the problem, mail samples to the MSU Extension Plant Diagnostic Lab, 405 Garrard Rd. East, Mailstop 9612, Mississippi State, MS 39762. (Do not include the box number for carriers that do not ship to boxes.) Instructions on how to properly collect and package a disease specimen are available in MSU Extension Publication M1562 How to Collect and Package Plant Disease Specimens for Diagnosis. A completed Plant Disease Sample Submission Form (F1139) should accompany all samples submitted for diagnosis. Additional information, including current fees, is available on the Extension Plant Diagnostic Lab webpage (extension.msstate.edu/lab).
Additional information on diseases and nematodes that attack garden vegetables is available at your county Extension office and at extension.msstate.edu.
Diseases take their toll in Mississippi gardens every year, but adequate planning and following recommended disease management methods will keep losses to a minimum.
Specific Diseases and Management
Measures
Damping-Off
Seeds and seedlings of many vegetables are susceptible to damping-off pathogens when planted in infested soils. Seeds may fail to germinate, or seedlings may be attacked before or after emergence. Roots and stems of infected seedlings may begin to rot, and seedlings may collapse and eventually die. Manage damping-off by using fungicide-treated seeds, planting in well-drained areas when soil temperatures have increased, avoiding the excessive application of nitrate forms of nitrogen fertilizers, and rotating the location of the vegetables. It is also a good idea to inspect the roots of purchased transplants before planting them in your garden. Discard transplants with brown or sloughing roots.
Root Rot of Beans and Southern Peas
Root rot is severe on green beans, lima beans, and southern peas. The disease first appears as reddish or reddish-brown areas on stems and roots. As the disease advances, discolored areas expand until the entire root and lower stem are affected. Aboveground symptoms include stunting, yellowing, drooping of leaves, failure to produce normal pods, and plant death.
These management practices reduce losses from root rot:
- Use high-quality, fungicide-treated seeds.
- During cultivation, do not throw soil against plant stems.
- Plant in a 4- or 5-year rotation with other vegetables.
- Plant in well-prepared soils with a pH of about 6.5 that have been fertilized based on soil test results and treated for nematodes, if recommended.
- Plant seeds 1 inch deep only during favorable weather, in warm soils, and on top of a bed to avoid “drowning.”
Buckeye Rot (Tomatoes)
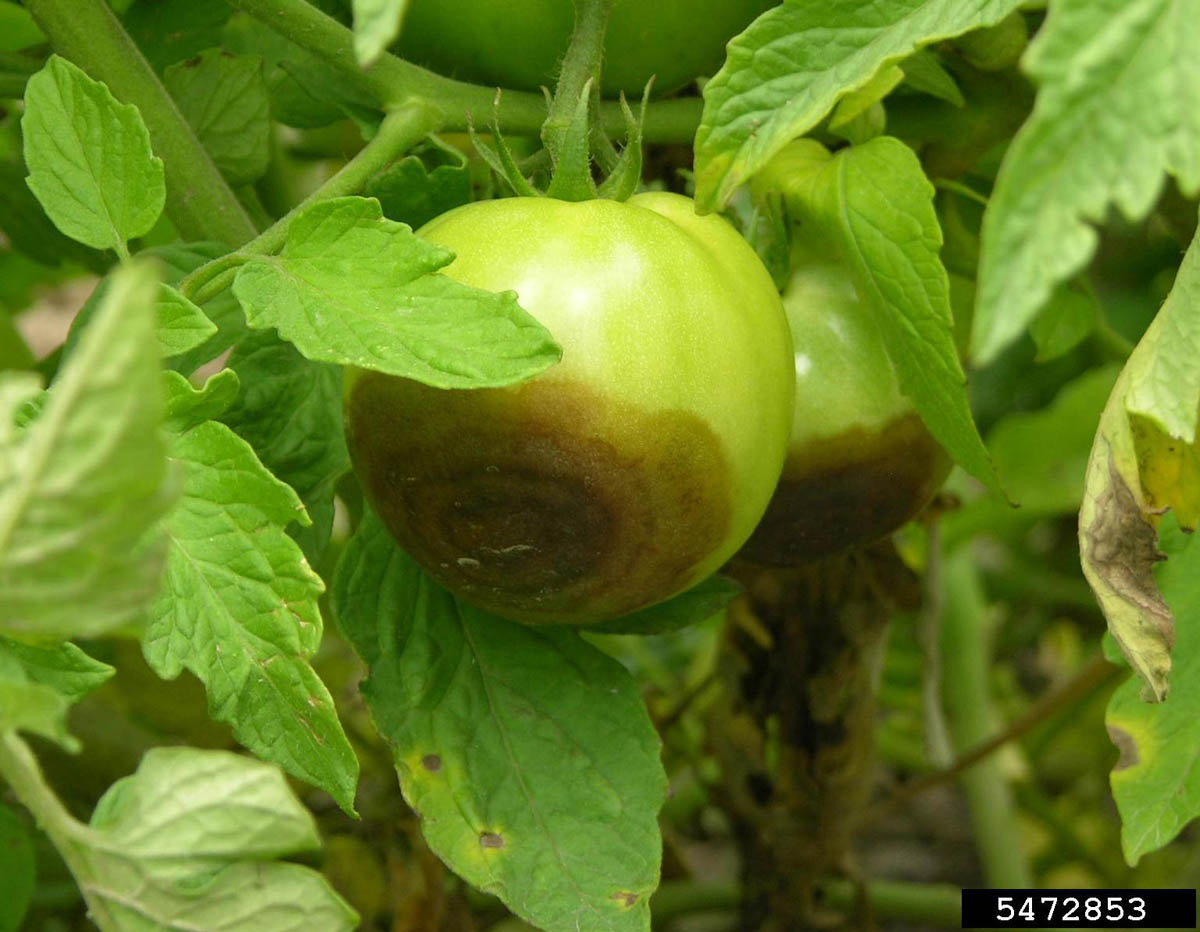
Symptoms of buckeye rot on tomato fruits. Credit: D. Ferrin, LSU AgCenter, Bugwood.org
Buckeye rot commonly occurs on tomatoes during periods of warm, wet weather. The pathogens that cause this disease are present in the soil and can infect fruits when they contact infested soil. This often occurs when soil is splashed onto low-hanging fruit during rains or overhead watering. Tomato fruits with buckeye rot develop a brown, oily-looking lesion that commonly contains alternating light and dark rings. This lesion can enlarge to cover much of the fruit. Buckeye rot is often confused with blossom-end rot, but blossom-end rot lesions are usually black and sunken and do not contain rings. The pathogens that cause buckeye rot in tomatoes can also cause a similar disease, called Phytophthora blight, in eggplants and peppers.
Buckeye rot and Phytophthora blight can be reduced using these management practices:
- Plant in well-drained soils.
- Remove and discard infected fruits.
- Rotate out of solanaceous crops.
- Stake or cage plants.
- Use mulch.
Early Blight (Tomatoes)
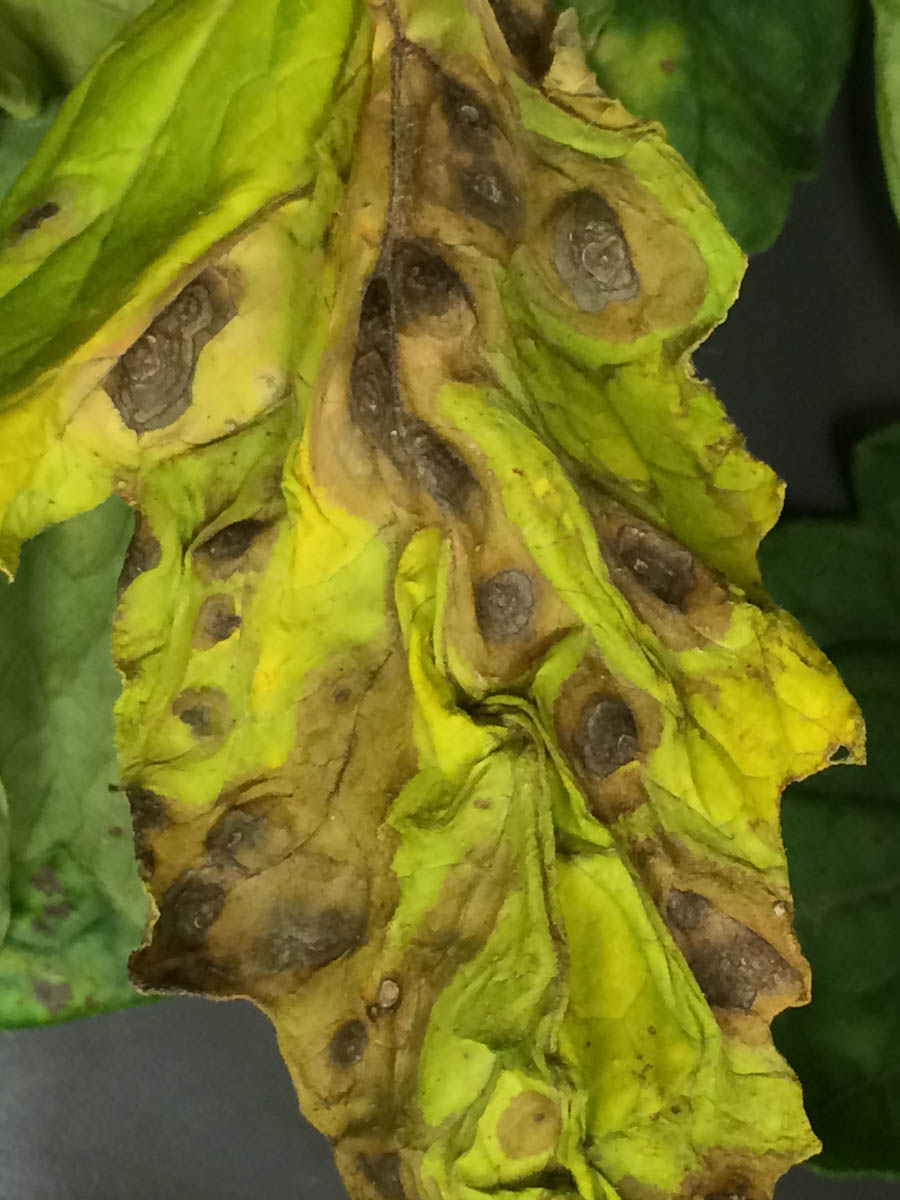
Symptoms of early blight on a tomato leaflet. Credit: R. A. Melanson, MSU Extension, Bugwood.org
Early blight is a common and major disease of tomatoes in Mississippi. Symptoms first appear on lower, older leaves as circular, brown lesions surrounded by a yellow halo. Lesions often contain rings. As the disease progresses, leaves turn yellow, wither, and drop. Frequently, only the upper half of the plant has green leaves, and in severe cases, the plant becomes completely defoliated.
Early blight also occurs on plant stems and sometimes on fruit. On seedlings, the disease may girdle the stem and give the appearance of damping-off.
Reduce losses to early blight by allowing for good air circulation and sunlight in plant canopies, reducing the amount of time that leaves remain wet (avoid overhead irrigation or apply water when leaves can dry quickly), planting in a location that did not have early blight the previous year, using mulch, removing and destroying diseased plant debris after harvest, and applying fungicides.
Applications of approved fungicides, such as chlorothalonil or mancozeb, at the appropriate times, can effectively manage early blight. There is no waiting period before harvest (PHI) after application of chlorothalonil, but there is a 5-day PHI after application of mancozeb.
Begin fungicide applications when plants are 8 to 10 inches tall and continue at 7-day intervals through the growing season. Applications of these fungicides also help manage some other leaf, stem, and fruit diseases of tomatoes.
Southern Blight
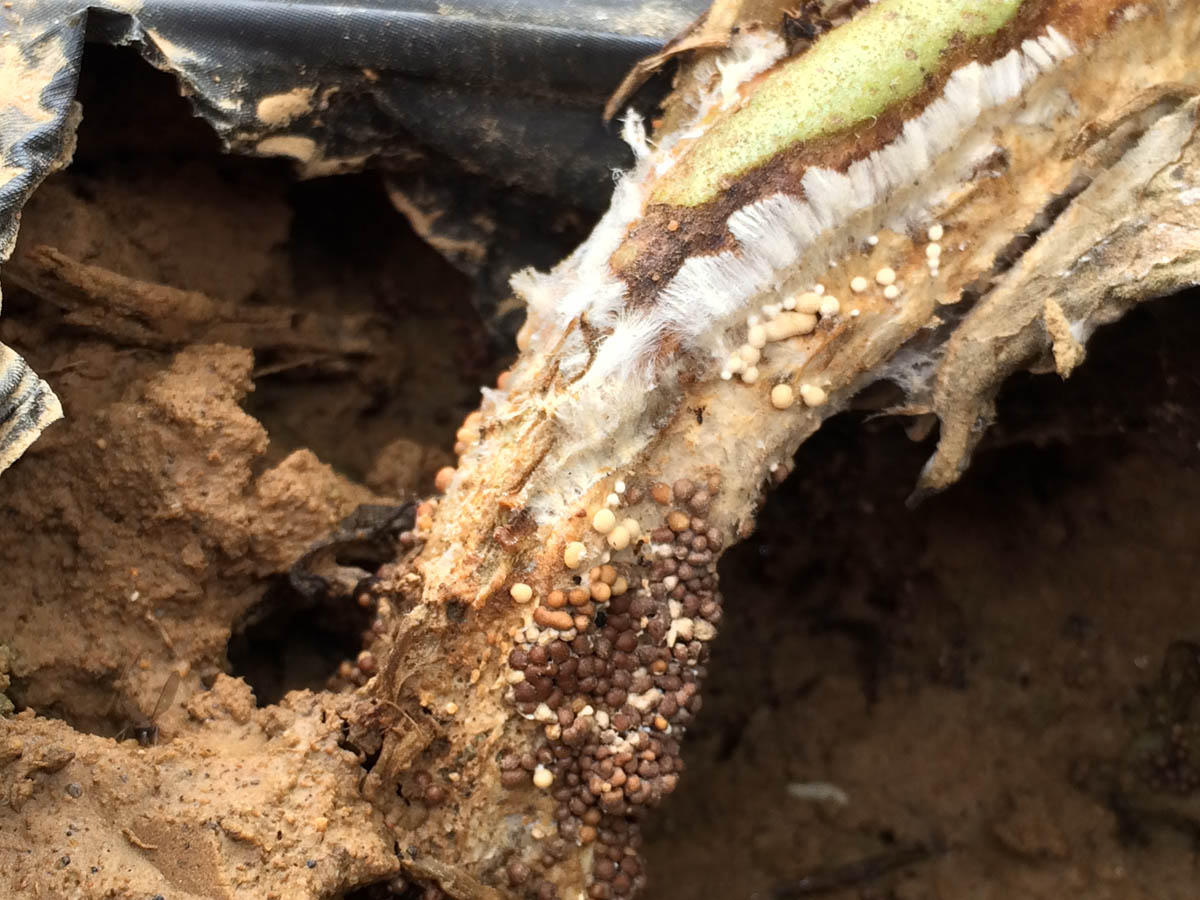
Signs and symptoms of southern blight on a tomato stem. Credit: R. A. Melanson, MSU Extension, Bugwood.org
Southern blight affects most garden vegetables. The fungus that causes southern blight attacks plant parts (roots, stems, leaves, or fruit) that are in contact with or just under the soil surface.
The first noticeable symptom of this disease in tomatoes and some other vegetables is usually an advancing yellowing and wilting of the foliage. During warm, moist weather, white fungal growth may develop on stems near the soil surface, on plant parts in contact with the soil, and on organic debris in the soil. Later, round, light tan to brown structures called sclerotia may develop. As the disease advances, several plants next to one another may become infected and eventually die.
Southern blight is difficult to manage, but losses can be reduced with these practices:
- Plow 6 inches deep in the fall to bury plant debris and sclerotia.
- Avoid throwing soil on plants when cultivating.
- When a few scattered plants are affected, remove them from the garden along with the soil 6 inches deep and 6 inches from the stem.
- Manage other foliar diseases as well as weeds; dead leaves on the ground and weed hosts may trigger pathogen growth.
- Wrap transplant stems with aluminum foil and plant so that the foil extends 2 inches below and above the soil line.
Fusarium Wilt
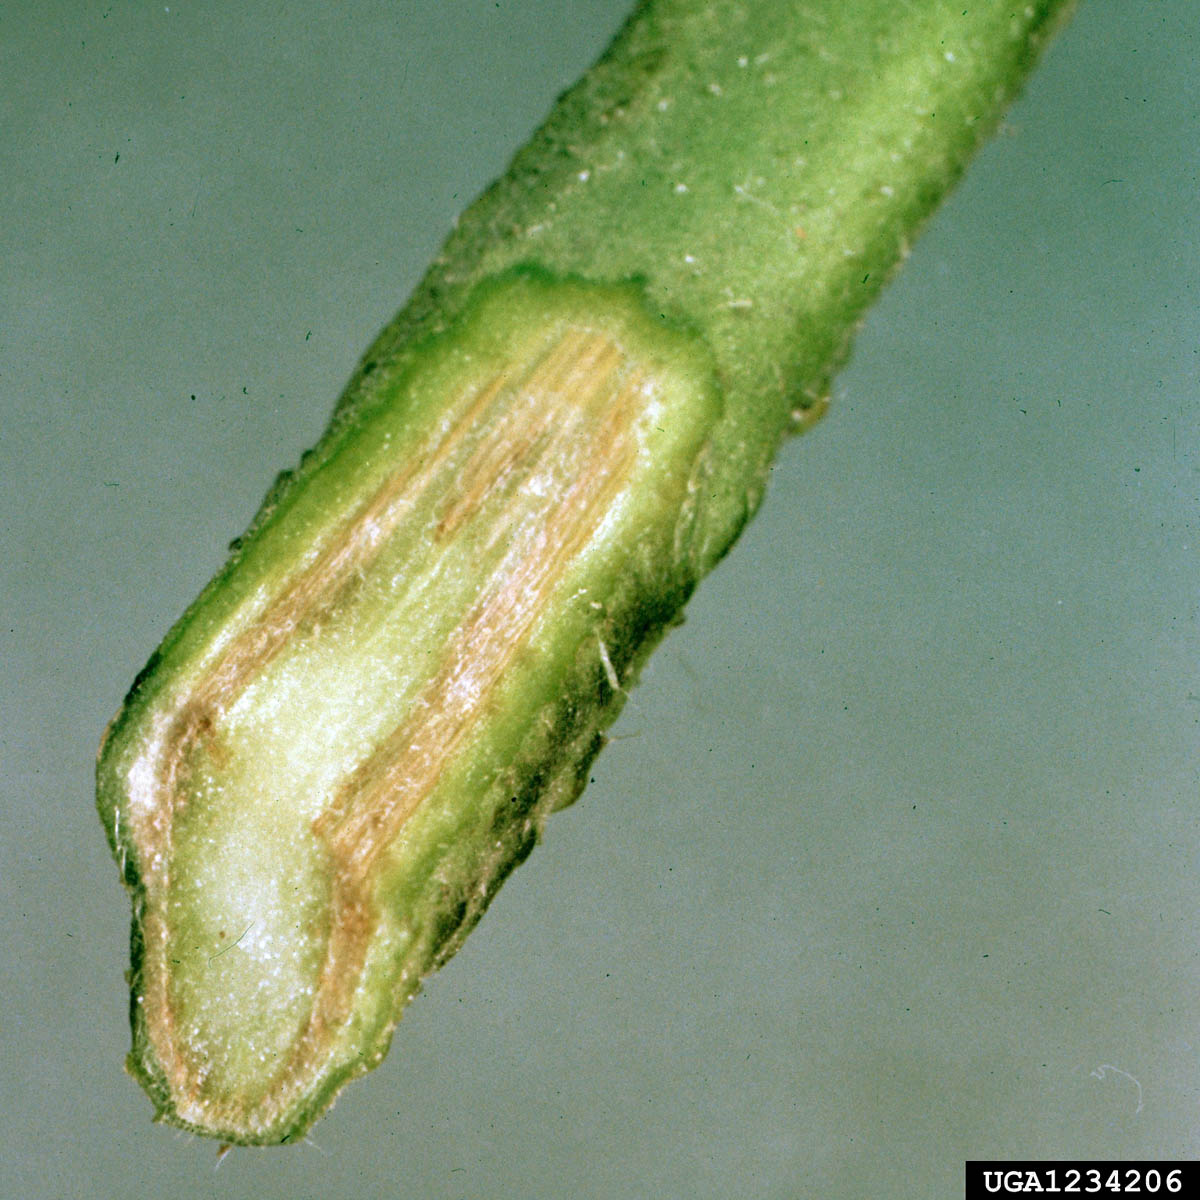
Vascular discoloration in a tomato stem with Fusarium wilt. Credit: Clemson University - USDA Cooperative Extension Slide Series, Bugwood.org
This fungal disease infects watermelons, cabbages, tomatoes, sweet potatoes, beans, and peas.
Lower leaves often turn yellow on one side of the plant only. Discoloration of the vascular tissue that originates from the roots is often visible when stems are split lengthwise. Infected plants are usually stunted and wilted.
The best way to manage Fusarium wilt is by using resistant varieties.
Bacterial Wilt (Tomatoes)
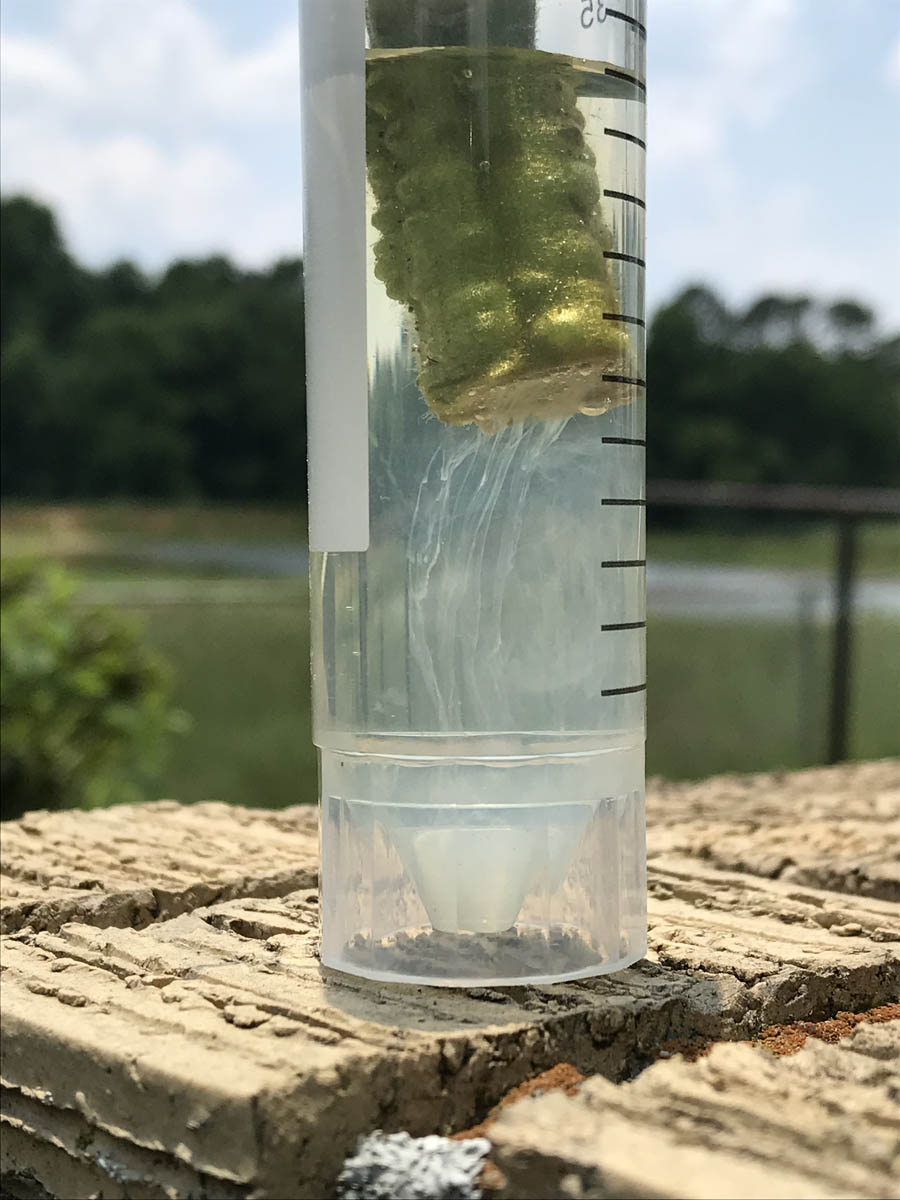
Bacterial streaming from the stem of a tomato plant with bacterial wilt. Credit: R. A. Melanson, MSU Extension, Bugwood.org
Bacterial wilt is a common disease of tomatoes in Mississippi. When temperatures increase in the summer, tomato plants infected with the bacterial pathogen suddenly wilt and do not recover. Wilting is the first symptom that is observed with this disease. A brown lesion may also be present at the base of the tomato stem. Discoloration of the vascular tissues may be observed in a cut stem. Bacterial streaming from a cut tomato stem suspended in a clear container of water is common and is often used as a quick field test to determine the presence of a vascular bacterial infection.
Management of this disease is difficult once the pathogen becomes established in the soil. Management practices to reduce the occurrence of this disease include using disease-free planting material, practicing crop rotation, removing and destroying infected plants, and practicing good sanitation.
Peppers may also be affected by the same pathogen that causes bacterial wilt in tomatoes.
Bacterial Wilt (Cucumbers)
This destructive disease is caused by a bacterium (different than the one that causes bacterial wilt in tomatoes and peppers) that overwinters in the bodies of adult striped and spotted cucumber beetles. As these beetles feed on young plants in the spring, bacteria are introduced into the vascular system where they multiply rapidly and produce a sticky material that stops the movement of water through the plant. As a result, leaves on an infected runner wilt rapidly. Within a short time, all runners may become permanently wilted. Plants can die within a week or two after initial symptoms appear. Yellowing is not normally associated with this disease.
A sign of bacterial wilt is a thick, white, sticky substance that oozes from the cut stem of a wilted vine. If you press your fingertip against the cut surface of a stem several minutes after cutting it and then slowly remove it, the bacterial ooze frequently remains attached and strings out in thin threads.
Since bacterial wilt-resistant cucumber varieties are not commonly available, the best management method is to keep cucumber beetle populations in check.
Anthracnose (Beans)
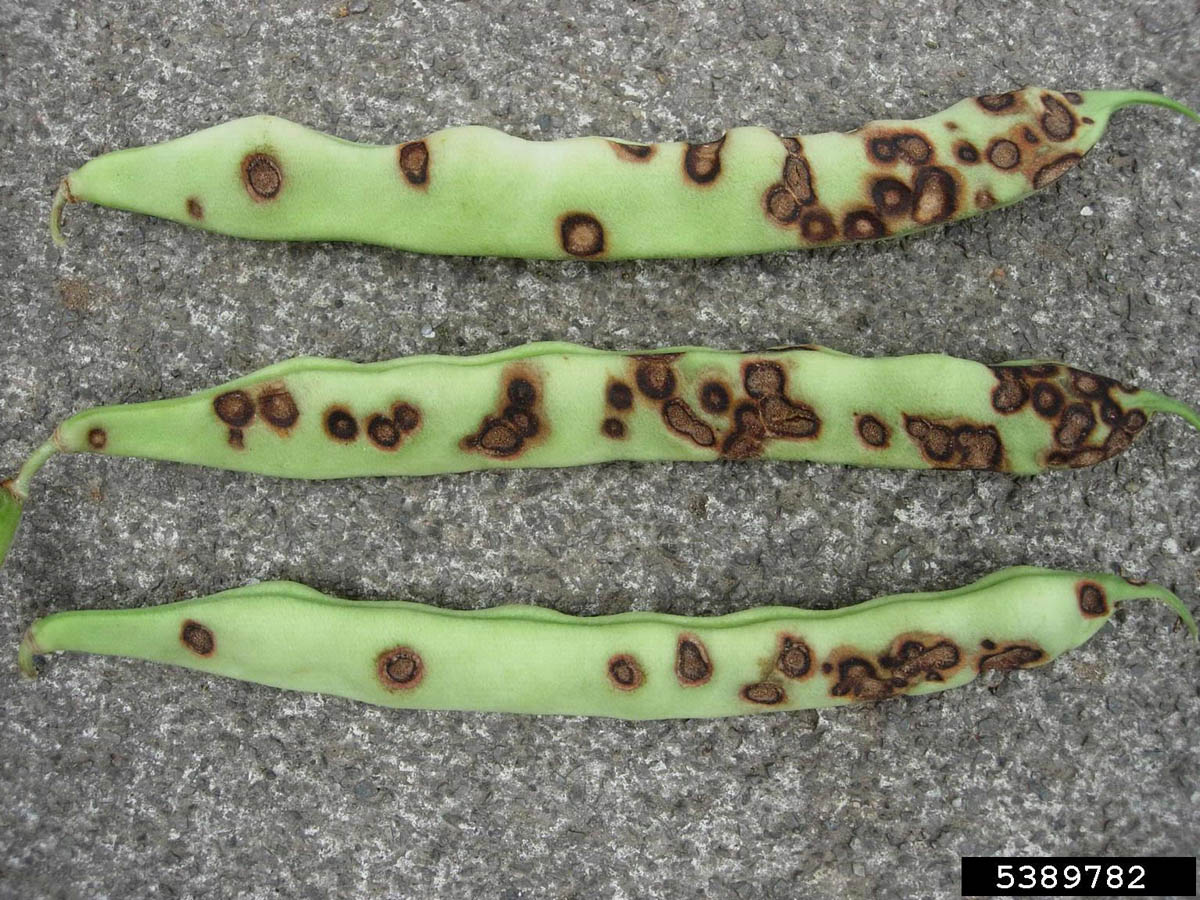
Symptoms of anthracnose on common bean. Credit: E. Bush, Virginia Tech, Bugwood.org
Anthracnose is a common disease of beans, including lima beans. Symptoms of this disease appear on pods as small, brick-red blotches. These blotches may spread over the entire surface of the pods. Later, the diseased areas become brownish to grayish and may have many tiny black specks, which are fruiting bodies of the fungus. Occasionally, diseased pods fall from the plant.
Brick-red streaking may occur along the veins on the underside of leaves and on young stems. Reddish spots occur on the lower leaf surface and enlarge and become noticeable on the upper leaf surface. Occasionally, leaves are killed and fall from the plant. Severely diseased plants are yellow and stunted.
Reduce damage from anthracnose by following these practices:
- Use only certified disease-free, western-grown seed.
- Practice crop rotation so that beans are not planted in the same location more than once in 3 years.
- Avoid planting beans in the fall in an area of the garden where anthracnose was a problem the previous spring.
- Apply approved fungicides according to label directions.
Mosaic Diseases
These virus diseases commonly infect beans, sweet corn, squash, melons, cucumbers, peas, peppers, and tomatoes. Symptoms include misshapen leaves with light and dark green areas; fruit with green specks, yellow and green mottles, or bumps; distorted fruit; and stunted plants.
Management of virus diseases is difficult. You can reduce the chance of mosaic diseases in these ways:
- Plant resistant varieties when available.
- Manage insect vectors.
- Remove weeds.
- Remove infected/diseased plants as they appear.
- Purchase certified transplants or buy western-grown seed.
- Do not use tobacco products when handling plants.
Phenoxy herbicides, such as 2,4-D, can cause damage that resembles symptoms of mosaic disease. Leaves and stems of plants damaged by phenoxy herbicides are typically twisted, deformed, curled, leathery, and excessively long and narrow.
Spotted Wilt (Tomatoes and Peppers)
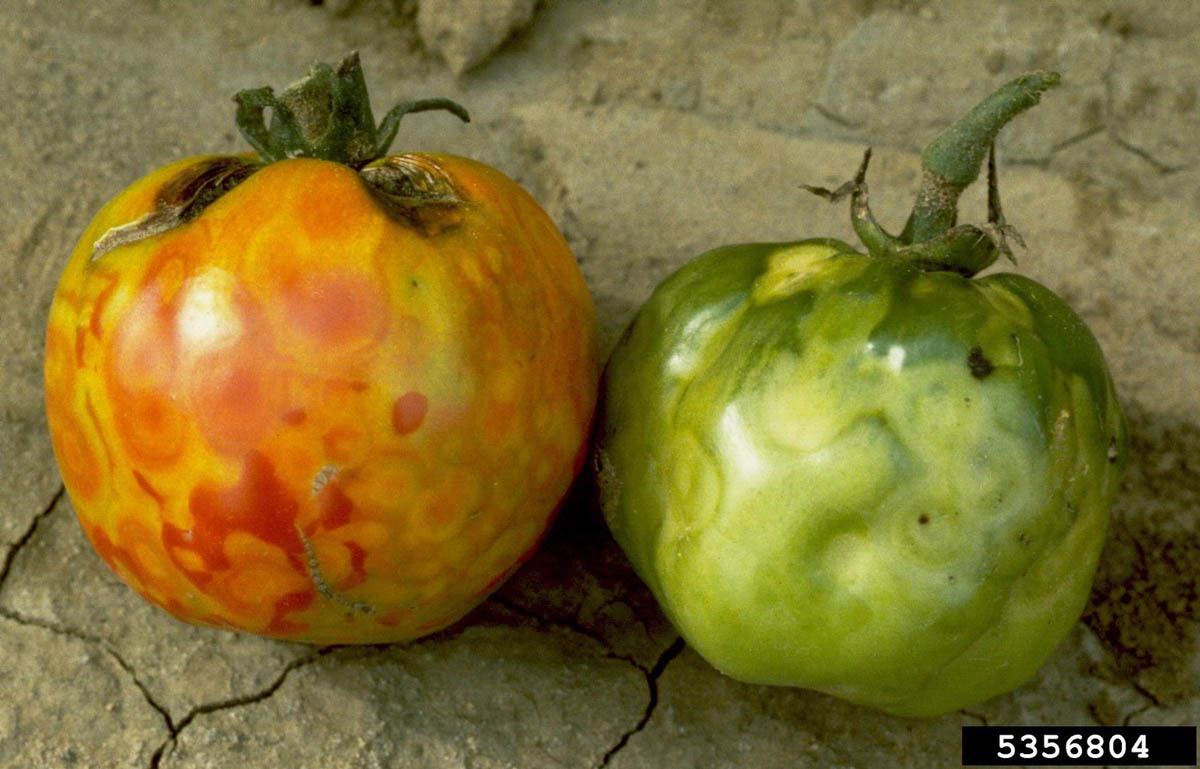
Symptoms of tomato spot wilt on tomato fruits. Credit: W. M. Brown, Jr., Bugwood.org
This virus disease is transmitted by several species of thrips and may kill plants or drastically reduce fruit-set. Fruits from diseased plants are generally small and distorted and often develop ring spots.
Initial symptoms appear as a thickening of veins on younger foliage. Younger foliage generally exhibits pronounced downward curling. Internodes become shortened, and immature fruit does not ripen. Dark purple streaks can occur on leaves, stems, and fruits. Other symptoms may include blighting and blackening of young shoots. On individual leaflets, small, dark, circular spots may appear. Heavily diseased leaves may turn dark and wither.
Try these management practices to reduce losses to tomato spotted wilt:
- Use resistant varieties.
- Remove and destroy diseased plants.
- Keep weed populations down in and around gardens to reduce movement of virus-carrying thrips from weeds to garden plants.
- Suppress thrips by applying approved insecticides.
Further suppress thrips with reflective mulch around tomatoes and other susceptible vegetables. Conventional black plastic may be painted with aluminum-colored paint. Oil-based paints adhere to plastic surfaces and are easy to apply. This technique works best when mulch is laid at planting and with other recommended management methods.
Powdery Mildew
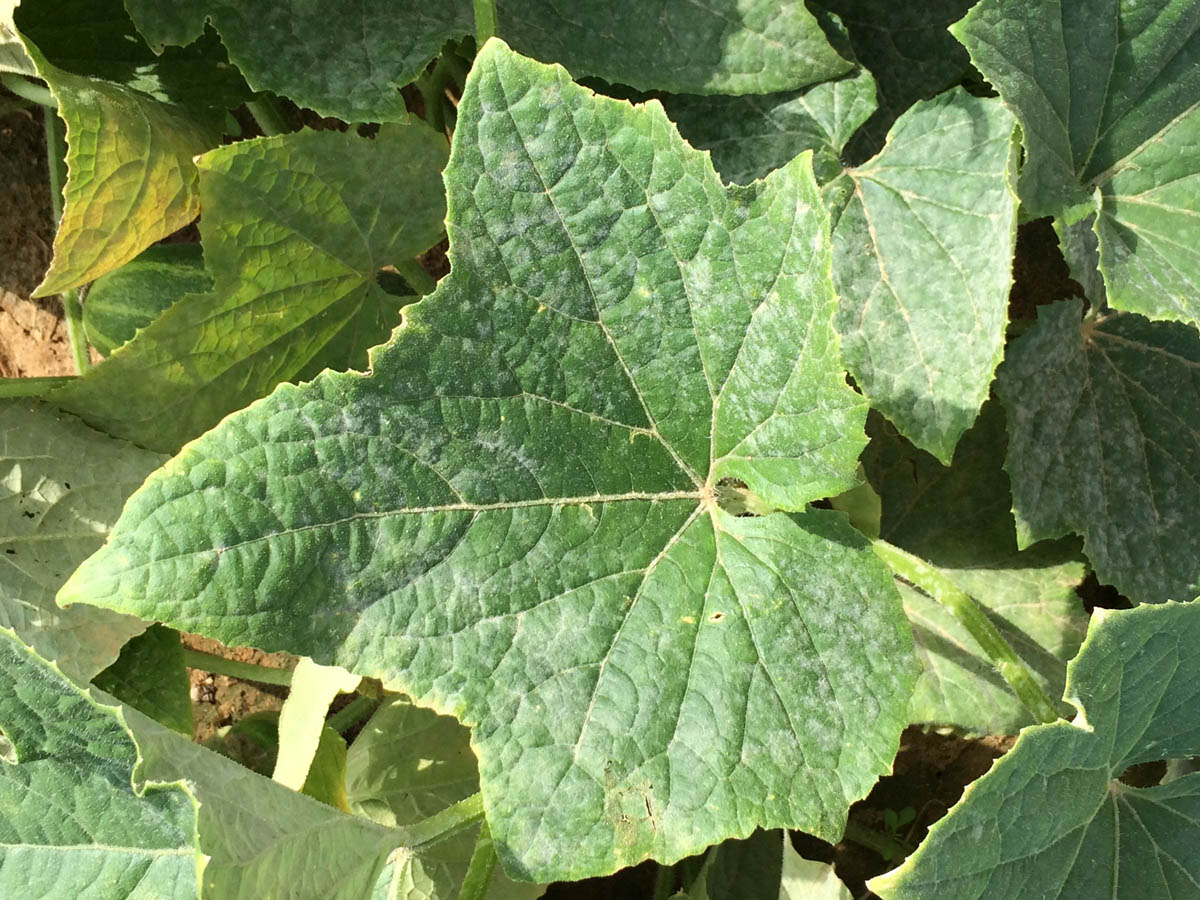
Signs of powdery mildew on a cucumber leaf. Credit: R. A. Melanson, MSU Extension, Bugwood.org
Powdery mildews are caused by fungal pathogens and are commonly visible as a white, powdery growth on leaves of cucumbers, squash, melons, beans, and English peas. Unlike other diseases that often develop during periods of frequent rainfall, powdery mildews can develop during dry periods.
Manage powdery mildew by using resistant varieties (cucurbits) and applying approved fungicides.
Downy Mildew
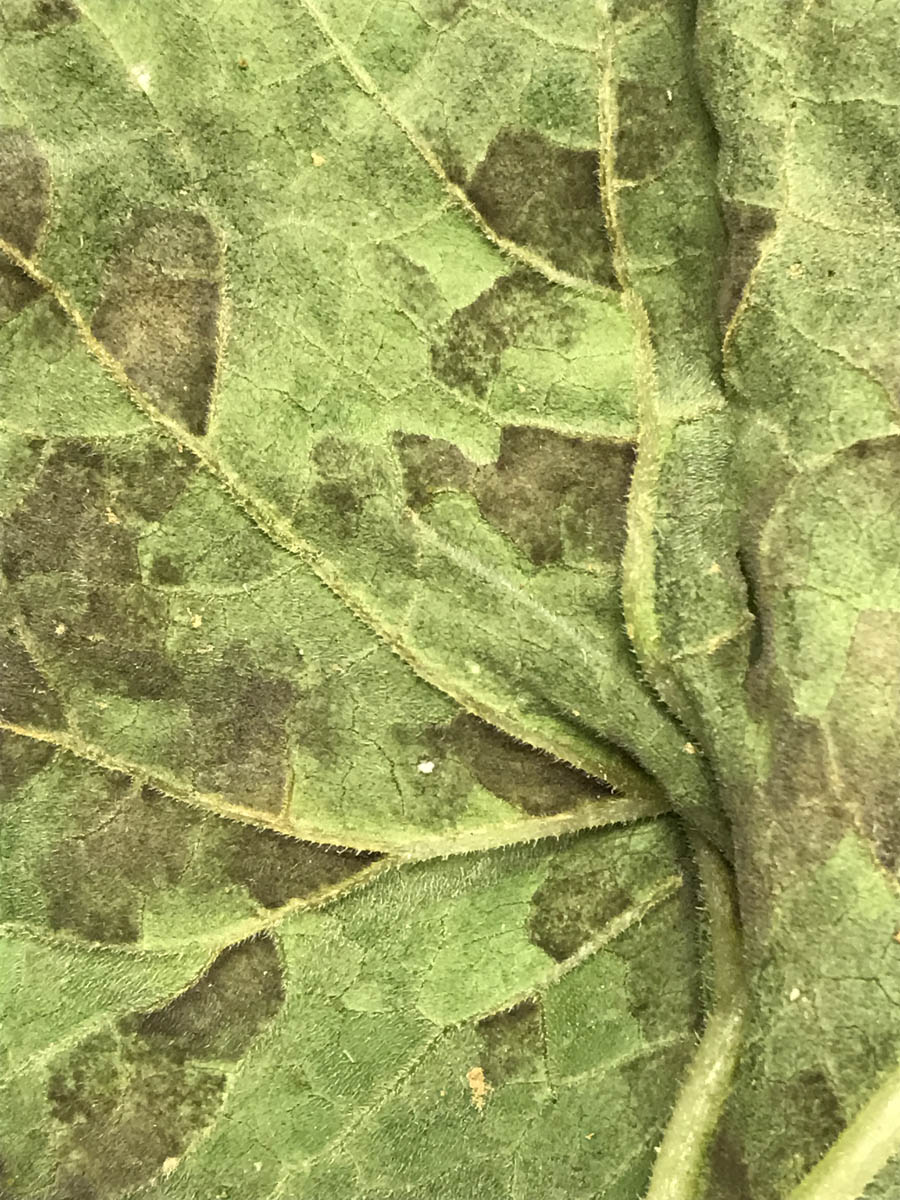
Pathogen growth on the underside of a cucurbit leaf with downy mildew has a downy appearance. Credit: R. A. Melanson, Bugwood.org
Downy mildews are caused by fungal-like organisms that are commonly called water molds. These diseases can occur on a variety crops, including cucurbit and cruciferous crops, lettuce, and basil. Symptoms vary depending on the host that is affected, but in most cases, visible pathogen growth that has a downy appearance can be observed on affected leaves when environmental conditions are favorable. Downy mildews commonly develop in cool, moist conditions.
Management of downy mildew will depend on the crop in question, but using resistant varieties, when available, and approved fungicides can help to reduce the occurrence of this disease.
Black Rot (Crucifers)
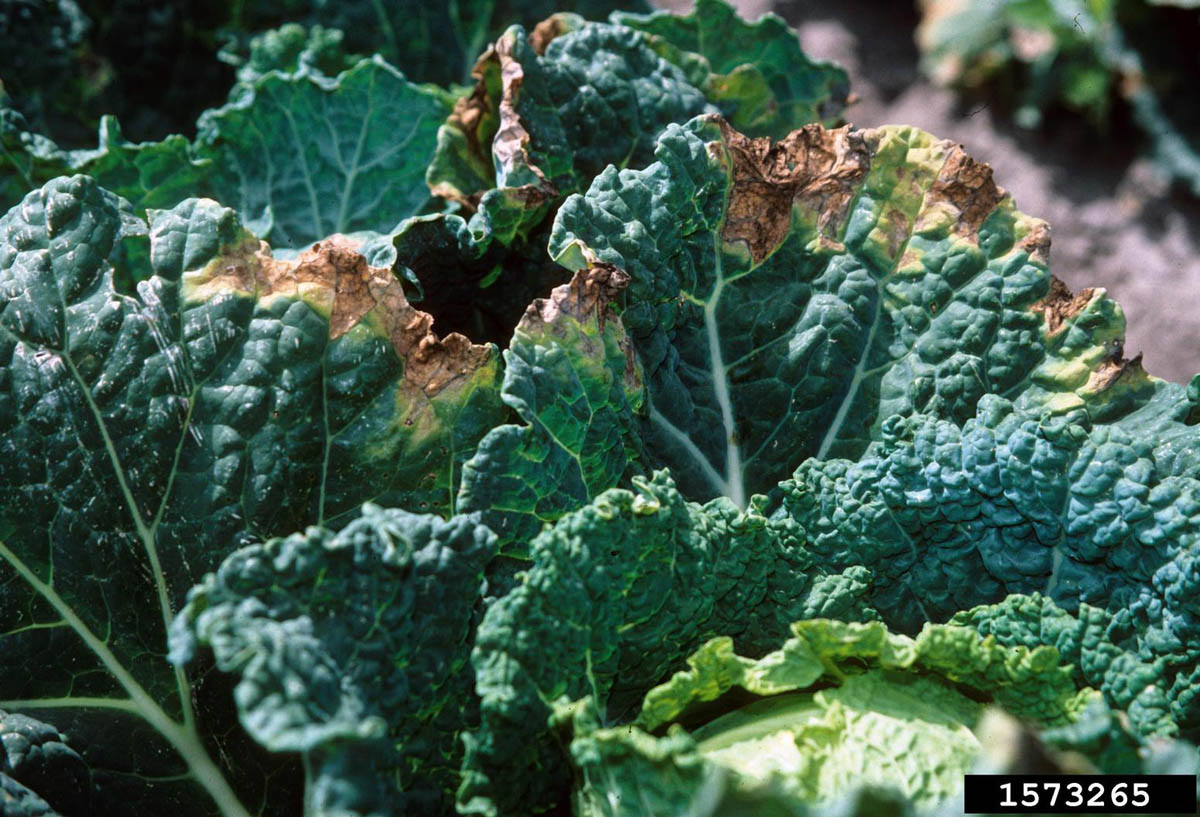
Symptoms of black rot on cabbage. Credit: G. Holmes, Strawberry Center, Cal Poly San Luis Obispo, Bugwood.org
This bacterial disease attacks crucifer crops, including cabbages, collards, mustard, cauliflower, Brussels sprouts, kohlrabi, rutabagas, turnips, kale, and rape. Black rot may affect plants at any stage of growth but usually is most prominent close to maturity. On older plants, yellow, wedge-shaped areas appear at leaf margins and expand toward the center. Blackened veins are apparent in affected areas. Vascular tissue within the stem also may become discolored.
Black rot also causes head dwarfing, and soft rot frequently develops on affected heads.
Practices important for managing black rot include:
- Use disease-free seeds that have been hot-water treated.
- Purchase transplants that have been certified as disease-free.
- Practice crop rotation so that at least 2, but preferably 3, years elapse between cruciferous crops.
Rusts
These fungal diseases commonly occur on beans and sweet corn as reddish-brown spots on leaves.
Rusts can be managed using approved fungicides according to label directions.
Leaf Spots
Leaf spot diseases are often caused by fungi or bacteria and commonly occur on many vegetables. They appear on leaves and sometimes stems as distinct, dark-colored or tan spots ⅟₁₆ to 1 inch in diameter. Regularly applying approved fungicides generally provides acceptable management of fungal leaf spots. Applying approved copper fungicides can help manage bacterial and fungal leaf spots.
Fruit Rots
Bacteria and fungi often infect fruit, resulting in soft, slimy fruit with an offensive odor. You can reduce the occurrence of fruit rot by staking plants, mulching, avoiding mechanical injury to fruits, managing insects, following a regular fungicide application program, and harvesting mature fruit from the garden.
Nematode Diseases
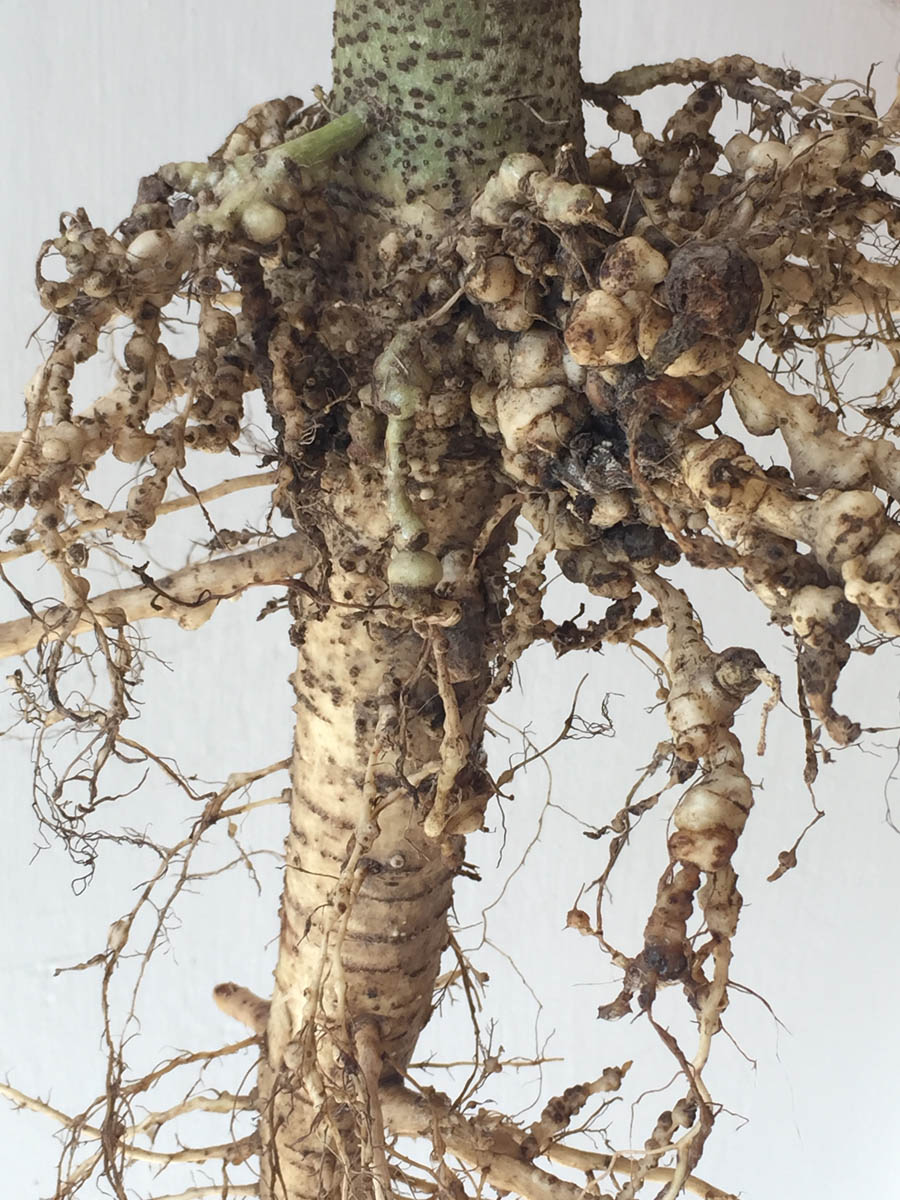
Galls on an okra root caused by root-knot nematodes. Credit: R. A. Melanson, MSU Extension, Bugwood.org
Nematodes are slender, tiny, worm-like animals that feed on plant roots, stems, and leaves. Nematodes cannot be seen with the naked eye, and their presence is not often noticed until plants become unthrifty and stunted. Nematodes seldom kill plants, but they can reduce the quality and yields of many vegetables, such as beans, beets, carrots, cucumbers, lima beans, okra, peas, squash, tomatoes, and watermelons.
Nematode injury to roots reduces uptake of water and nutrients from the soil. Typical aboveground symptoms are general stunting, yellowing, loss of vigor, and overall decline. The most common symptom of belowground plant tissues (roots) in gardens is galling caused by root-knot nematodes. Nematodes other than the root-knot nematode also can cause severe plant damage. Some of the less obvious symptoms are stubby or excessively branched roots, a complete loss of secondary roots, or small lesions on the roots.
The best time to determine if you have a nematode problem is during the fall when nematodes are most active. The presence of root-knot nematodes can be determined during the growing season if you observe galled roots on plants.
You can have your soil tested for nematodes by sending a soil sample to the MSU Extension Plant Diagnostic Lab. A completed Nematode Sample Submission Form (F448) should accompany samples. Additional information, including tips for sample collection and current fees for nematode analysis, is available on the Extension Plant Diagnostic Lab webpage (extension.msstate.edu/lab).
Various management practices can help reduce nematode populations:
- Plant resistant varieties.
- Plant nematode-free transplants.
- Practice crop rotation.
- Incorporate fallow periods.
- Practice good sanitation.
- Remove weeds.
- Plant marigolds.
- Implement solarization.
- Apply approved chemical treatments.
For additional details on managing nematodes in the home garden, see MSU Extension Publication 483 Nematode Control in the Home Garden.
Weed Control
Weeds are a serious garden problem. They are much more problematic than a plant out of place, which is usually called a “volunteer.” The soil acts as a seed bank, where weed seeds lay dormant until the right environment (temperature, moisture, soil depth, and light) is provided for them to germinate. Cultivation brings weed seeds to the soil’s surface, and in as little as a week, a new lawn of weed seeds may already be visible. Weeds rob vegetable plants of space, sunlight, water, and nutrients. They can also host insects and diseases that could infect nearby vegetable plants.
Controlling weeds can be overwhelming, especially if they are left unchecked for more than a month. Some gardeners even abandon the garden in midsummer because of out-of-control weeds. The key to controlling weeds is to act when they are small before they get out of control.
Some of the most common and problematic garden weeds are crabgrass, yellow and purple nutsedge, morning glories, chamber bitter, lesser swinecress, bermudagrass, and pigweed.
Most weeds can be controlled and kept from becoming serious problems in the garden. Methods of control include hand-pulling, cultivation, mulching, and applying herbicides.
Hand-Pulling
Hand-pulling is not an efficient way to control weeds in a large garden, but it can be effective under certain circumstances. Hand-pull weeds that are growing so close to garden vegetables that using another method may damage them. Thinning seedlings spaced too closely together and hand-weeding frequently can be done at the same time.
Cultivation
Cultivation is the most widely used method of garden weed control. It is not a one-time chore—with each rain, irrigation, and stirring of the soil, weed seedlings emerge.
A variety of hand and power equipment is used for cultivation, but the most used tools are the hoe and garden tiller. A sharpened hoe blade is one of the most economical and efficient tools for removing weeds. You can scrape their blades along the soil surface to cut the emerging seedlings off from their roots while leaving the soil undisturbed; no new weed seeds are brought to the surface, and the severed weeds dry in the sun and die.
If the weeds are left to grow too large, hoeing becomes much harder and will disturb the soil. Careful, shallow hoeing can be used to remove weeds that are close to vegetable plants, especially if the vegetable plants are much larger than the weeds, but hand-pulling is best for weeds that are growing right next to vegetable plants.
Use a garden tiller for weeding in areas farther from the vegetable plants, such as in walkways and between rows. This is especially effective on hot days when the disturbed weeds will dry out quickly. Cultivation kills small weeds faster than larger weeds, so do it frequently enough to prevent weed seedlings from becoming established. Cultivation for weeding purposes should also be shallow, so you do not disturb or injure vegetable plant roots.
Remove perennial weeds, such as bermudagrass, from the soil following cultivation to prevent these plants from reestablishing themselves in the garden.
Mulching
Mulching is an effective way to prevent most garden weeds. Natural and plastic mulches properly applied to weed-free garden soil prevent most weeds from becoming established in the mulched area. Bermudagrass and nutsedge are almost impossible to control completely with mulches and will require other methods. Also, hand-pull weeds that appear in the planting holes of plastic mulch.
Herbicides
Commercial vegetable growers have a fairly wide choice of chemical weed killers (herbicides) to prevent or control weed problems. Gardeners, however, have a much smaller choice.
Read and follow all safety precautions on the herbicide label to prevent injury to yourself and your vegetables. When used correctly, it is possible to apply herbicides in vegetable gardens without harming your vegetables, but applying them incorrectly can be disastrous.
Herbicides applied to the soil before vegetables are planted and before weeds have emerged are called preemergence herbicides. Some can be applied immediately after the vegetable seeds or plants are planted but before the weed seeds germinate. Postemergence herbicides are applied after weeds have emerged from the soil.
Herbicides used in the garden may be in the form of granules, wettable powders, or liquids. The equipment needed for an application depends on the formulation used. Use a pump-up pressure sprayer for applying liquids and wettable powders. Since most garden sprayers are equipped with a cone-type nozzle, use a 50-mesh screen and an 8003 E or equivalent fan nozzle attached to the sprayer for applying herbicides.
Chemical herbicides used in the vegetable garden can be washed from the sprayer, but some of those used on the lawn cannot. Therefore, a wise gardener will keep two sprayers: one for lawn herbicides and the other for garden herbicides. When spraying herbicides approved for application over the tops of vegetable plants, do not use a sprayer that has been used with lawn herbicides.
Before using an herbicide in your garden, find the recommended application rate, application method, and vegetables for which the herbicide has been approved on the product’s label. Never use a product that is not labeled for the vegetables you will be spraying around, and do not exceed the recommended rate.
Dacthal
Several brand names are available. Dacthal can be used on a wide variety of vegetable plants. Applied correctly, Dacthal gives good preemergence control of most grasses and a few broadleaf weeds. Remove existing weed plants before application.
Trifluralin
Several brand names are available. Trifluralin is a preemergence herbicide used to control grass problems in the garden. It is helpful to group trifluralin-labeled vegetables in one area of the garden. To obtain good weed control, mix trifluralin with garden soil. Cultivate the soil to eliminate clods. Broadcast the recommended amount of either the granules or the liquid formulation. (Granules are easier for most gardeners to use.) After application, mix the herbicide in the top 2 inches of the soil. Two very shallow cultivations provide good mixing with the soil. Trifluralin is labeled for use before planting seeds of several vegetables and before setting transplants of others. Read the package label for a list of approved vegetables.
Sethoxydim
Several brand names are available. Sethoxydim is a postemergence herbicide that selectively controls grass weeds in several vegetables. Apply it to most grasses before plants reach 8 inches high. One application controls most annual grasses, but several applications may be required to control perennial grasses like bermudagrass. Mix a crop oil concentrate in the spray solution before application. Read the label for specific instructions and approved vegetable crops.
Glyphosate
Formulations of this popular nonselective, postemergence herbicide are approved for limited use in the vegetable garden. Most applications are for eliminating existing weed problems before vegetable seedling emergence and before vegetable plants are in the garden. Read the label for specific application instructions and limitations.
Staking and Training Tomatoes
The main reason for staking and supporting tomato plants is to keep plants and fruit off the ground. This reduces losses from fruit rots when fruit touch the soil and from sunburn when fruit are not shaded by foliage.
Supported plants are easier to spray or dust for insect and disease control and easier to harvest than those sprawling on the ground. Three popular methods of supporting tomato plants are staking, caging, and trellising. Supported tomato plants are pruned (suckered) to reduce the number of branches. Plant type also determines the amount of pruning.
Tomato varieties are divided into two general groups based on their pattern of growth: determinant and indeterminant.
Determinate, or self-topping, varieties have short- to medium-length vines. Plants are heavily branched. Rather than having continuous production of leaves and flower clusters, every branch ends with a flower cluster. Determinate varieties often are early and have a short but concentrated production season. These plants are staked or caged but are not adapted to trellising. Some determinate varieties are Celebrity, Mountain Pride, and Rutgers. Determinate varieties are not heavily pruned, regardless of the support system, because most of the fruit is produced on the branches.
Indeterminate varieties continue to grow and produce leaves and flower clusters until disease, insects, cold, or lack of water and fertilizer kills the plants. Indeterminate varieties are Better Boy, Floradel, and Big Beef. Indeterminate varieties are heavily pruned when trellised, moderately pruned when staked, and lightly pruned when caged.
Pruning removes small shoots where each leaf joins the stem. Properly pruned plants produce larger and earlier fruit than non-pruned plants of the same variety. Remove shoots when they are less than 4 inches long to avoid injuring the plant. The larger the sucker before removal, the larger the resulting wound, and the more wasted plant energy that went into the sucker. Remove a sucker by grasping it between your thumb and second finger and bending it to the side until it breaks. This is best done early in the day when plants are crisp and not wilted from the day’s sun and heat. Do not cut suckers with a knife because this can spread virus diseases.
Staking
Staking requires wooden or metal stakes 5 to 6 feet long for indeterminate varieties and 3 to 4 feet long for determinate varieties. Wooden stakes should be at least 1 inch square. Metal stakes can be smaller and have the advantage of lasting many years. Do not use chemically treated wood. Sections of concrete reinforcing rods (rebar) make excellent tomato stakes.
Space plants 18 to 24 inches apart in the row and drive a stake next to every plant or every other plant. Place the stake 3 to 4 inches from the base of the plant on the side away from the first bloom cluster to prevent trapping the fruit between the plant and the stake.
There are many ways to prune and tie tomato plants. Limit staked indeterminate plants to two or three fruit-producing branches. A popular method is to select the main stem, the sucker that develops immediately below the first bloom cluster (a very strong sucker), and one other sucker below that. Remove all other suckers and, as you tie the plants, periodically remove additional suckers that develop on selected branches. Tie individual branches to the stake with a soft cord by first tying twine to the stake and then looping it loosely around the plant. Never tie a plant immediately below a fruit cluster because the weight of the fruit may cause the plant to sag and strip the cluster from the plant. Continue to prune and tie the plant as it grows.
The Florida weave is an alternative system to support staked tomato plants in a row. Using polypropylene cord (it doesn’t stretch), tie the cord to the first stake about 6 to 10 inches above the ground. Run the cord to the second stake and wrap it around the stake once at the same level. Be sure to keep the cord tight. Repeat this process, going on to the third, fourth, and remaining stakes until you reach the end of the row. Come back with the cord on the opposite side of the stakes, wrapping it around each stake. Plants are held in the space between the cords on opposite sides of the stakes. Repeat this process as plants grow, so the branches are always held between the cord. Three to five runs down the row should be enough for the season. Remember to keep pruning plants as they grow to reduce the amount of plant material that must be supported.
When staking determinate varieties, prune only once to remove the first suckers.
Caging
Tomato plants supported by cages made from concrete reinforcing wire require considerably less work than either staked or trellised tomatoes because there is no tying and only limited pruning. A 5-foot length of 10-gauge reinforcing wire with 6-inch openings makes a cage of about an 18-inch diameter. Make cages at least 5 feet high for indeterminate varieties. Shorter cages are best for determinate varieties. Using heavy bolt cutters, remove the bottom horizontal wire sections, leaving wire legs to stick into the ground.
Set your tomato plants 3 feet apart in the row and place a cage over each plant. Push the legs into the ground to anchor the cage. Protect early plants from cold and wind by wrapping the bottom 18 inches of each cage with clear plastic. In combination with caging and a clear plastic wrap, black plastic mulch promotes early blooming.
Caged plants generally are pruned to four or five main fruiting branches. As plants grow, keep turning the ends of the branches back into the cages. Caged plants may not produce ripe tomatoes as early as staked or trellised plants, but they produce more tomatoes that are less likely to crack or sunburn.
Trellising
Trellising is only for indeterminate varieties. Set plants about 1 foot apart in the row and prune to just the main stem, or occasionally to the main stem and one strong sucker (the sucker originating just below the first bloom cluster). Remove all other suckers as they develop.
Build a trellis by setting support posts in the ground about 20 feet apart. The tops of the posts should be about 6 feet above the soil surface. Stretch a heavy wire or a piece of barbed wire between the tops of the posts and attach a length of heavy twine to the wire above each plant. The barbed wire prevents the twine from slipping as the top wire sags with the weight of the plants. Tie the twine to the base of each plant or to a bottom wire if one is used. As plants grow, wrap them around the twine for support, or use the plastic clips that greenhouse tomato growers use. When trellising two stems per plant, use a separate cord for each stem.
Trellising produces ripe fruit earlier than other methods of support. Each plant produces fewer but larger tomatoes that are more subject to sunburn because of the small amount of protective foliage.
Tomato plants loaded with fruit are heavy. Anchor the posts to keep them from collapsing.
Table 6. Days to maturity and harvesting comments for garden vegetables.
| Vegetable | Days to maturity | Harvesting comments |
|---|---|---|
| asparagus | Cut or snap spears when they are 6 to 8 inches tall and before leaf bracts at the tips begin to open. Harvest spears but leave 20–50 percent of the spears to grow to provide energy for next year’s crop. | |
| beans, snap | bush: 50 pole: 65 | Best when pods are crisp and snap easily but when tips are still pliable. |
| beans, lima | bush: 65 pole: 80 | Pick when pods are well-filled but still bright green and fresh. The end of the pod should feel spongy when squeezed. |
| beans, shell | 70 | Harvest when beans are very evident in the pods but before pods begin to dry, very much like lima beans and southern peas. |
| beans, dried | 90 | Harvest when pods are dry but before they shatter. Plants may be turning yellow. Cut the entire plant and dry or pick the pods. When the beans are completely dry, shell and store in the freezer. |
| beets | 60–70 | Pull when medium-sized (1¼–2 inches in diameter). Leafy tops are an excellent cooked green. |
| broccoli | 65–75 from transplants | Heads should be compact with tight buds. Individual bud and head size are determined by variety. Yellow flowers indicate overmaturity. |
| Brussels sprouts | 90 from transplants | Cut sprouts from the stalk when they are 1–2 inches in diameter and firm. Lower sprouts develop first. Remove the leaf when cutting the sprout. |
| cabbage | 80 from transplants | Cut when the head is firm and before splitting. |
| carrots | 75 | Harvest according to desired size and weather. Sugar content is higher in mature roots, but younger ones are more tender. |
| cauliflower | 65 from transplants | Cut when the head is firm and smooth. It should not be coming apart or “ricey” in appearance. The pure white color is a result of blanching. The creamy color is fine. |
| Chinese cabbage | 80 | Cut the entire plant at the ground when the head is fairly compact or the plant has reached the desired size. |
| collards | 55 | Harvest as soon as leaves are large enough to pick. Large, old leaves are tough and fibrous. |
| sweet corn | 70–85 | Harvest when silks turn dark and begin to shrivel (17–21 days after silking). Kernels should be bright, plump, and milky, except super sweets, which may appear watery. Small, soft kernels and large, hard, starchy kernels are tasteless. |
| cucumbers, pickling | 55 | Pick when 2 inches or less in length for pickles and 4–6 inches for dills. Use large cucumbers for relish. Frequent harvest is necessary. |
| cucumbers, slicing | 62 | Harvest when 6–8 inches long and before the ends become soft or begin to turn yellow. |
| cucumbers, burpless and European types | Harvest when 8–10 inches long and 1–1½ inches in diameter. | |
| eggplant | 65–85 from transplants | Ready when fruit is half grown, before color dulls. |
| endive, escarole | 85 | Cut plants at ground level when large enough to eat. |
| gourds, small decorative | Cut from the vine with stem attached when the rind is hard, before frost. | |
| gourds, dipper and birdhouse | Cut from the vine with the stem attached when they begin to dry. Frost does not injure mature gourds. | |
| gourds, luffa | Cut from the vine when skin turns yellow or after the gourd has dried. For eating, harvest when small (4 inches or less in length) and tender. | |
| horseradish | Dig roots in late fall after frost. Where soil doesn’t freeze and is well drained, roots can be left in the ground until needed. | |
| Jerusalem artichoke | Dig tubers all winter after cold kills the tops. | |
| kale | 55 | Cut the entire plant or larger leaves while still tender. Old kale is tough and stringy. Cold weather improves flavor. |
| kohlrabi | 55 | Pull when the swollen stem is the size of a baseball. Large, old kohlrabi is woody and tasteless. |
| lettuce, leaf | 40–50 | Ready when leaves are large enough to harvest. |
| lettuce, head | 80 | Harvest for leaves as needed before heads form or as soon as heads are firm. |
| melons, muskmelons | 42–46 from pollination 90 from seed | Ready when the blossom end of the fruit gives to finger pressure and the melon separates (slips) easily from the stem. Netting should be coarse and prominent according to the variety and with no green lines showing. |
| melons, honeydew | 110 from planting | Harvest when the greenish rind takes on a golden cast and the melon does not slip from the vine. |
| melons, watermelons | 42–45 from pollination 90 from planting | Ready when the undersurface (ground spot) turns from white to creamy-yellow. |
| mustard | 45 | Ready as soon as leaves are large enough to harvest; old leaves are tough. |
| okra | 4–6 from pollination 60 from planting | Pick when pods are 2–4 inches long. |
| onions, green | Harvest when ¼–½ inch in diameter and tops are 12–16 inches tall. | |
| onions, bulb | Dig when tops have yellowed and fallen over. | |
| parsley | 90 | Harvest when leaves are large enough to pick. |
| peanuts | 110 | Dig when the tops are yellowing and inner hulls are brown. All pods do not mature at the same time, but dig the entire plant. |
| peas, English | 65 | Best when pods are bright green and fairly well filled. Raw peas should be sweet. |
| peas, snap | 65 | Best when pods are green and crisp and peas have filled pods. |
| peas, southern | 65 | Pick purple hull varieties when pods are up to 50 percent purple. Pick tan pod types when pods show a hint of yellow. Peas should be green when shelled. |
| peppers | 75 from transplants | Pick green bell peppers when shiny green and firm. Harvest colored peppers when fully colored. Pimientos should be fully red. Harvest sweet banana and hot Hungarian wax peppers when fully yellow, turning red, or fully red. Harvest hot peppers when green or fully colored. |
| potatoes, Irish | 100 | Harvest as soon as they are large enough for early potatoes. Harvest the main crop after vines have yellowed. Greenish or sunburned potatoes are not good. The skin should be firmly attached to the tuber. |
| potatoes, sweet | 120 | Harvest when roots have reached a usable size, before frost or the ground cools below 50°F. |
| pumpkins | 110 | Harvest when fully colored and heavy with a hard rind. |
| radishes | 28 | Pull as soon as they are large enough. |
| radishes, winter | 50 | Harvest before the ground freezes. |
| rhubarb | Pull leaf stalks from plants when the leaves are fully grown. Discard the leaf blade and eat the stalk only. | |
| rutabagas | 90 | Dig anytime they are large enough. They become dry and woody if soil moisture is insufficient. |
| spinach | 45 | Use before the leaves get old and tough. |
| spinach, New Zealand | Pick the terminal 3–4 inches of shoots when the plants get large enough. | |
| squash, summer | 55 from planting | Harvest when medium-sized with good color and the rind is easily dented with a fingernail. Harvest zucchini when 6–10 inches long and shiny. Yellow summer, 5–7 days from pollination; zucchini, 3–4 days from pollination. |
| squash, winter (storage) | 90 | Harvest when color is good and the rind very hard. Acorn, 60 days from pollination; butternut, 65 days from pollination; hubbard, 85 days from pollination. |
| Swiss chard | 50 | Harvest as soon as leaves are large enough to pick, from about 12 inches up. Old leaves are tough and fibrous. |
| tomatoes | 70 from transplants 45 from pollination | Harvest when color is good all over. Size is no indication of maturity. Tomatoes will ripen off the plant, but the quality is better when ripened on the plant. Reduce bird damage by picking tomatoes before they are fully colored. |
| turnips, greens | Harvest when leaves are large enough to pick. Leaves are tough, fibrous, and bitter when old. | |
| turnips, roots | 60 | Best when medium-sized and firm. Large turnips are tough and strongly flavored. |
| watermelons | See melons. |
Harvesting
Gardening itself is a lot of fun, but the harvest is what gardeners work toward. Harvesting at the right time is essential to getting quality produce. If you pick vegetables too soon, they can be tough or too tender, lacking substance and flavor. If you pick them too late, they may be tough, fibrous, or too soft.
The number of days from planting to maturity is generally listed in the catalog descriptions. For vegetables commonly started with transplants, such as tomatoes and peppers, number of days given in Table 6 is from setting plants in the garden to harvest. For vegetables that are typically direct-seeded in the garden, such as peas and sweet corn, the number represents the days from planting the seed.
The number of days given represents an average and varies with weather and variety. Cool-season vegetables mature more rapidly as weather warms in late spring; warm-season vegetables mature more slowly as weather cools in the fall. Early varieties mature more rapidly than mid- and late-season varieties. Use the number of days as a guide and consider the weather, the variety description (early, midseason, or late), and the appearance of the vegetables.
See Table 7 for average bushel weights of garden vegetables.
Keep these points in mind when harvesting vegetables:
- Harvest at the proper stage of maturity, not before. Most vegetables can be harvested several times if you harvest only what is ready.
- Harvest on time. Harvest okra, summer squash, beans, and cucumbers every 1 or 2 days.
- Harvest when the foliage is dry. Tramping through wet foliage spreads diseases.
- Don’t damage foliage by stepping on vines or breaking stems. This creates wounds and entrances for diseases.
- Don’t harvest when plants are wilted. Harvesting wounds permit water loss, which increases water stress inside the plant.
- Immediately move freshly harvested vegetables into the shade and keep them cool.
- Use freshly harvested vegetables as soon after harvest as possible.
- Don’t injure the plant during harvest. Gently remove the part to be harvested from the plant. Cut eggplants and watermelons with a knife. Cut okra that won’t snap off.
Table 7. Average bushel weights of vegetables.
| Vegetable | Weight in pounds |
| beans, lima (unshelled) | 32 |
| beans, snap | 30 |
| cabbage (sack) | 50 |
| cucumbers | 47–55 |
| eggplant | 33 |
| greens | 23–24 |
| okra | 30 |
| peanuts (green) | 35–45 |
| peas, English | 28–30 |
| peas, southern | 25 |
| peppers, bell | 25 |
| potatoes, Irish | 60 |
| potatoes, sweet | 55 |
| spinach | 20–25 |
| squash, summer | 42 |
Storing Vegetables
In addition to canning, freezing, and drying fresh vegetables, you can store many to use later. The length of successful storage depends on the vegetable and the storage conditions. Moisture loss is the major factor that reduces quality during storage. Reducing the temperature slows this loss and delays bacteria and fungi growth that causes vegetables to spoil.
Some vegetables, such as winter squash, onions, Irish potatoes, and pumpkins, lose moisture slowly, while others, such as leafy greens, lose moisture rapidly. Place vegetables in a plastic bag or container before refrigerating to prevent wilting or softening. This applies to lettuce, mustard greens, spinach, collards, turnip greens, Chinese cabbage, beets, carrots, radishes, snap beans, shelled limas, cucumbers, broccoli, cauliflower, kohlrabi, and green onions. Turnip roots not only lose moisture rapidly but have a strong odor, so be sure to bag them.
For short-term refrigerated storage, wash vegetables to remove insects, soil, and spray residue before refrigerating.
Some vegetables can be stored for several weeks or longer without refrigeration under proper conditions.
Beets, carrots, turnips, rutabagas—When grown in the fall, leave them in the garden until needed. Pull the soil up over the roots or cover them with straw. Store harvested roots in plastic bags in your refrigerator or in moist sand in a cool location.
Cabbage—Protect fall-grown cabbage from freezing. Pull mature heads and wrap the leaves over the heads. Set the heads, roots up, in a well-drained, cool place, and cover with soil or straw. Pull mature heads with roots attached and place them in a cold frame.
Onions—After bulbs are harvested and dried, trim tops, leaving about ½ inch. Most southern onions do not store well, but for best storage, keep dry bulbs in a cool, well-ventilated place. If the temperature is too warm, the tops will sprout. If the humidity is too high, the roots will begin to swell and develop.
Irish potatoes—Spring-grown Irish potatoes are difficult to store. Cure potatoes for several days in a warm place to heal cuts and bruises. Do not wash potatoes unless they are very dirty from harvesting in wet soil. Store dry potatoes in boxes in a closet in an air-conditioned house. If the house is on a conventional foundation, store potatoes under the house. Be sure to shut out all light to prevent greening.
Irish potatoes grown in the fall are easier to store than spring-grown potatoes. Harvest when the soil is dry, and don’t expose the potatoes to the sun. Cure in a warm, moist place for about a week to heal cuts and bruises; then place potatoes in a cool, dark place. Make sure they don’t freeze. Fall-grown potatoes can be successfully stored for several months.
Sweet potatoes—Sweet potatoes are very sensitive to cold soils and cold storage. Potatoes that are chilled in the soil or in storage will not keep very long. Dig potatoes before soil temperatures drop to 55ºF. Cure potatoes for 7 to 10 days in a warm, moist place—80 to 85ºF and 90 percent relative humidity. Curing helps heal all cuts and bruises that occurred during harvest. Store cured potatoes at 55ºF and high humidity to prevent shrinkage. Storing at warmer temperatures encourages sprouting.
Pumpkins, winter squash—Harvest these vegetables as they mature because they do not store well in the garden. If planted in April or May, they are ready to harvest in July and August. If left exposed to the sun and wet weather, they rot. Store in a cool, fairly dry place. Small quantities can be stored in an air-conditioned home. Do not stack these vegetables in storage, and do not expose them to temperatures below 50ºF. If the humidity is too high, molds and rots will develop.
Tomatoes—Ripe tomatoes store best at a temperature around 60ºF. At refrigerator temperatures, the quality rapidly deteriorates. Mature green tomatoes (those that have reached full size and are turning white before coloring) will ripen if picked before frost injures them. Wrap tomatoes in paper and store in a cool place. Check them regularly to remove any ripening or spoiled tomatoes. You can have garden tomatoes for Christmas and even later if you strip the vines of fruit before a freeze and handle them as described.
Dried beans and peas—The greatest danger in storing dried beans and peas is insect infestation. Pick dry pods and thoroughly dry them in a warm, well-ventilated place before shelling. Kill insects by heating dry, shelled beans and peas in a 180ºF oven for 15 minutes. Store these treated beans and peas in plastic bags in containers with tight-fitting lids. If freezer space is available, you can store dried peas and beans in the freezer without prior heating.
Seed Storage: Cool and Dry
Old seeds that are not stored properly typically lack vigor (viability) and won’t germinate well. Moisture and high temperatures are the biggest contributors to seed decline. Therefore, do not store seeds in storage sheds, garages, vehicles, or outdoors where temperature and humidity fluctuate greatly. Some seeds naturally last and store better than others, but all seeds last longer when stored properly.
Generally, it is best to store seeds below 50 percent relative humidity and below 50°F. This makes the refrigerator an ideal place. In fact, seeds stored in airtight containers in the fridge can last for many years.
Desiccation packets or other drying agents like calcium chloride, dried silica gel, or freshly opened powdered milk can be placed inside airtight containers to keep seeds dry. Store bean and okra seeds in separate containers without any drying agents to prevent them from overdrying, which may cause them to become hard and not germinate as well. Be sure to let the container come to room temperature before opening it to prevent condensation from forming on the seeds.
Seeds can also be stored in the freezer, but it takes longer to come to room temperature before the container can be opened, and seeds that are not dry enough can be damaged by multiple freeze/thaw cycles that occur when the seeds are removed from and returned to the freezer.
Do not store chemically treated seeds with vegetables or other food items. Pelleted seeds, while easier to handle, may deteriorate faster than non-pelleted seeds, so avoid purchasing more than you plan to use in a season.
Miscellaneous
Fall Gardening
Fall gardening is the way to have fresh vegetables right into winter. Many fall gardens are carried over from summer gardens. Tomato plants, okra, peppers, and eggplant, if cared for during the summer, continue to produce until the first killing frost.
To keep these vegetables producing, control insects and diseases and keep the plants watered and fertilized, but don’t let weeds overtake the garden. A good fall garden, however, is not just keeping the summer garden alive. It means planting new vegetables to produce in fall and early winter.
Seeds and transplants may be difficult to find in the late summer, so it is usually better to plan the fall garden at the same time you plan the spring and summer garden and purchase the seeds in the winter or early spring. Store them in an airtight container in the fridge until you are ready to plant them.
Early-spring wet weather can cause planting delays to the point that plants don’t have enough time to fully establish and develop before warm temperatures arrive. A fall garden provides a second opportunity to get a harvest. Many cool-season vegetables perform better (with higher quality produce) when they are planted in the late summer or early fall. Chinese cabbage (which is very sensitive to heat) and rutabagas (which require a long period of cool weather) are two cool-weather vegetables recommended for planting only in the fall. High-quality cilantro can be challenging to grow in the spring. You may have better success planting it in the late summer and harvesting it through the fall. In some years, cilantro’s harvest window may even continue right through the early spring.
Fall gardens are not just for cool-season vegetables. Gardeners may have success removing tired warm-season plants and replacing them with fresh plants or seeds. For example, tomato plants can be ravaged by diseases that develop during the heavy summer rains that accompany the tropical storms off the Gulf Coast. But they can be replanted in midsummer in a different location in the garden for a fall harvest. It is important to remember that they may require additional time to mature as the weather cools in September and October. Choose planting dates in midsummer that allow these vegetables to mature before frost.
A benefit of cool-season vegetables in Mississippi is that many of them continue producing long into the winter months. Cole crops like broccoli and kale, spinach, and parsley may produce multiple harvests all the way through winter and into the early spring. In years with particularly harsh winters, some vegetable plants or specific varieties may not survive, or their growth may slow significantly until the weather begins to warm.
Young Plants
The hot, dry weather in July, August, and September is hard on germinating seeds and young seedlings. Using one of these methods will improve germination and seedling survival:
- Water a day or two before planting so that seeds are planted in moist soil. Watering after planting can cause the soil surface to pack and crust.
- Plant seeds in moist soil and cover with moistened, non-crusting materials: a mix of peat moss and vermiculite or composted sawdust and sand. Keep the surface moist during germination and seedling establishment.
Plant three to five seeds of the small-seeded vegetables like broccoli and cabbage at the recommended final plant spacing in the garden row. Once the seedlings are established, thin the seedlings to one plant at each location.
Check the garden every day to make sure that the seeds and transplants do not get too dry.
Transplants
Start vegetable transplants for the fall garden in individual containers, such as peat pots, small clay or plastic pots, or peat pellets. Setting out plants without disturbing the root systems reduces transplant shock.
You can move thinned seedlings to extra places, but be extremely careful while handling them, and provide water and shade until they become established. Protect young plants from the sun for a few days.
A fall garden is open to attack by insects and diseases, just as the summer garden. In some cases, insect problems are worse. Worms (cabbage loopers and imported cabbage moths) are serious problems on fall cabbage, cauliflower, broccoli, and collards. Control these leaf-eating worms with a biological spray. Squash bugs are troublesome on fall squash and pumpkins.
Fall vegetables need fertilizer just as much as spring and summer vegetables. Don’t count on the fertilizer applied in spring to supply the fertilizer needs of vegetables planted in late summer and fall. Fertilize before planting and side-dress as needed.
As the danger of frost approaches, pay close attention to weather predictions. Tender plants can often be protected from an early frost and continue to produce for several weeks. When a killing frost is inevitable, harvest tender vegetables.
Green tomatoes that are turning white just before turning pink will ripen if stored in a cool place. Pick these tomatoes, wrap them in paper, and use them as they ripen.
Don’t abandon the garden when freezing temperatures kill the warm-season plants. Clean up the debris, store stakes and poles, take a soil test, and row up part of the garden to be ready for planting early-spring Irish potatoes and English peas.
Table 8. Herbs and their characteristics.
| Herb | Characteristics |
|---|---|
| anise | Annual; grown for its licorice-flavored leaves and seeds; slow-growing. |
| basil | Annual; grown for its leaves; available in several different flavors and plant types; easily grown from seeds; purple leaf types make attractive vinegar; Thai basil has an anise-like flavor and is not well suited for Italian dishes just as sweet basil is not well suited for Asian dishes. |
| bay | Perennial (usually not hardy in northern Mississippi; in central and south Mississippi, plant in spring to allow it to get established before winter); evergreen shrub; source of bay leaves; requires cool greenhouse protection in winter; frequently grown as a container plant; start with a nursery-grown plant; dried leaves impart a slightly different flavor to a dish than fresh leaves. |
| bergamot | Perennial; also known as bee balm; grown for minty leaves; flowers attract bees and hummingbirds; start from crown division or seeds. |
| borage | Annual; grown for cucumber-flavored leaves and attractive small, blue flowers; attracts bees; makes a large, unruly plant; difficult to transplant bare-root. |
| burnet, salad | Perennial; grown for cucumber-flavored leaves; grow from seeds or crown division. |
| catnip | Perennial; grown for leaves; in the mint family; grow from seed, cuttings, or division. |
| chamomile | Perennial but grown as annual; flowers used for tea; grow from seed. |
| chives | Perennial; grown for onion-flavored leaves; attractive purple flowers; grow from seeds or division. |
| chives, garlic | Perennial; grown for leaves with light garlic flavor and scent; grow from seed or division; attractive white flowers; sow many seeds; self-seeds prolifically; easily distinguished from regular chives because of its flat (not round) leaves. |
| coriander (cilantro) | Annual; grow from seeds; fresh green leaves known as cilantro and Chinese parsley; intolerant of hot summers; plant in early spring and early fall; choose varieties that are slow to bolt. |
| costmary | Perennial; also known as bible leaf; grown for mint-scented leaves; grow from seeds or division. |
| dill | Annual; grown for seed heads and leaves; prefers cool weather; grow in spring and fall; scatter seeds where plants are to grow or use container-grown plants. |
| fenugreek | Annual; in the bean family; leaves and seeds are used in Indian and Middle Eastern cuisines. |
| garlic | Perennial; grown for dry bulb; plant hardneck garlic cloves in October and harvest bulbs in May and June. |
| geraniums, scented | Tender perennial; available in many different scents (rose, peppermint, lemon, lime, orange, strawberry, apple, almond, mint); variety of foliage forms available; excellent pot plant; propagate by cuttings. |
| ginger | Tender perennial but treat as annual (plant in spring and harvest in fall); grown for pungent root; propagate by root cuttings; prefers moist, rich soil. |
| hyssop, anise | Perennial; grown for licorice-flavored leaves for teas; purple flowers attract bees; in the mint family; propagate by seeds or division. |
| lavender | Perennial; grown for essential oils from leaves; flower buds are used in French cuisine; plant in well-drained soil. |
| lemon balm | Perennial; grown for lemon-scented leaves; grow from seeds, division, or cuttings. |
| lemongrass | Perennial (usually not hardy in northern Mississippi; in central and south Mississippi, plant in spring to allow it to get established before winter); grown for lemon-flavored leaves used in Asian cooking; attractive as ornamental grass with blue-green color; leaves have sharp edges. |
| marjoram | Perennial grown as annual; grown for leaves; grow from seeds, cuttings, or by layering. |
| mint | Perennial; many different flavors and leaf and plant types; spreads rapidly; somewhat invasive; best kept in a pot to contain it; prefers moist soil; tolerates shade; keep cut for tender growth; spearmint is typically used in main dishes, while peppermint is used in desserts. |
| oregano | Perennial grown for leaves; grow from seeds, cuttings, or division; dried leaves often have more flavor than fresh; Greek oregano tends to be punchy in flavor while Italian oregano is milder. |
| oregano, Mexican | Tender perennial; may be perennial in southern Mississippi; leaves impart a similar flavor to oregano; evergreen shrub is not related to other oregano but to verbena; needs well-drained soil. |
| parsley | Biennial grown as annual; grown for leaves; grow from seeds; prefers moist soil; may be planted in the fall for fall and spring harvest. |
| rosemary | Perennial; evergreen shrub but reliably hardy; grown for leaves; available in different plant types, upright and creeping; adapted to pot culture; prefers moist, well-drained soil. |
| sage | Perennial grown as annual; not reliably hardy; available as common, golden, and variegated; grown for leaves; grow from seeds, cuttings, or layering; requires well-drained soil. |
| sage, pineapple | Tender perennial; pineapple-scented leaves; large plant; attractive red flowers grow from cuttings. |
| savory, summer | Annual grown for leaves; grow from seeds; unruly plant; flavor is preferred to winter savory. |
| savory, winter | Perennial grown for leaves; grow by layering; a neater plant than summer savory. |
| tarragon | Perennial; French tarragon is the major herb for culinary use because of its strong licorice flavor; propagated from stem and root cuttings; suffers from diseases during humid and wet summers, but can be grown successfully in a pot if the pot is sheltered from heavy rains. |
| tarragon, winter | Tender perennial; not reliably hardy; also known as mint marigold; propagate by cuttings and division; small, single, orange, marigold-type flower in fall. |
| thyme | Perennial but may be short-lived; variety of flavors and plant types; grown for leaves; propagate by seeds, cuttings, or division; prefers well-drained soil; English thyme is the most common type for culinary uses. |
| thyme, lemon | Perennial; low-growing plant for sunny areas; needs well-drained soil; leaves have strong lemon fragrance. |
| verbena, lemon | Tender perennial; shrubby, grown for leaves; propagate by cuttings; grow in container and provide winter protection. |
Herb Gardening
Herbs are a group of plants used for flavoring and scents. Many herbs used in flavoring foods and teas (culinary herbs) can be grown in Mississippi gardens. Almost all fresh herbs provide a stronger and more nuanced flavor in food than their dried counterparts (with some exceptions). Most herbs should be grown in full sun, but a few tolerate light shade. They prefer a well-drained soil of medium fertility with a pH of 6.0 to 7.0. Plants benefit from an organic mulch in the summer. See Table 9.
Herbs can be categorized into annuals that are planted every year, biennials that are planted in the fall and flower the following year, hardy perennials that survive the winter and come back year after year, and tender perennials that may survive a mild winter but often need to be treated as annuals or protected from freezing temperatures.
As with vegetables, plant what you will use. You can start many herbs very easily from seeds.
Many perennial herbs are propagated by stem cutting, layering, or crown divisions. Many herbs are sold at nurseries and garden centers. Seeds and plants are available online.
Because herbs are used in very small amounts, just a few plants of each type may be enough. If you want a large quantity of a particular herb, such as sweet basil for making pesto, plant the herb in the vegetable garden. Otherwise, prepare a small area set aside for herbs so that you can enjoy them for their appearance and fragrance. It is also a good idea to locate herbs very close to your house so you can harvest them easily and quickly to use in the kitchen.
Herbs typically do not have pest problems. When planting herbs in the vegetable garden, protect them from pesticides used on vegetables.
Most herbs transplant readily from starts into the garden, but there are exceptions. Cilantro, borage, and dill are best planted by seed. Scatter seeds directly in the garden or start them in containers.
The flavors and scents of herbs are caused by oils in the plant tissue. High fertilization, excess moisture, and shade may result in low oil content and weak flavor. The oil content in many herbs is at its highest just before the plants begin to flower.
Organic Gardening
Interest in organic gardening—avoiding synthetic fertilizers, pesticides, and genetically modified plants—is increasing. Organic gardening in Mississippi can be particularly challenging with the severe insect and disease pressures on vegetable plants.
The most beneficial soil input for organic (and conventional) gardeners is organic matter, such as compost or fresh organic materials (see Table 10). Blend straw, dry leaves, sawdust, wood chips, and paper with high-nitrogen materials like grass clippings, manure, or blood meal. This prevents nitrogen deficiencies in vegetable plants.
Soils with a low pH (acidic) can be corrected using limestone, ground oyster shells, wood ashes, or dolomitic limestone. Adding organic matter benefits soils with a high pH (alkaline).
Animal manures are the most widely used organic fertilizers. Unfortunately, their nutrients vary with the source, age, degree of decomposition, water content, and amount and kind of litter used. For more information on organic fertilizers, see MSU Extension Publication 2036 Organic Vegetable IPM Guide.
Plants used as green manures and cover crops can also provide nutrients. For example, when allowed to grow over the winter, hairy vetch or crimson clover can fix up to 100 pounds of nitrogen per acre. Southern peas grown during the summer can provide nitrogen for fall vegetables. Mow and plow green manure crops into the soil at least 4 weeks before planting the next crop.
Most organic materials do not contain plant nutrients in balance with plant requirements and must be supplemented to correct these imbalances. Well-leached animal manure has an estimated fertilizer value of 1-1-1, or 20 pounds each of nitrogen (N), available phosphate (P2O5), and available potash (K2O) per ton of manure. Besides being relatively low in nutrient content, the nutrients are available more slowly than nutrients from inorganic sources. This protects nutrients from leaching, but when a rapid change in nutrient level is needed, this can be a problem.
Currently, organic pesticides for controlling diseases and insects are limited. A few insecticides are available, including Bacillus thuringiensis (Bt), spinosad, and pyrethrums, but disease control is difficult. Neem oil, bicarbonate, and copper- and sulfur-based fungicides provide some protection against diseases, but the best results for disease management come from selecting resistant varieties and planting them at the proper time and spacing. For these reasons, organic gardening is easier on a small scale.
To increase chances for success, organic gardeners should follow these practices:
- Plant disease- and nematode-resistant varieties.
- Use mustard, solarization, and organic products like Clandosan 618 to control plant-parasitic nematodes (see Extension Publication 483 Nematode Control in the Home Garden).
- Plant seeds from disease-free plants.
- Plant only healthy vegetable transplants.
- Place a cardboard collar around plant stems at ground level to prevent cutworm damage.
- Incorporate plant residues and animal manures early to allow sufficient time for them to decompose before planting.
- Use mulches to control weeds and keep soil from splashing onto the plants and fruit.
- Use aluminum foil or reflective plastic mulches to repel aphids and thrips that injure plants and transmit plant viruses.
- Plant as early in the spring as temperature allows to avoid some insect problems.
- Keep the garden free of weeds that may harbor diseases and insects.
- Hand-pick insects.
- Water earlier in the day so the plants are dry by nightfall.
- Remove diseased plants and plant parts from the garden.
- Control insects using biological controls and natural products.
- Practice crop rotation and consider relocating the garden after several years of cultivation.
- Encourage natural insect predators. Trap slugs under boards and moist burlap laid on the ground, or use beer traps.
- Stay out of the garden when the plants are wet to prevent spreading diseases.
- Do not use tobacco products while working in the garden or just before entering the garden.
- Mix different vegetables or vegetable varieties in a row to eliminate monocultures and the chance for a disease to spread rapidly.
Table 9. Nutrient content of organic materials.
| Material | N (%) | P2O2 (%) | K2O (%) | Availability |
| rock phospate | 0 | 20–30 | 0 | very slow |
| bone meal | 1 | 15 | 0 | slow medium |
| compost | up to 3 | 1 | 1 | slow |
| dried blood | 12 | 1.5 | .5 | medium rapid |
| fish emulsion | 5 | 2 | 2 | rapid |
| cotton seed meal | 6 | 3 | 1.5 | slow medium |
| cow manure, fresh | .25 | .15 | .25 | medium |
| sawdust | 4 | 2 | 4 | very slow |
| wood ashes | 0 | 1–2 | 3–7 | rapid |

The Mississippi State University Extension Service is working to ensure all web content is accessible to all users. If you need assistance accessing any of our content, please email the webteam or call 662-325-2262.


