
Mississippi Water Stewards Youth Biomonitoring Manual
Download the PDF above for lesson handouts.
Introduction
What Is Mississippi Water Stewards?
Mississippi Water Stewards (MSWS) is a statewide citizen water-monitoring and education program. The program aims to build the capacity in every major Mississippi watershed for citizens to understand local water issues, respond via monitoring if necessary, and lead local efforts to protect water resources through scientifically sound, actionable solutions.
Volunteers are trained in three different water monitoring types: chemistry, fecal coliform bacteria, and biomonitoring. Once trained, citizens monitor the water quality of streams, rivers, lakes, ponds, and coastal waters around the state.
What Is Biomonitoring?
Biomonitoring involves assessing macroinvertebrates, which are aquatic insects, crustaceans, snails, and mollusks in wadable bodies of water like streams, creeks, ponds, and lakes. Aquatic macroinvertebrates are good indicators of water body health because they spend all or most of their lives in water, they are easy to collect, and they differ in their tolerance of pollution. Because macroinvertebrates differ in their tolerance to pollution, surveying the presence of different macroinvertebrates in a community over time can give scientists insight into the health of a water body. Biomonitoring is a cost-effective way for anyone to monitor water quality conditions with just a few materials.
How to Use This Educational Tool
We want to help you deliver this program safely and effectively, without spending extra time or resources. To help you get started, we recommend completing a 1-hour in-person or virtual orientation. This is not required, but we are glad to assist you as needed. Please email beth.baker@msstate.edu or call (662) 325-7491 to set up a time to discuss implementing this curriculum.
If your students are not familiar with water science, we recommend getting them familiar with the hydrological cycle, watersheds, and water quality with our Water Science and Stewardship manual (MSU Extension Publication 3423).
This manual will walk you step-by-step through educating youth about how scientists use living organisms as indicators of water quality and how they can conduct biomonitoring as citizen scientists. Each section is thoughtfully designed to help participants build on the basics of water science through monitoring aquatic life of a nearby water body to determine if the water quality is good, fair, or poor. Throughout these lessons, students will learn what biomonitoring is, why it is important, where in water bodies to sample, how to conduct the monitoring and identify aquatic insects, and how to turn data collected into important information.
Quick Tips
![]() Indicates explore by doing a hands-on or interactive activity. This allows students to learn by doing!
Indicates explore by doing a hands-on or interactive activity. This allows students to learn by doing!
![]() Indicates questions to allow learners to reflect on the topic and to share what is important or interesting about the topic or activity.
Indicates questions to allow learners to reflect on the topic and to share what is important or interesting about the topic or activity.
![]() Indicates where to connect ideas to each other and to what the learner already knows.
Indicates where to connect ideas to each other and to what the learner already knows.
This allows students to apply information in a meaningful way so that they retain new content.
A great way to allow students to engage, think critically, and explore topics is to let them lead the learning. Use the question prompts in this manual before and after activities to connect ideas about macroinvertebrates, pollution, and biomonitoring to other concepts familiar to the students. Use neighborhood water bodies as living laboratories to investigate water!
Each module is designed to minimize educator preparation time, and to allow educators to learn with students through each activity. Take time to further explore topics students are interested in and spark the curiosity in youth so that they want to explore! Encourage students to ask more questions and, as time allows, help them seek out answers. The internet has a wealth of resources. The best way to ensure reliability is to use information from government agencies (state, local, and federal), academic institutions like universities, and scientific sources using the Google Scholar search engine. YouTube videos can also help students visualize complex concepts, but make sure the information was developed by a credible source.
Correlations to Mississippi Science Standards
Mississippi 4-H Common measures 2.0 – Universal Common Measures and Science
Mississippi College and Career Readiness Standards for Science
- Ask questions and define problems. Evaluate and communicate information.
- Environmental Science (ENV.2) Natural Resources Use and Conservation
- ENV.2.5 Research various resources related to water quality and pollution (e.g., non-fictional text, EPA’s Surf Your Watershed, MDEQ publications) and communicate the possible effects on the environment and human health.
- ENV.2.6 Enrichment: Obtain insects from a local source (e.g., stream on campus, rainwater, ditch water) to monitor water quality over time, using a spreadsheet program to graphically represent collected data.
Curriculum
- Lesson 1: What Is Biomonitoring?
- Lesson 2: Where Do Macroinvertebrates Live?
- Lesson 3: How Do We Sample Macroinvertebrates?
- Lesson 4: How Do We Identify and Sort Macroinvertebrates?
- Lesson 5: What Does the Data Tell Us about the Water Body Condition?
- Lesson 6: How Do We Turn Our Data into Information?
Student Safety
Sampling in water bodies is fun; however, accidents may happen whenever there is a group of students involved in an outdoor activity. Use common sense and think ahead of possible problems with an activity location. If it’s not feasible for your class to go to a water body, as the instructor, you can bring the water body and surrounding habitat to them through interactive online modules and use the leaf pack method (Lesson 3) to sample for macroinvertebrates. Below are a few general safety guidelines.
- Keep a freshly supplied first aid kit close at hand in case of accidents. Avoid sampling during lightning storms, heavy rain, or high-water events.
- Avoid sampling at sites that have deep holes or steep banks.
- Keep an eye out for poison ivy.
- Include at least one adult helper for every 10 students.
- Remind students that rocks and mud can be slippery.
- Decide on your class wading policy beforehand. If wading, students need to wear appropriate footwear such as an old pair of sneakers, boots, or waders. It is recommended that they also bring a change of clothes. Do not let students wade in the water body barefoot. Closed-toed shoes are recommended for all types of monitoring.
Water Body Access
- Make sure there is adequate space for parking or dropping students off at the water body site without being near traffic.
- Clear briars and brush from the path to the water body if possible.
Choosing a Monitoring Site
Some of the activities in this manual require an educator and/or students to enter shallow, wadable water bodies. Choosing a stream or pond at or near your class/meeting location can provide a convenient, low-cost way to have all students participate in the scheduled outdoor activities. If this isn’t feasible, that’s OK! We have alternative options to bring the outdoors to your classroom. If you decide to go outdoors, make sure to wait 48 hours after a rainfall event to visit the site, because water depth can vary significantly due to runoff. Use the general characteristics found in Table 1 to identify sites.
Table 1. Ensure that monitoring sites are convenient, legal, accessible, safe, and strategic (CLASS). Examples of characteristics that might meet the criteria are below.
| Convenient | Legal | Accessible and Safe | Strategic |
| At your class meeting place or close by. | Public property or private property with permission from the landowner. | Not too difficult or dangerous to access. | Strategically located in a key area (land uses contributing point or nonpoint source pollution; drinking water supplies; roads, bridges, and public access corridors). |
In the Water Body
- Do not allow students to enter a water body if the water levels are high, currents are swift, or water pollution is present (i.e., a recent sewer overflow).
- Because of possible bacteria contamination, do not scratch or rub your eyes while working in the water body and until you use hand sanitizer. Wash your hands thoroughly with soap and water after working in the water body. If students have cuts or abrasions on skin that could come in contact with water, have them wear gloves and assign them tasks that do not require getting wet.
- Identify an appropriate area for students to sort macroinvertebrates. Is the water body bank flat enough and big enough for your students to perform the activity? If not, can the students feasibly transport the aquatic insects to a nearby area where these tasks can be completed?
- Remind students that rocks and mud in the water body become very slippery and can cause them to fall.
- Have students work in pairs or groups.
- Do not allow intentional splashing among students.
Collection Permits
No special permits are currently required for biomonitoring for education if the organisms are released alive back into the creek. Be sure to place all organisms back in the stream unharmed after biomonitoring with nets or leaf packs.
Note: Do NOT disturb or collect mussels or crayfish; many in Mississippi are protected and possibly threatened or endangered. Always put aquatic insects back into the water body after biomonitoring.

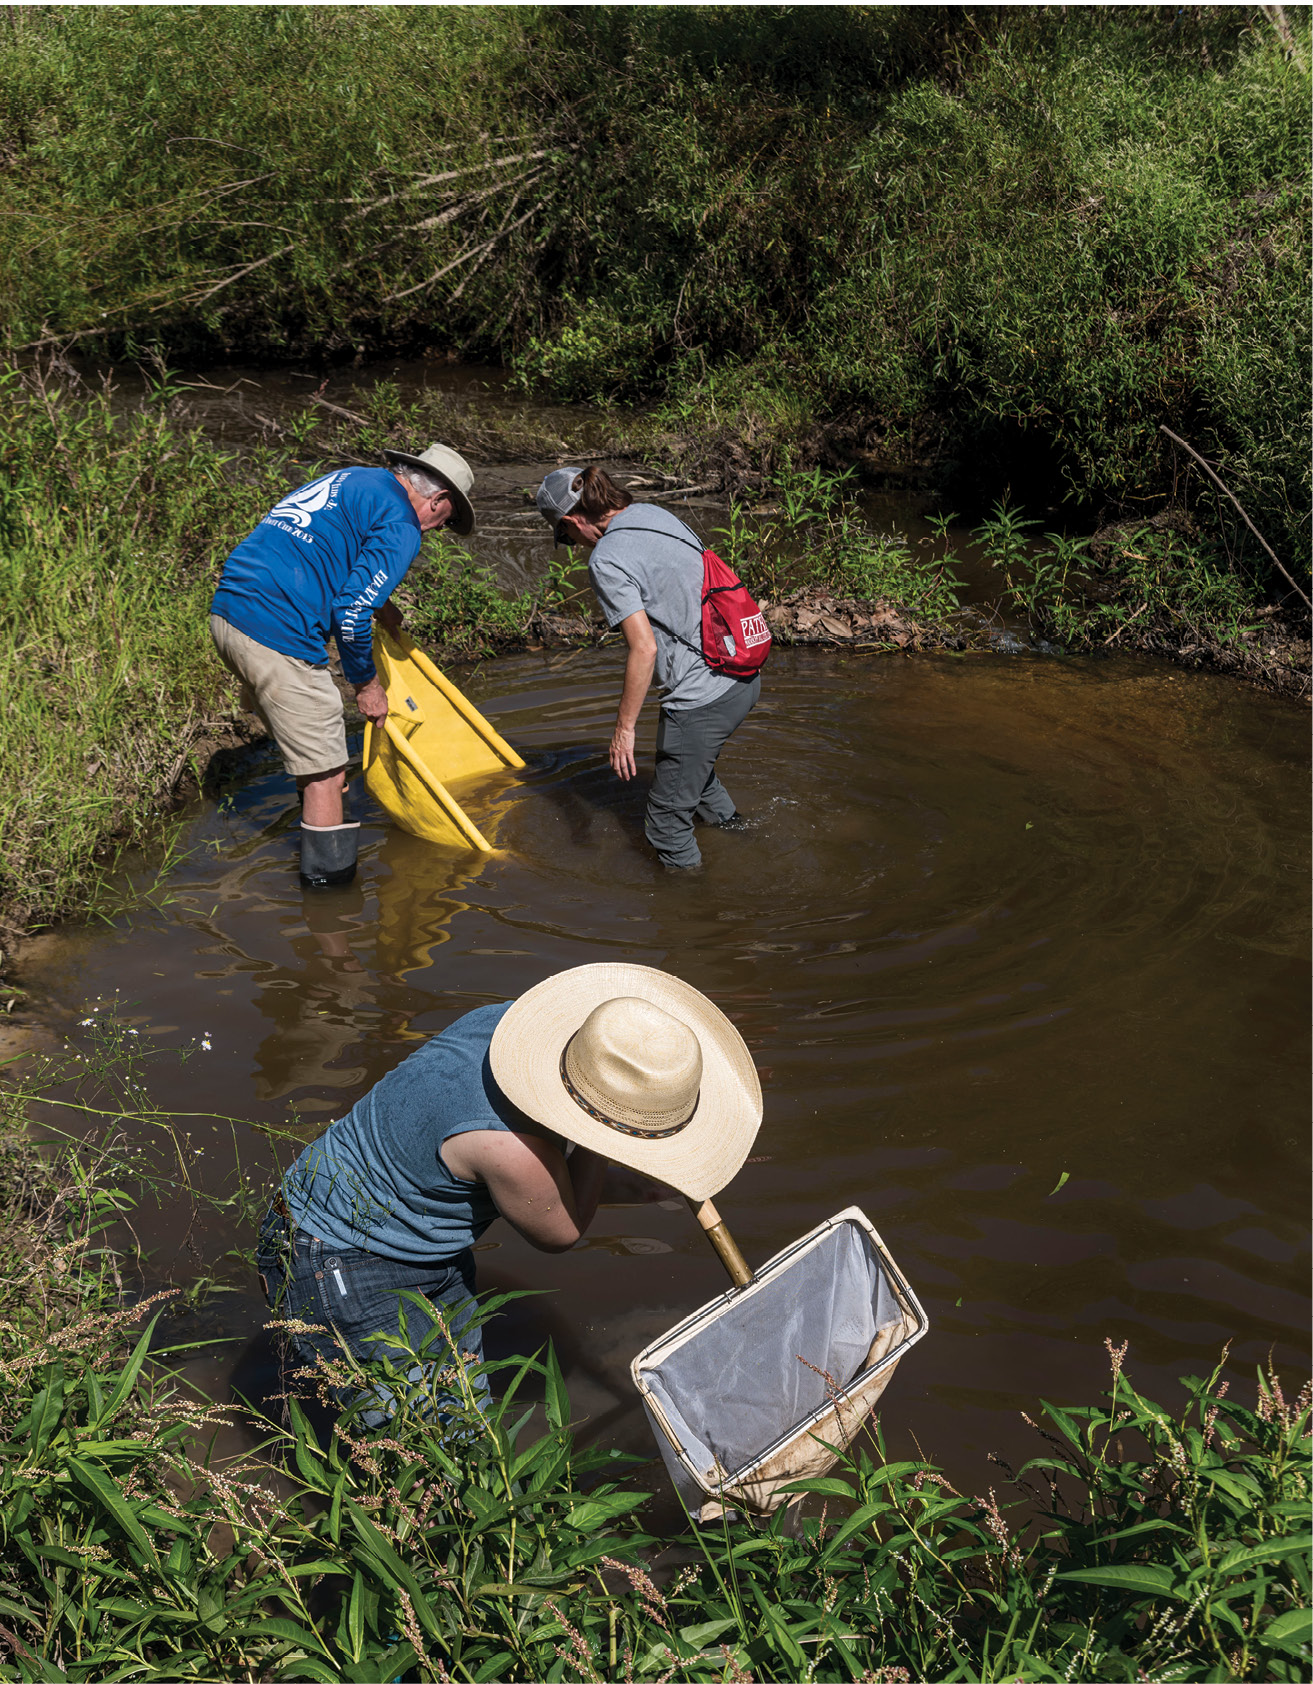
conducting biomonitoring in
Jackson, Mississippi.
Lesson 1: What Is Biomonitoring?
In this lesson, students will become familiar with what biomonitoring is and play a game called MacroMania. This game helps students learn about the different types of macroinvertebrates and increase their understanding of pollution tolerance and intolerance of different macroinvertebrates. The game also explores how different land uses around streams impact water quality, and habitat conditions for macroinvertebrates. If you don’t have access to MacroMania, don’t worry! There’s also an option to have students learn the same concepts through a Leaf Pack Network Simulation (see the Explore section below to access the link). This lesson will help prepare students to identify real macroinvertebrates in Lesson 4.
- Estimated preparation time: 10 minutes
- Estimated activity time: 60 minutes
Objectives
Students will explore the relationship between macroinvertebrate assemblages and water quality.
Key Words
pollution tolerance
simulation
biomonitoring
community assemblage
Materials for MacroMania
- MacroMania is available to purchase online, or you can check it out from the MSWS office.
- MacroMania includes:
- 6 decks of cards (2 blue, 2 yellow, 2 green; see the checklist on page 5 of the MacroMania manual)
- 6 sorting sheets
- 1 MacroMania manual
- 1 MacroMania poster
- At least 2 site maps
- At least 2 stream water quality worksheets
Materials for Leaf Pack Simulation
- Computer and internet access
- A projector if playing as a class
Warm-Up
Get students familiar with biomonitoring by working through the questions and related information below. You can share all the information with students after asking them the question prompts and giving them time to answer.
Q: What lives in Mississippi waters like ponds, lakes, streams, and creeks?
A: Many types of fish, amphibians, reptiles, mammals, plants, plankton, bacteria, and creatures called macroinvertebrates live in our waters and around the globe.
Q: What are benthic macroinvertebrates?
A: Benthic refers to living on the bottom of a water body in the rocks, plants, or sand/mud; macro means large enough to see with the naked eye; and invertebrate refers to animals without backbones. These are aquatic insects that spend part of their life cycle in water bodies.
Q: How can macroinvertebrates help us monitor water?
A: Macroinvertebrates are indicators of water quality. Benthic macroinvertebrates differ greatly in their ability to survive or tolerate physical and chemical characteristics (e.g., temperature, suspended sediments in the water, and low dissolved oxygen) related to pollution and human disturbances. Therefore, they are useful for evaluating water body health. In clean, healthy water bodies, macroinvertebrates intolerant of pollution thrive and outcompete many species that are more tolerant of pollution. As pollution increases, the pollution-intolerant organisms are outcompeted by more pollution-tolerant species that sometimes become very abundant. Note that assemblages of macroinvertebrates will not usually fall into water quality categories, but rather you will likely see a mixture of these groups.
Watch
Watch this video to learn more about how macroinvertebrates have different tolerances to pollution!
 Explore
Play MacroMania for an introduction to macroinvertebrates.
Follow the instructions accompanying MacroMania. This game simulates a stream biological assessment, which is used to determine water quality based on macroinvertebrate assemblages, or the proportion of Group 1, Group 2, and Group 3 macroinvertebrates sampled. Play the game!
Play the Leaf Pack Network Simulation for an introduction to macroinvertebrates.
Have students use computers with access to the internet to play the simulation, or show the simulation with a projector and play together. Download the simulation instructions at the top of the page, or scroll below the simulation window to view instructions directly on the page.
Following the instructions, the class will explore different streams (A–D). While exploring each stream, they will need to explore and identify habitat characteristics, deploy a leaf pack to capture and identify macroinvertebrates, test water chemistry, and determine stream health! This game simulates a stream biological assessment, just like MacroMania. Stream biological assessments are used to determine water quality based on macroinvertebrate assemblages, or the proportion of Group 1, Group 2, and Group 3 macroinvertebrates sampled. Play the game!
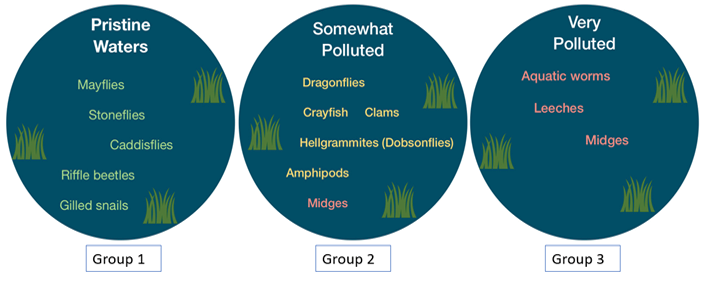
The types of benthic macroinvertebrates you find in the water body indicate the level of pollution in the water.
 Reflect
- Which site/stream had the best water quality?
- Why do you think you sampled different types of macroinvertebrates at different sites?
A: There are different land uses (forest, farm, and city) upstream of each site. These land uses release different pollutants in various quantities to nearby water bodies. The presence and abundance of pollutants in a stream will influence the types of macroinvertebrates that are able to survive and reproduce there.
- Which land use negatively impacted the macroinvertebrates the most? Which land use supported the most macroinvertebrates?
 Connect
- Based on what we have learned in this activity, do you expect water quality downstream of your town to have excellent, fair, good, or poor water quality?
- What do you think are the benefits of using macroinvertebrates as indicators of water quality instead of other chemical tests?
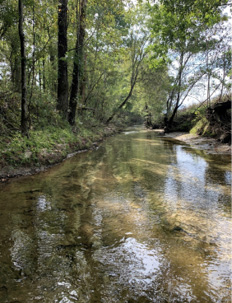
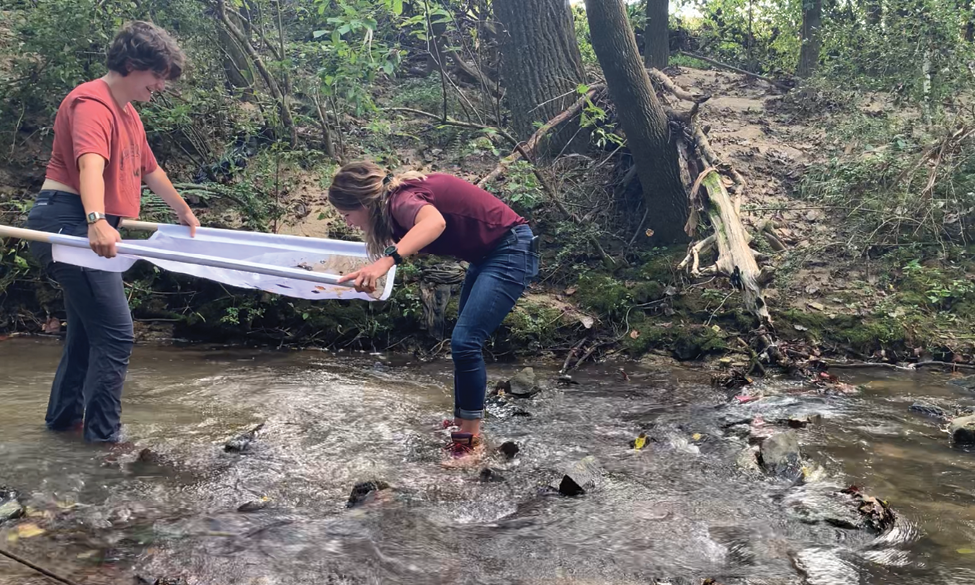
when water levels are low, making it a good location for biomonitoring.
Lesson 2: Where Do Macroinvertebrates Live?
An important part of macroinvertebrate sampling is to make a visual assessment of the habitat characteristics at and around your monitoring site. At MSWS, we do this through the Water Body Walk, which is a visual assessment of a water body and its watershed. It is done by walking along a water body and noting physical characteristics where macroinvertebrates typically live and surrounding land use. The central purpose of a water body walk is to answer the question: What’s happening in the watershed that may be affecting this water body and the organisms that live in it?
If there is a local pond, stream, or creek that is convenient, legal, accessible, safe, and strategic, which will be used for biomonitoring in Lesson 3, use the same site to conduct Activities 1 and 2 in this lesson. Always scout the site before taking the class to the site. It’s difficult to gauge steepness of banks, vegetation, and other characteristics from a virtual map. Doing a site visit beforehand will also allow you to place a leaf pack at the site you plan to monitor with your class (see instructions and materials in Lesson 3).
- Estimated preparation time: 15 minutes
- Estimated activity time: 1 hour
*Keep travel time in mind for this activity.
Objective
Students will identify physical and biological characteristics of watersheds, learn how landscape slope influences water movement (hydrology), and explore how humans influence watersheds through land use, pollution, and community infrastructure.
Key Words
watershed
algae
vegetation
streambank
pollution
microhabitat
Materials
- Internet access, computer, and projector
- Transportation to a local monitoring site (optional)
- Copies of Lesson 2 Handout 1: Macroinvertebrate Microhabitats
- Copies of Lesson 2 Handout 2: Water Body Walk Form
Warm-Up
There are various techniques to conduct biomonitoring, but they all require assessing macroinvertebrate communities that live in a wadable body of water, like streams, creeks, and ponds. To adequately monitor them, we need to know where they live.
Get familiar with microhabitats of streams where macroinvertebrates live by having students watch the video below and explore Lesson 2 Handout 1.
Where do benthic macroinvertebrates live?
Explore
Identify and Explore a Monitoring Site
Activity 1: Explore your watershed virtually.
The first step to protecting the water in your area is identifying the watershed in which you live. Knowing this will allow you to consider human activity within your watershed and to pinpoint what land use activities may be impacting it.
Use the EPA How’s My Waterway tool to find out more about your watershed!
- What watershed do we live in?
- What water body are we sampling in?
- What land areas drain into our watershed?
- What are some uses of land in our watershed?
Activity 2: Explore your monitoring site (optional based on safety; an adult instructor can complete this part of the activity and discuss with the class).
Have each group of students use the MSWS Water Body Walk form to conduct a visual assessment of the area surrounding your sample site. Check all answers that apply for each question.
Reflect
After students have completed the Water Body Walk activity, they should discuss how site conditions might influence the water quality of their sampling site and the macroinvertebrates that might live there. Have students synthesize observations made during the activity and the information they have learned about water pollution.
- How many different microhabitats did we identify that macroinvertebrates could live in?
- Do you expect that the water quality will be poor, fair, good, or excellent? Why?
- Do you expect to find a lot of Group 1, Group 2, or Group 3 macroinvertebrates? Why?
Connect
Emphasize that the water body observed by the class is part of a larger watershed, just as they saw online and in MacroMania. This water body is where water in this watershed drains when it rains. There are likely several pollutants entering the water body.
Students can discuss the following questions:
- Which pollutants would you expect to see given the land uses around the site?
- How might these pollutants affect aquatic life?
- What do you think is the purpose of biomonitoring?
Lesson 3: How Do We Sample Macroinvertebrates?
In this module, students will explore how biomonitoring is conducted and learn how to conduct biomonitoring using three simple methods: kick nets, dip nets, and leaf packs. The primary method we’ll use to conduct biomonitoring in this lesson is the leaf pack method. This method is great because it’s simple and safe! The instructor should make a leaf pack ahead of time, place it at the monitoring site, leave it there for 2–3 weeks, and retrieve it on the day you plan to conduct Lesson 4. The suggested months to conduct macroinvertebrate sampling are December to March or mid-July to September. Students will be able to capture a variety of macroinvertebrates during these months.
- Estimated preparation time: 30 minutes (including two Warm-Up videos)
3 weeks if using the leaf pack method.
- Estimated activity time: 60–90 minutes (not including travel time)
*Keep travel time in mind for this activity.
Objective
Students will investigate different microhabitats within a stream or pond ecosystem, conduct leaf pack monitoring, and learn how to make their own leaf pack.
Key Words
sampling methods
dip net
kick net
leaf pack
Materials for Leaf Pack Monitoring
- Thermometer
- Scissors
- Onion sacks
- Nylon string
- Rebar metal stake
- Post driver
- Rubber boots or waders
- Sharpie
- Leaves from the local monitoring site
- 5-gallon bucket
- Fine mesh screen or net
- Lesson 3 Handout 1: Biomonitoring Data Form
- Students will turn in their forms after completing this activity. They will finish the forms in Lesson 5.
Materials for Biomonitoring with Kick Nets or Dip Nets
- Dip nets (1–2 to share)
- Kick nets (1–2 to share)
- Thermometer
- Rubber boots or waders
- Three 5-gallon buckets
- Lesson 3 Handout 1: Biomonitoring Data Form
- Students will turn in their forms after completing this activity. They will finish the forms in Lesson 5.
Warm-Up
Learn how to conduct biomonitoring using the leaf pack method. Biomonitoring with leaf packs generally involves placing organic substrate (leaves) in a casing into a water body for enough time to allow macroinvertebrates to colonize the leaf pack.
Learn how to conduct biomonitoring using the kick-net and dip-net methods. Biomonitoring with nets generally involves disturbing substrate manually to dislodge organisms so that they flow into the nets.
Explore
Option 1: Conduct biomonitoring with leaf packs.
- Make and deploy your leaf pack 3 weeks before conducting Lesson 4.
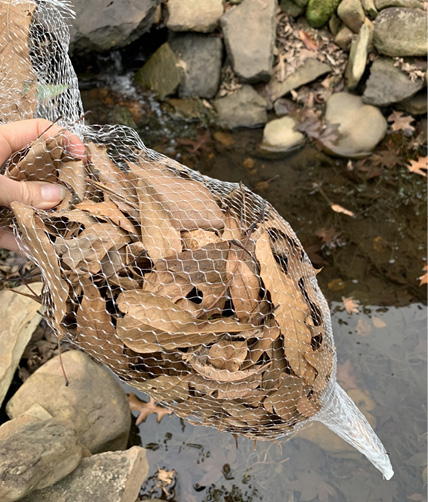
- To make the leaf pack, gather leaves from your local watershed where you will be monitoring. Use gathered leaves to fill the onion bag and tie it closed in a knot. This is your leaf pack!
- To deploy the leaf pack, take it to the water body that you plan to monitor and find a suitable area to secure the leaf pack. If you are in a pond or lake, wade into a depth that is between your shin and knee, in an area with diverse substrate (rocks, gravel, sand, wood debris, submerged vegetation, decaying organic matter). If you are in a stream, wade into the stream to a depth between your shin and knee, look for a place in the stream with riffles and rock substrate; deploying the leaf pack below the riffle will be ideal.
- Once you’ve determined a suitable location, secure the nylon to the onion bag, drive the metal rebar into the sediment of the stream bed, secure nylon string from the onion bag to the rebar, and place the leaf pack on the water body substrate. Use a nearby rock to additionally secure the leaf pack to the water body floor (it should not be floating in the water column). If in a stream, ensure that the leaf pack is in the flow of water.
- Wait 2–3 weeks!
- Retrieve the leaf pack. Fill a 5-gallon bucket halfway with stream water. Untie the leaf pack from the rebar apparatus and place it in the bucket for sorting. Sorting in Lesson 4 can be done on a safe streambank at the monitoring location. Sorting on-site ensures that all organisms are placed back into the stream after sorting and identification is complete.
- Remove the rebar from the stream bed. Remove any supplies from the watershed.
Option 2: Conduct biomonitoring with kick nets and dip nets.
- Gather all supplies for monitoring with dip nets (suitable for wadable stream, pond, or lake) and kick nets (suitable for wadable stream only).
- Travel with your class to the monitoring location.
- If possible, find at least three sites within the water body to conduct sampling to ensure your sample is representative of the water body. If you are monitoring a stream location, look for riffles, runs, and pools to sample in a 1m × 1m (3ft × 3ft) grid. If you are sampling a lake or pond, stay in the shallow areas (<12 inches) and look for varying substrates and vegetation to sample. If possible, in the lake or pond, also try to sample three different areas in a 1m × 1m grid to get a representative sample of the macroinvertebrate community in the water body.
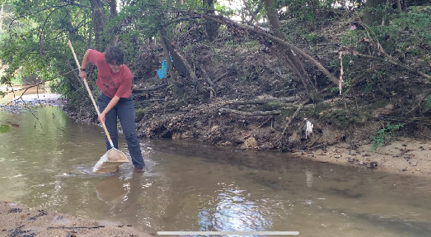
- Starting with the kick net, have two students hold the kick net on either side downstream of rock substrate or from a riffle. Have two additional students gently disturb the substrate upstream of the net using their hands and/or feet to dislodge organisms so that they flow into the kick net.Once the students disturb substrate in a 1m × 1m area, students holding the kick net can slowly and gently scoop the net from a perpendicular position to the water body floor, until it is laying parallel to the water body floor, collecting all debris in the kick net.
- Fold the net to enclose the collected material and place the end with the most material into the bucket. Use stream water to rinse the net (and all the stuff you collected) into the bucket for sorting.
- Repeat kick net sampling as needed.
- Have students use dip nets using kick methods or the jab method to disturb substrate in hard-to-reach locations; also ensure that water flow is always directed into the opening of the dip net. After sampling a 1m × 1m area, rinse contents into a 5-gallon bucket for sorting.
- Repeat dip net method as needed until the group has adequately monitored at least three areas of the water body.
- Combine buckets with water and material from rinsing nets into in one bucket. Mix with hands to dislodge macroinvertebrates and remove large organic debris. Sorting in Lesson 4 can be done on a safe streambank at the monitoring location or in the classroom within 24 hours.
Before Leaving the Site
- Rinse all sampling nets in the water body to remove debris.
- Pick up all sampling equipment from along the water body banks.
- Assign one or more people to patrol the sampling site and collect all paper, plastic, or other scraps that may have been left by the group.
- Give the instructor all data forms to keep for future lessons and discussions.
When You Return Home
- Wash hands thoroughly.
- Return the first aid kit to its proper storage place.
- If needed, rinse equipment with a water hose.
- Dry all sampling equipment and return it to its proper storage location.
Reflect
- Did you find different macroinvertebrates in different microhabitats (leaves, rocks, sand)?
- Why do you think you found different types of macroinvertebrates in different habitats?
- Do you think one of the monitoring methods is more effective to collect different types of macroinvertebrates?
Connect
- Had you ever seen a macroinvertebrate in a water body before this experience? If not, do you think you’ll be more likely to see one or find one in or on a water body in the future?
- What types of recreation activities do you do with your family?
- What types of water bodies do you enjoy for recreation?
Lesson 4: How Do We Identify and Sort Macroinvertebrates?
Students will identify macroinvertebrates with a key and record the numbers of macroinvertebrates they sampled from each tolerance group.
- Estimated preparation time: 10–15 minutes
- Estimated activity time: 40–50 minutes
Objectives
Students will understand how to use a macroinvertebrate identification key.
Students will identify macroinvertebrates and sort them into tolerance groups.
Key Words
tolerance groups
pollution
Materials
- Biomonitoring Data Form from Lesson 3
- Fine mesh screen or net
- 4 white plastic pans or ice cube trays per group for sorting macroinvertebrates
- At least one copy of Lesson 4 Handout 1: Beginner Identification Key and dichotomous key per group (used for identifying organisms and sorting into pollution tolerance groups; lamination is recommended)
- 3–4 plastic spoons per 10 students for sorting macroinvertebrates
- Optional: 3–4 magnifying glasses or observation cups (these magnifying devices help when observing gills, mouthparts, and other structures)
Warm-Up
Watch this video to learn how to identify and sort macroinvertebrates.
Explore
Sort and Identify Macroinvertebrates
- Add a small amount of water to the bottom of four sorting pans or trays and place them in a convenient and flat location for sorting. This should be done in a shaded area, when possible, to keep the water cool.
- Label three of the pans or trays as group 1, 2, or 3, or place the appropriate number of small stones in the pans. The fourth tray may be used as a starting tray from which to sort macroinvertebrates. Be sure everyone understands the labeling system.
- Using 5-gallon buckets with sampling contents from nets or the leaf pack, mix water and organic contents thoroughly to dislodge invertebrates, remove large organic debris, and check for invertebrates. Then pour water with sampling contents through a fine mesh screen or net.
- Wait a few seconds without disturbing the mesh screen, net, or sorting pan. Macroinvertebrates will start moving.
- Gently remove all active macroinvertebrates using tweezers or plastic spoons and place them in an observation cup or tray. Be careful not to squeeze the specimens too hard. Their legs and gills are easily broken if not handled with care.
- Look carefully for small or hidden macroinvertebrates on the front and back of each leaf, pebble, and piece of debris.
- Identify organisms using the picture key. At first all the specimens may look the same, but look closer. The dichotomous key provides some helpful characteristics.
- Once you identify a macroinvertebrate, determine which pollution tolerance group it belongs to and place it in the corresponding pan.
- As you identify macroinvertebrates, use tick marks to keep track of the number of macroinvertebrates you sampled from each taxa on the Biomonitoring Data Form. Fill in this information for each taxa present in your sample. Leave the box empty for taxa that were not found.
*Students will complete the Water Quality Rating calculation in Lesson 5.
If any specimens remain unidentified, discard them or keep them for your collection.
Clean Up
- After sorting macroinvertebrates at the site, return macroinvertebrates safely to the water body.
- Rinse all sorting pans to remove debris.
- Dry and store sorting materials.
Reflect
- How did you sort and categorize different life stages of the same organism? Why?
Different life stages of the same organism should be grouped together in the appropriate Group 1, Group 2, or Group 3.
- How did you treat organisms that were in your sample but not on the data form? Why?
These organisms could be noted but not counted. Typically, the reason a specimen is left out of the MSWS water body evaluation is because it cannot be identified or is an air-breather. Macroinvertebrates that can breathe air can often survive in water with low dissolved oxygen, where animals with gills could not survive.
Connect
- What other animals or plants do you often see in the outdoors?
- Do you think other animals might serve as indicators of good or poor habitat quality?
Lesson 4 Handout 1: Beginner Identification Key
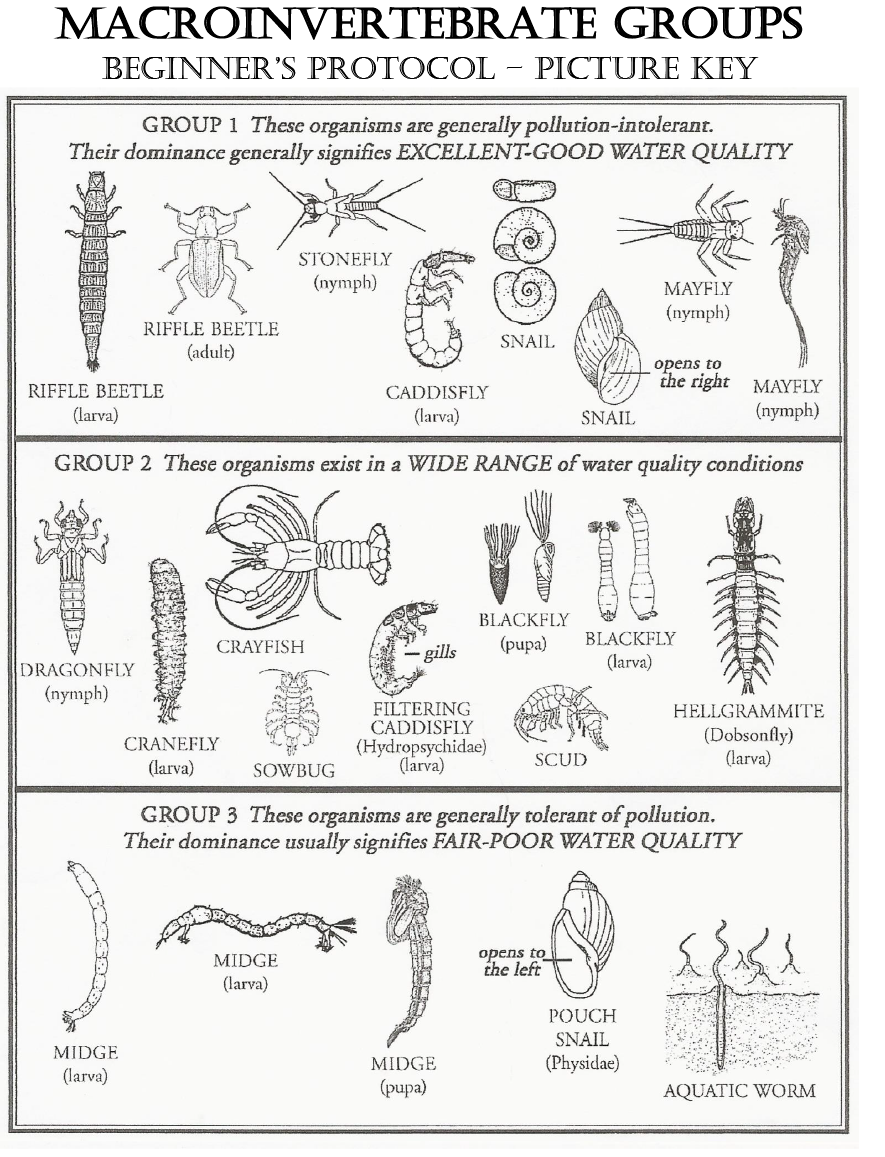
Download image here.
Lesson 5: What Does the Data Tell Us about the Water Body Condition?
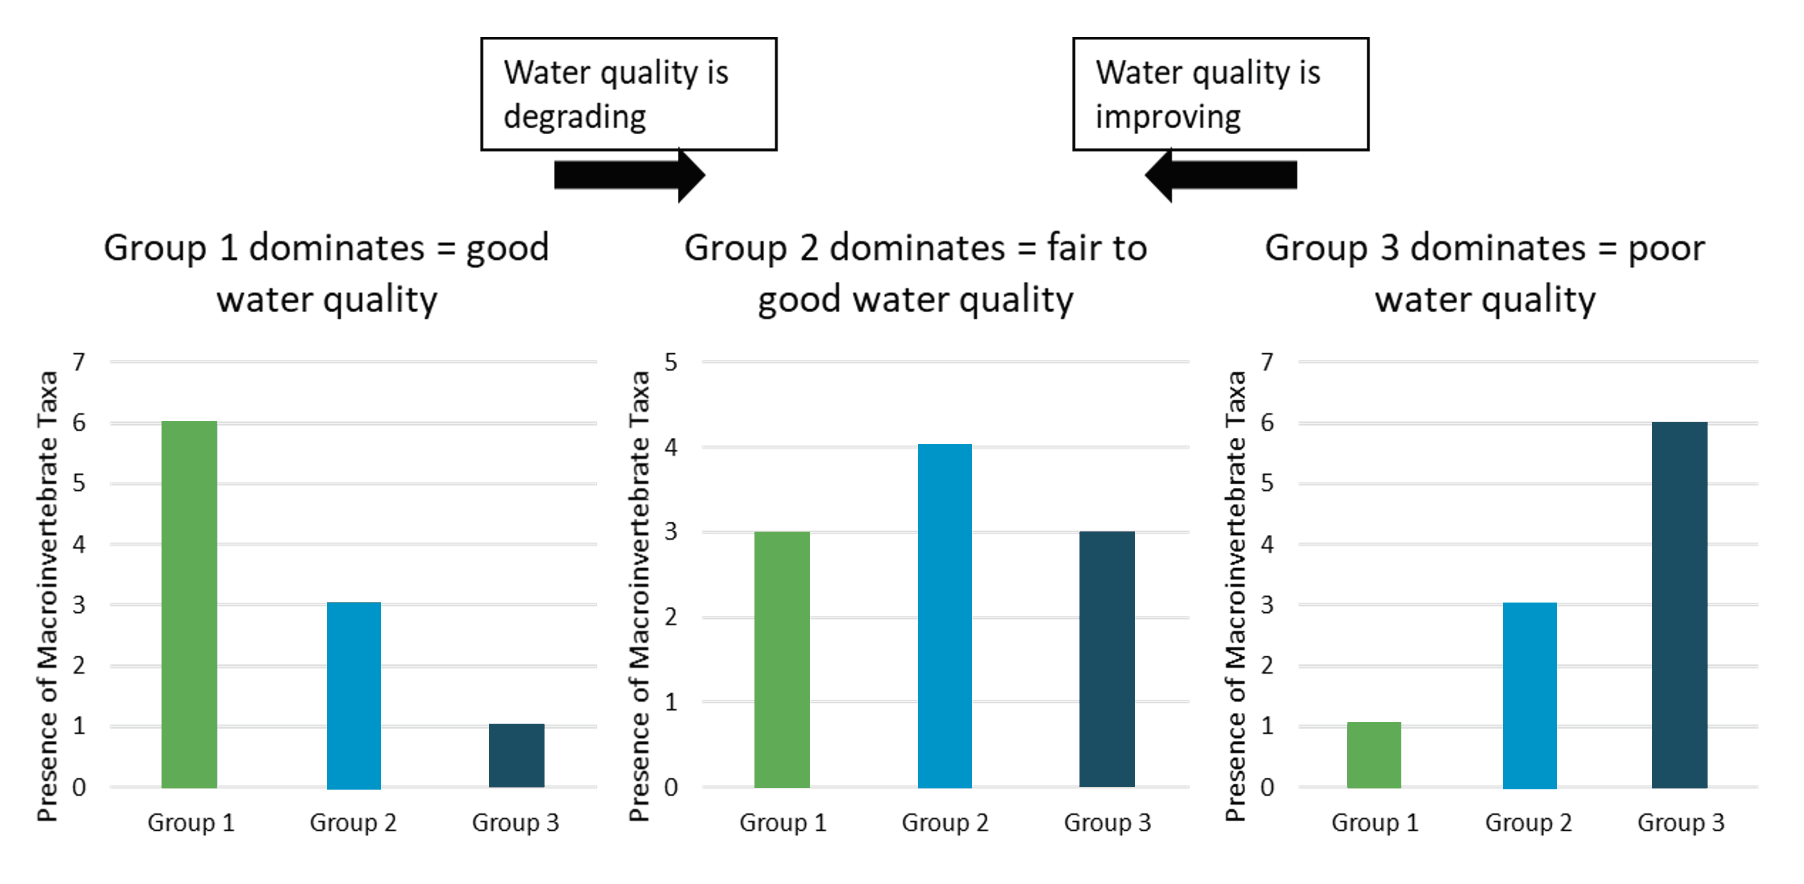
In this lesson, we will be using our macroinvertebrate community data to rate the overall condition of the water body—we call this value a water quality rating. The water quality rating value is calculated using the proportion of Group 1, 2, and 3 taxa collected during sampling. Each group is rated differently based on their tolerance to pollution and the cumulative index value (excellent, fair, good, or poor).
- Estimated preparation time: 5 minutes
- Estimated activity time: 10–15 minutes
Objective
Students will demonstrate computation of biological data, aspects of the scientific process through critical thinking, and data interpretation relative to local water quality.
Key Words
water body quality assessment
biotic index
Materials
Biomonitoring Data Form from Lesson 3
Warm-Up
Determining the Water Body Quality Assessment
Watch this video to learn how to determine the biotic index and water body quality value.
Explore
Determine your water body water quality assessment and biotic index by following the steps below.
- Add up how many taxa you found in each tolerance group. For example, if you found four gilled snails and six riffle beetles, that would be two taxa from Group 1.
- Multiply Group 1 number of taxa by 3, Group 2 number of taxa by 2, and Group 3 number of taxa by 1. This is a way of weighing more pollution-intolerant animals so that they are “heavier” than (account for more of the water body quality assessment) pollution-tolerant ones. Higher water body quality assessment values indicate good water quality.
- Move on to the water body biotic indices portion of your data sheet. Add up the number of taxa sampled by adding the number of taxa for each group together.
- Then, add together each index value and record this value in the space next to Cumulative Index Value (CIV).
- Next, locate the Water Quality Rating of CIV section of the data sheet. Place a check mark in the box next to the category of the Cumulative Index Value.
Reflect
- Why are tolerance group totals multiplied by different numbers?
We want macroinvertebrates that require clean water to have larger numbers compared to macroinvertebrates that do not require clean water so that when we add the numbers together, high numbers reflect good water quality and low numbers reflect poor water quality.
- What does a water body quality assessment tell us?
Connect
- When you go to the doctor, how does the doctor assess your health?
Just like you and your classmates have things in common, you also have experiences that make you different, like places you’ve lived that might have different weather and the foods your family likes to eat. Even though we can use biomonitoring as a tool to assess health in different watersheds (just like a doctor uses the same test to assess the health of different individuals), what characteristics of a watershed will be unique to different locations? Hint: Think back to your Water Body Walk form!
Lesson 6: How Do We Turn Our Data into Information?
Students will visualize their biomonitoring results by graphing the data.
- Estimated preparation time: 5–10 minutes
- Estimated activity time: 30–45 minutes
Objectives
Students will demonstrate data visualization through graphing exercises and data interpretation by communicating what graphed data mean relative to the water body water quality.
Key Words
data analysis
bar graph
Materials
- Data sheets from Lessons 3–5 (Water Body Walk Form and Biomonitoring Data Form)
- Copies of Lesson 6 Handout 1: Number of Taxa per Group (1 per student)
- Copies of Lesson 6 Handout 2: Number of Macroinvertebrates by Identified Type (1 per student)
Explore
Students will create two bar graphs.
- Using data recorded on the Biomonitoring Data Form, create a bar graph for the number of taxa within each tolerance group. Color code each tolerance group (Green = Group 1, Yellow = Group 2, Red= Group 3).
- Using data recorded on the Biomonitoring Data Form, create a bar graph for the number of each type of macroinvertebrate.
These graphs will help students see changes in abundance of macroinvertebrates and tolerance group members.
Reflect
All this work makes up a single sampling event. The data describe the conditions of the sampling site at one time, on one day of the year, in one year of its many years. Water body quality changes over time, from season to season and from year to year. As a class, think carefully about the following questions:
- What macroinvertebrate group was the largest—Group 1, 2, or 3?
- What type of macroinvertebrate was the most abundant?
- Did you find many different types of macroinvertebrates?
Connect
- Does sampling once allow us to determine the quality of a water body?
It depends. With biomonitoring, we can tell what conditions were like before we sampled because the macroinvertebrates there have been living there since they were eggs. When we monitor water, we are generally trying to answer the question: Is my water body getting better or worse, and why? To understand the long-term water quality trends in a water body, we need to have several samples from the same time of year over multiple years from the same location.
- Do you think the type of macroinvertebrates we find could change throughout the year? Why or why not?
Probably, because macroinvertebrates have different life cycles. There are certain times of the year when macroinvertebrates emerge in an aquatic ecosystem, and once they’re large enough to see with a human eye, we are more likely to detect them when monitoring.
For water bodies that are either improving or already healthy, monitoring information is important for water body protection. For water bodies that are getting worse, it is important to collect monitoring information that can be used to identify and correct pollution problems. It is impossible to assess if the health of a water body is getting better or worse by testing the water only once, so depending on the type of test, monitors test the water weekly, monthly, or seasonally.
Mississippi Water Stewards Program
775 Stone Blvd
P.O. Box 9690
Mississippi State, MS 39762
(662) 325-7491
https://extension.msstate.edu/natural-resources/water/mississippi-water-stewards
The information given here is for educational purposes only. References to commercial products, trade names, or suppliers are made with the understanding that no endorsement is implied and that no discrimination against other products or suppliers is intended.
Publication 3886 (06-23)
By Beth Baker, PhD, Associate Extension Professor; Madison Gnoose, Intermittent Worker; and Leslie Burger, PhD, Associate Extension Professor, Wildlife, Fisheries, and Aquaculture.

The Mississippi State University Extension Service is working to ensure all web content is accessible to all users. If you need assistance accessing any of our content, please email the webteam or call 662-325-2262.

