
Plant Analysis Sampling Instructions
This publication tells you how to collect a plant tissue sample for analysis. Remember: Plant analyses and evaluations are worthless unless you submit the proper plant part. Following are instructions as to the plant part, stage of growth to sample, and the number of plants to sample.
- Do not sample:
- Dead or diseased plants.
- Insect- or mechanically-injured plants.
- Stressed plants (those that have suffered from extreme temperatures or moisture).
- Plants with soil-covered leaves.
- Plants in the advanced fruiting stages.
- Plants that have had no rainfall since a foliar application of insecticides, fungicides, or nutrient elements.
- Plants that have shown deficiency symptoms for a prolonged period of time.
- Early in the morning or on extremely cloudy days. Nitrates accumulate under these conditions.
- Place plant tissue samples inside a large paper bag. Do not wrap or enclose tissue samples in polyethylene bags (freezer bags) or other impermeable containers. Let succulent or wet tissue samples air-dry for at least one day before mailing to the lab.
- You may want to compare a normal plant with a suspected nutrient-deficient plant. If so, take two samples—one from the normal plant and the other from the abnormal plant. Place each sample in a separate paper bag. Use individual mailing containers, and make reference to each sample.
- When sampling instructions are not given for the crop you want to sample, a good rule of thumb is to sample the most recently matured leaves. If you are in doubt, contact your county Extension agent.
- Complete the questionnaire as accurately as possible. Feel free to write additional comments about the crop in question on a note and attach to the questionnaire. Place this information inside the small envelope attached to the mailing kit.
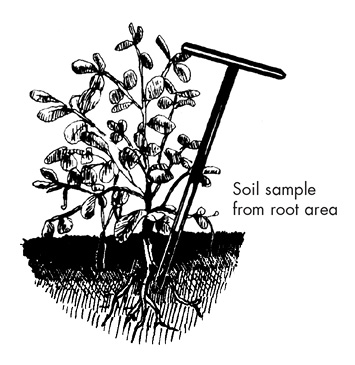
- When possible, collect a soil sample from the same location and time as the plant sample was taken. Send soil samples separately from plant samples, but make reference to each sample provided.
For more information, contact your county MSU Extension office.
|
Stage of Growth |
Plant Part to Sample |
No. of Plants to Sample |
|---|---|---|
|
Corn¹ |
||
|
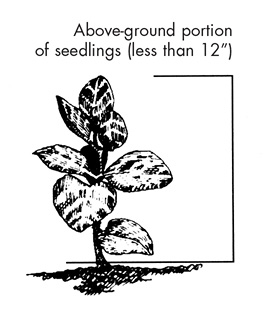
Seedling stage (less than 12”) |
All the aboveground portion. |
15–20 |
|
Before tasseling |
The entire leaf fully developed below the whorl. |
10–15 |
|
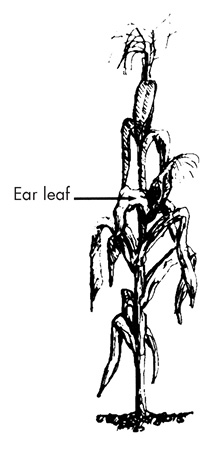
From tasseling and shooting to silking |
The entire leaf at the ear node (or immediately above or below it). |
10–15 |
|
Soybeans or Other Beans² |
||
|
Seedling stage (less than 12”) |
All the aboveground portion. |
20–30 |
|
Before or during initial flowering |
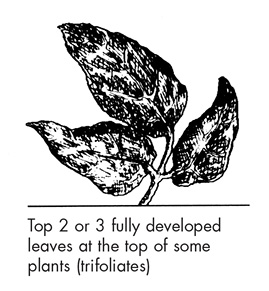
Two or three fully developed leaves at the top of the plant. |
20–30 |
|
Small Grain (Wheat, Oats, Rye)³ |
||
|
Seedling stage (less than 12”) |
All the aboveground portion. |
20–30 |
|
Before heading |
The four uppermost leaves. |
40–50 |
|
Hay, Pasture, or Forage Grasses |
||
|
Before seed head emergence or at the optimum stage for best quality forage |
The four uppermost leaf blades. |
40–50 |
|
Alfalfa |
||
|
Before or at 1/10 bloom stage |
Mature leaf blades taken about 1/3 of the way down the plant. |
40–50 |
|
Clover and Other Legumes |
||
|
Before bloom |
Mature leaf blades taken about 1/3 of the way down from the top of the plant. |
40–50 |
|
Sorghum-Milo |
||
|
Before or at heading |
Second leaf from top of plant. |
40–50 |
|
Peanuts |
||
|
Before or at bloom stage |
Mature leaves from either the main stem or cotyledon lateral branch. |
20–30 |
|
Cotton |
||
|
Before or at first bloom or when first squares appear |
Youngest fully mature leaves on main stem. |
20–30 |
¹Sampling after silking is not recommended.
²Sampling after pods begin to set is not recommended.
³Sampling after heading is not recommended.
|
Stage of Growth |
Plant Part to Sample |
No. of Plants to Sample |
|---|---|---|
|
Potatoes |
||
|
Before or during early bloom |
Third to sixth leaf from growing tip. |
20–30 |
|
Head Crops (such as Cabbage) |
||
|
Before heading |
First mature leaves from center of whorl. |
20–30 |
|
Tomatoes (Field) |
||
|
Before or during early bloom stage |
Third or fourth leaf from growing tip. |
20–30 |
|
Tomatoes (Greenhouse) |
||
|
Before or during fruit |
Young plants: leaves adjacent to second and third clusters. Older plants: leaves from fourth to sixth clusters. |
20–30 |
|
Peppers |
||
|
Before bloom |
Most recently matured leaf. |
20–30 |
|
Beans |
||
|
Seedling stage (less than 12”) |
All the aboveground portion. |
20–30 |
|
Before or during initial flowering |
Two or three fully developed leaves at the top of the plant (trifoliates). |
20–30 |
|
Root Crops (such as Carrots, Onions, Beets) |
||
|
Before root or bulb enlargement |
Center mature leaves. |
20–30 |
|
Celery |
||
|
Midgrowth (12–15” tall) |
Petiole of youngest mature leaf. |
20–30 |
|
Leaf Crops (such as Lettuce, Spinach, Turnips, Mustard) |
||
|
Midgrowth |
Youngest mature leaf. |
20–30 |
|
Peas |
||
|
Before or during initial flowering |
Leaves from the third node down from the top of the plant. |
20–30 |
|
Sweet Corn |
||
|
Before tasseling |
The entire fully mature leaf below the whorl. |
20–30 |
|
At tasseling |
The entire leaf at the ear node. |
20–30 |
|
Melons (such as Watermelons, Cucumbers, Muskmelons) |
||
|
Early stages of growth before fruit set |
Mature leaves near the base portion of plant on main stem. |
20–30 |
|
Stage of Growth |
Plant Part to Sample |
No. of Plants to Sample |
|---|---|---|
|
Apples, Apricots, Plums, Prunes, Peaches, Pears, Cherries |
||
|
Midseason |
Leaves near base of current year’s growth or from spurs. |
20–30 |
|
Strawberries |
||
|
Midseason |
Youngest full expanded mature leaves. |
20–30 |
|
Pecans |
||
|
6 to 8 weeks after bloom |
Leaves from terminal shoots, taking the pairs from the middle of the leaf. |
20–30 |
|
Walnuts |
||
|
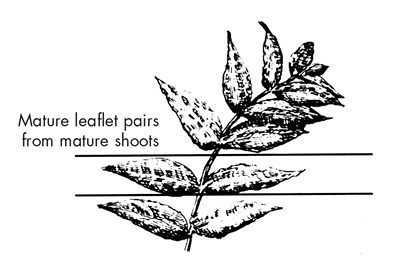
6 to 8 weeks after bloom |
Mature leaflet pairs from mature shoots. |
20–30 |
|
Grapes |
||
|
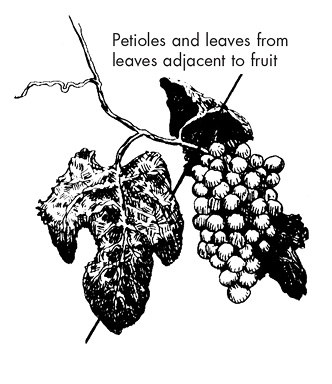
From end of bloom period through August |
Petioles and leaves from leaves adjacent to fruit clusters. |
20–30 |
|
Berries |
||
|
Midseason |
Youngest mature leaves on laterals or “primo” canes. |
20–30 |
|
Stage of Growth |
Plant Part to Sample |
No. of Plants to Sample |
|---|---|---|
|
Ornamental Trees |
||
|
Current year’s growth |
Fully developed leaves. |
20–30 |
|
Ornamental Shrubs |
||
|
Current year’s growth |
Fully developed leaves. |
20–30 |
|
Turf |
||
|
During normal growing season |
Leaf blades. Clip by hand to avoid contamination with soil or other material. |
1/2 pint of material |
|
Roses |
||
|
During flower production |
5-leaflet leaves below bud. |
20–30 |
|
Chrysanthemums |
||
|
Before or at flowering |
Most recently matured leaf from top of plant. |
20–30 |
|
Carnations |
||
|
Unpinched plants |
Fourth or fifth leaf pairs from base of plant. |
20–30 |
|
Pinched plants |
Fifth and sixth leaf pairs from top of primary laterals. |
20–30 |
|
Poinsettias |
||
|
Before flowering |
Most recently matured, fully expanded leaves. |
20–30 |
|
Begonias (Rieger elatior) |
||
|
Before heavy flower formation |
First leaf from top that is 2 or more inches wide. |
20–30 |
|
Azaleas, Camellias |
||
|
Before flowering |
Most recently matured leaves. |
20–30 |
Be sure to take the proper plant sample:

Publication 1224 (POD-12-22)
Reviewed by Keri Jones, PhD, Laboratory Coordinator, Plant and Soil Sciences.
The Mississippi State University Extension Service is working to ensure all web content is accessible to all users. If you need assistance accessing any of our content, please email the webteam or call 662-325-2262.
