Showmanship and Grooming


Showmanship is the conditioning, grooming, and presenting of a horse to its best advantage. Conformation of the horse should not be considered. However, it is easier to groom and show a horse with good conformation than one with poor conformation. Look at the horse and study his faults; try to correct these faults and make him look as much like the ideal horse as possible. To do this, you must have a good mental picture of the ideal horse of the breed being shown.
Conditioning, grooming, and training a horse for showmanship cannot be done quickly. Sometimes readying a horse for show takes three to six months, depending on the time of year you start, the age of the horse, and how quickly the horse responds.
Conditioning
- Get the horse in good health. Feed a balanced ration (one with enough protein, vitamins, and minerals). Put your horse on a regular deworming schedule. If possible, take a fecal sample to your veterinarian, and deworm based on evaluation.
- Exercise the horse regularly. This may be done under the saddle, loose in a pen, or on a lunge line. Exercise removes excess fat, adds muscle tone, and makes the horse look like an athlete.
- Trim feet when necessary. Do not let lack of trimming cause incorrect action or conformation.
- Train the horse to lead correctly. Train the horse to lead so that his head is just slightly back and off to the right of your right shoulder. He should respond to you quickly at a walk or trot. Horses with good action show better when moved at a brisk gait. Horses moving slowly sometimes show a springy action and, in some cases, drag their feet. The horse that moves out well will flex at the joints and have a smoother flowing action. A light tug on the lead shank should bring the horse to a stop. The horse should settle down but be alert after the stop.
- Train the horse to stand. A horse can be trained to stand when you face him and to follow you when you turn your back to him. If you have taught the horse to recognize these movements during training, he will know what to expect in the ring. When you set up the horse, use the lead shank and move him into position. When he is standing squarely on all four legs, just say “whoa.” This lets him know he is to stay in that position.
- Work the horse daily through the entire routine of showing until he responds. Always stop for the day when the horse is responding well. Don’t overwork one day and then lay off for several days. Patience and consistency are important tools in successful horse training.
Grooming
Brush your horse daily. Brushing cleans the horse and brings the natural oil to the hair. A horse brushed and fed properly will always have sheen to his hair coat.
The mane should be thinned and shortened to about three inches in length. The bridle path should be trimmed as short as possible.
Trim the long hair from the throatlatch and underside of the jaw to give a neat appearance. Clip the hairs inside the ears. Trim the hair around the coronet and fetlock. Horses with white on the legs can be booted up. Clipping the white hair down the clipper length makes it much easier to clean, and shows up much whiter. Clip whiskers; remove (pull or clip) long eyebrows. Don’t cut the eyelashes!
Clipping and mane pulling should be done well in advance of shows. Be sure not to clip too far in any area or pull the mane excessively. Most tails are left full and ground length. Clean and brush as often as possible, because this promotes growth. Never comb or brush a dirty or tangled tail, since this will pull and break the hairs. Keep a good conditioner or oil on the tail to prevent split ends and breaking. Clip white legs far enough in advance of shows so clipper marks are gone. Clip and groom muzzle whiskers, ears, coronets, and bridle path just before showing. Clip in such a manner so as to blend into the overall appearance of the horse. If this is done, you will show a horse that exhibits a more refined, classic appearance.
Be sure your horse is clean! (Wash with mild soap or brush and vacuum until clean.) Wash your horse the day before showing to allow the natural sheen to come back to the horse. If soiled spots occur before showing, clean with a wet cloth and towel dry. Clean hooves with brush and water.
Exercise your horse before the show so he will be easier to handle in the ring. When exercising, try to keep the horse from breaking into a sweat. If showing in hot weather, exercise early in the morning, and then brush after the horse dries.
Begin last-minute grooming about two classes before your class. Go over your horse with a fine bristle brush or sheep skin to remove any dust. If the hair lacks gloss or bloom, use a small amount of coat dressing. Petroleum jelly, baby oil, or mineral oil can be used to give the “wet look” on the muzzle, inside the ears, and around eyes. Apply freely and wipe excess material off with a towel. (Note: As soon as you finish showing your horse, make a point to wipe these areas clean with a towel. This will help prevent sunburn and irritation.)
Hooves may be oiled, but it would be better to paint them with a commercial hoof black or shoe polish. Commercial preparations don’t tend to dry the hooves as much as do the shoe polishes. Remove as much hoof polish as you can, and apply hoof dressing as soon as possible. This will help prevent hooves from drying out.
Check and clean your tack. If you use a silver show halter, be sure to polish the silver and oil the leather.
Be as particular with your own appearance as you are your horse’s. Be neat, clean, and well-dressed.
Showing
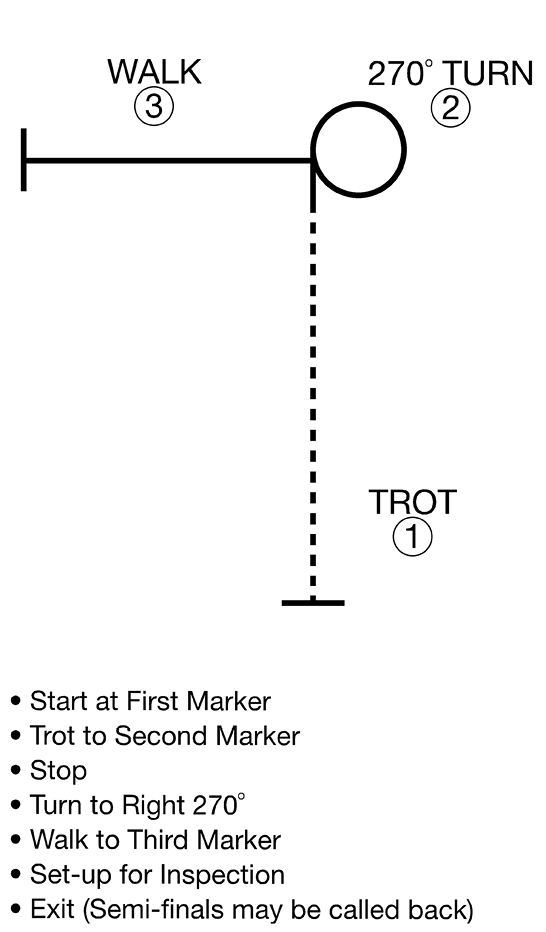
Different situations dictate different show-ring procedures. There is no set pattern for a showmanship class. Below is an example of a pattern that you might be asked to perform (Figure 1). The pattern you will be asked to perform will be posted at least an hour before your class. Familiarize yourself with this pattern, and know how you are going to execute every maneuver. Part of your score depends on the accuracy and precision you demonstrate in completing the pattern.

Be sure the exhibitor’s number is readily visible. Hold the halter shank in the right hand, giving the horse enough shank to allow him to walk with a natural balanced stride. Hold the remaining portion of the shank in the left hand. The remaining portion of the shank should not be excessive. Keep a safe distance between you and the next exhibitor. Be alert and know where the judge and ring steward are at all times.
When asked to line up for the inspection, set up your horse correctly and as quickly as possible. When the horse is standing correctly, let him stand! Don’t continue to move your horse. Keep the horse alert when the judge observes him. Some part of the showmanship pattern will be designed for you to show the action of your horse at the walk and trot (or saddle gait). Other maneuvers, such as 360-, 270-, 180-, or 90-degree turns, stops, and backs, may be added to test your ability to show your horse.
When beginning your pattern, let the horse take the first step, then walk or trot (depending on the pattern) to the judge (or marker, etc.) at a good, alert, and collected gait. The trot should be brisk and smooth to show the ability of the horse to flex at the joints, and to show the alignment of the feet and legs in motion. Movement at both gaits should be made so the horse is traveling in a straight line to or from the judge. If asked to return to the line, move your horse through the line before turning around, then lead back up to your position, and set up as quickly as possible.
The judge will inspect the horses individually. You should have your horse set up correctly.
Use your imagination to draw lines in the ground, dividing into four sections the area around your horse (see Figure 2). One line goes straight in front of the horse and straight behind. The second line goes across the horse, just behind the withers. You should never be in the same or diagonal section with the judge. However, you should always be in the section next to the section that the judge is in. Execute these moves in a smooth, natural, and precise manner. Don’t anticipate the judge’s moves, and don’t be mechanical in your moves. Never stand directly in front of your horse. Keep the horse alert. If the horse is too far out of position when the judge is observing him, move your horse into a good position.

Don’t continuously fret the horse. Move the horse with the lead shank. Make all the motions of showing in a natural manner. Do not overshow your animal. Be a part of the exhibit, but not the major part. Remember, it is the horse that is being exhibited.
Publication 1136 (POD-05-21)
Reviewed by Dean Jousan, PhD, Associate Extension Professor, Animal and Dairy Science
The Mississippi State University Extension Service is working to ensure all web content is accessible to all users. If you need assistance accessing any of our content, please email the webteam or call 662-325-2262.


