
Vermicomposting for the Mississippi Gardener
Vermicompost
Vermicompost is a finely divided peat-like material produced by earthworms, insects, and associated microorganisms processing organic waste materials. When added to garden soil or peat-based potting mixtures (substrates), it improves structure, porosity, aeration, drainage, and moisture-holding capacity. Vermicompost can help improve growth and overall performance of both vegetable and flowering plants.
Vermicomposting is a very efficient system. It is being examined as a method of treating municipal sludge, shredded solid wastes, and organic wastes (bio-solids) produced by agricultural sources. Researchers are evaluating earthworms to see how well they break down animal manures (pig, cattle, and horse), poultry waste (chicken, turkey, and duck), brewing waste, and other wastes from agricultural industries that produce large amounts of organic wastes.
How Vermicomposting Differs from Traditional Composting
The traditional composting process is a complex series of biological events in the degradation of organic wastes and can be divided into three phases:
- an initial phase of 1–2 days during which easily degradable soluble compounds are decomposed
- a thermophilic phase (lasting several months) during which high temperatures occur and in which mostly cellulose is degraded
- a stabilization period during which the rate of decomposition decreases, temperatures decline, and antagonistic and other ambient microorganisms re-colonize the compost
Stabilization of the compost is important as the microorganisms are reducing the amount of nitrogen being incorporated into proteins and will not compete for the available nitrogen with plants grown in the compost.
Composting is a dynamic process, representing the combined activity of a wide succession of mixed bacterial and fungal populations associated with a broad series of environments as a result of continual change in temperature and substrate. The substrate changes are due to a progressive breakdown by bacteria of complex compounds to increasingly simpler compounds. The microbes use the organic materials for carbon and energy, nitrogen, and other nutrients.
As the process continues, the temperature begins to increase from the heat generated through microbial oxidations and respiratory activity. If insulated and placed in a pile or windrow, the heat may be retained for an extended period. Because the environment is dynamic and any individual group of microorganisms can survive a wide range of environmental conditions, one population begins to emerge while another is flourishing and another is declining.
Eventually, as the available carbon and other nutrients are depleted, microbial activity declines, decomposition slows, and cooling of the pile occurs. At this point, the compost is ready for garden use.
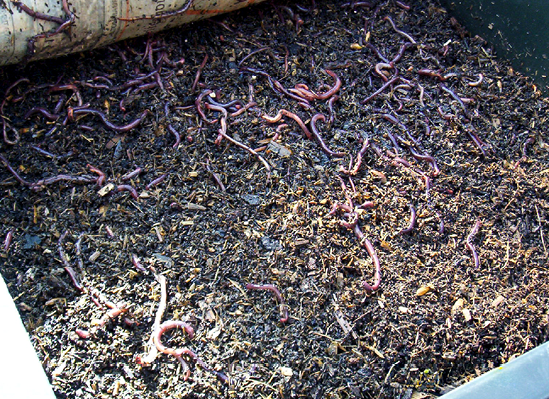
Vermicomposting is the degradation of organic wastes by earthworms, insects, and mixed bacterial and fungal populations. The product of this degradation process is commonly referred to as “worm castings.”
Earthworms have a critical role in developing and maintaining soil fertility through the breakdown of organic matter. Vermicomposting is a complex biooxidation and stabilization process that depends on the action of earthworms and microorganisms for turning, fragmentation, and aeration without the need for the organic waste to heat up (thermophilic phase).
The advantage of vermicomposting is that organic wastes can be stabilized in a matter of days instead of the months required for traditional composting.
Species of Worms Used
The earthworm species most commonly used for vermicompost are red wrigglers, and two species fall under this name—red worms, or tiger worms (Eisenia foetida), have tan and red stripes; red tiger worms (E. andrei) are all red without stripes.
These two species are most commonly used because they are widely distributed throughout the temperate regions. Their range is extensive with many organic wastes becoming naturally colonized. Red wigglers are small- to medium-sized earthworms, less than ¼ inch in diameter and 3 inches long. They have a wide temperature range, can tolerate a range of moisture contents, and are surface dwellers normally found in the top 3 inches of soil.
Another worm species suitable for vermicomposting is the Indian blue worm, or traveling worm (Perionyx excavatus). This tropical species processes organic wastes at a high rate. It tolerates handling and managed culture. However, it is not cold tolerant and should be used indoors during the winter in northern Mississippi.
All vermicompost worms are susceptible to leaving the bins when environmental conditions are not ideal, but Perionyx earns the name “traveling worm” from its tendency to move out of its bins without any reason.
The Worm Bin Community
The worms in the bin are not alone in breaking down the organic waste materials. There is a complex community of organisms working together. In fact, the other species of organisms greatly outnumber the worms in the bin. All of these organisms consume dead organic materials.
Beneficial Organisms
Bacteria are among the most numerous organisms in a worm bin. Bacteria secrete enzymes that dissolve bonds holding molecules together and are responsible for starting the initial organic decomposition. This allows earthworms, as well as other, larger organisms, to more easily feed on the materials.
Fungi and molds feed with hair-like hyphae that secrete enzymes and simplify the organic material, making it easier for earthworms to feed.
Pot worms are related to earthworms and are frequent bin inhabitants. They are about ¼ inch long and are transparent. They are often mistaken for baby earthworms. Pot worm feeding is similar to that of earthworms, and pot worms are efficient at soil aeration and organic waste decomposition.
Springtails and pill bugs are old orders of organisms that find their way into decomposing organic matter and your worm bin. Though you might be concerned to find these in your bin, they actually are some of the most efficient decomposers.
Nuisance Organisms
Among the decomposing organisms, several are nuisances, more for us than the earthworms. These nuisance organisms can be controlled somewhat through bin and waste management practices.
Mites can make up a large portion of the population of decomposers. In the presence of large numbers of mites, the earthworms can become stressed and less productive. Using fresh fruit rinds as feed stock can cause an increase, or bloom, of mites. This is because mites lay their eggs in the fruit rinds in the field, and then the eggs hatch in the worm bin. A simple way to control mite populations is to freeze fresh fruit rinds for a couple days before adding them to the bin. This will kill any mite eggs.
Large populations of fruit flies are generally an indication of overfeeding and can be introduced like mites via the rinds of fresh fruit. Burying the feedstock in the bin can be an effective measure to prevent an infestation. Once a population becomes established, you must reduce the adult fruit fly population.
Fruit fly traps, using vinegar as an attractant, are very effective at reducing the numbers. A simple fruit trap can be constructed by recycling a 2-liter bottle.
Remove the cap and drill three or four 1/8-inch holes. Add about ¼ cup of apple cider vinegar to the bottle and replace the cap. Wrap the bottle in aluminum foil and place near your worm bin. The fruit flies will enter the bottle through the holes but will not be able to find their way out.
After a few days, look under the foil; there should be large numbers of trapped fruit flies. Empty and refresh the vinegar weekly until the fruit fly population is under control.
How It Works
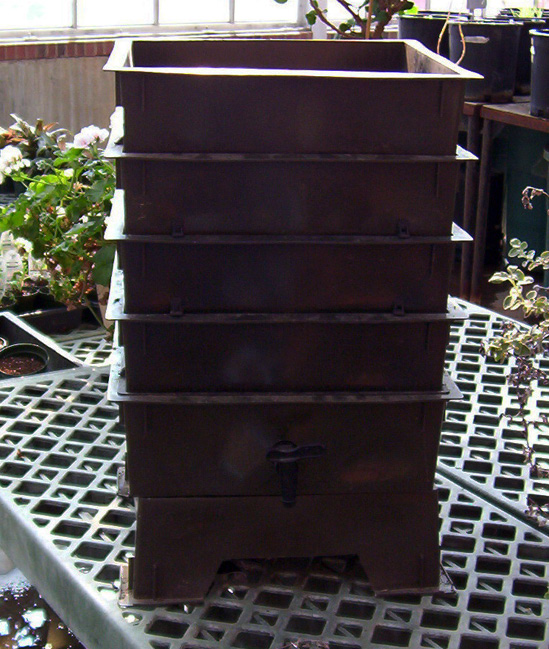
Most vermicompost bins take advantage of the upward migration of the worms’ feeding tendencies. Worms are typically found in the top layers of the soil where the organic composition is the greatest. Thin layers of organic waste are added on a frequent schedule, keeping the worms at the top of the bin. When the vermicompost gets to a certain depth, the bottom layers are removed with very little sorting of worms required. Other strategies use a series of shallow boxes with screens on the bottom for the worms to move up through as they feed and self-separate. This feature makes it easy to harvest the resulting vermicompost material.
Types of Materials to Feed the Worms
Earthworms can break down a wide variety of organic wastes, so feeding them is quite simple. Leftover food wastes such as fruit rinds, coffee grounds and tea bags, egg shells, and citrus (in moderation) are good additions to your bin. The wastes should be ground or chopped as fine as possible. This increases the surface area of the waste and speeds up the vermicomposting process.
Food wastes to avoid are meats, oils, and dairy products; these will attract unwanted pests. Also, do not add any pet (dog or cat) wastes.
The final physical structure of vermicompost produced from organic wastes depends on the original material from which it is produced.
Vermicomposters
There are quite a few vermicompost bins available at garden centers or gardening supply websites. Most will be upward-migration worm bins that use multiple tray layers to make vermicompost harvest easier. The commercial worm bins will range in cost from $50 to more than $200.
You can also make your own using products and materials that are readily available at home improvement stores. Plastic bins and totes make good beginner worm bins. Follow these steps to make yours:
- Drill holes in the top for aeration.
- Add bedding materials such as moist peat moss, coconut coir, shredded newspaper, or cardboard. The bedding needs to be 3–4 inches deep.
- Add 1/2 pound of worms for each square foot of surface area as the worms will multiple quickly.
- Bury kitchen scraps in the bedding to discourage fruit flies. Be sure to add waste materials daily.
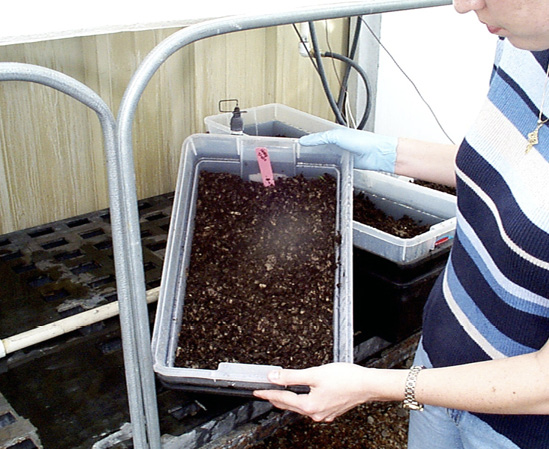
To harvest the vermicompost, follow these steps:
- Place a 1/8- to 1/4-inch screen on top of the bedding. Continue to feed the worms on top of the screen.
- After about 3 weeks, a couple inches of material and most of the worms should be on the screen.
- Dump out what’s left in the bin and sort through it, putting the remaining worms back in your bin.
- The vermicompost is now ready to use in your garden.
- You can also use plastic containers that nest together with holes drilled in the bottom to make vermicompost harvesting a little easier.
For a simple demonstration on how to make a small vermicompost bin, watch the Gardening through the Seasons video titled “Compost with Wiggle” on the MSU Extension website.
Vermicompost Uses in Landscapes and Vegetable Gardens
Vermicompost really is “black gold,” and a small amount will have a big impact on plant growth. Apply only about ¼–½ cup around the base of your vegetables or flowers when planting. The vermicompost does not replace fertilizer, but it will boost plant growth by adding life back into the soil and improving nutrient absorption and availability.
Publication 2663 (POD-04-24)
Reviewed by Jeff Wilson, PhD, Assistant Professor, North Mississippi Research and Extension Center. Written by Gary R. Bachman, PhD, Extension/Research Professor Emeritus, Horticulture.

The Mississippi State University Extension Service is working to ensure all web content is accessible to all users. If you need assistance accessing any of our content, please email the webteam or call 662-325-2262.
